How to perform HP Notebook SSD upgrade? This comprehensive guide walks you through selecting the right SSD, installing it properly, and transferring your data with ease.
Upgrading the SSD in an HP Notebook (or any laptop) can significantly improve performance and extend the lifespan of your device. Here are the main reasons why upgrading the SSD is a good idea:
1. Faster boot and load times: A new SSD (especially an NVMe SSD if your laptop supports it) can drastically improve boot times and the speed at which applications load. If you're using a traditional hard drive (HDD), it can take much longer to boot up or load programs compared to an SSD.
2. Increased storage capacity: SSDs are available in larger capacities than older models. If you're running out of storage space on your current SSD or HDD, upgrading to a larger SSD will provide more room for files, applications, and games without slowing down your system.
3. Enhanced system responsiveness: An upgraded SSD improves the overall responsiveness of your system, including tasks like opening and saving files, multitasking, and handling demanding programs. This is especially important for people who use memory-intensive software like video editors or 3D modeling tools.
4. Improved durability and reliability: Unlike traditional HDDs, SSDs have no moving parts, making them less prone to physical damage due to drops or bumps. This is particularly beneficial for portable devices like notebooks, which are often handled roughly.
5. Optimal for gaming or intensive applications: If you use your HP notebook for gaming, video editing, or other intensive tasks, an SSD will provide much faster read/write speeds. This will help reduce load times, and in the case of gaming, it might even improve in-game performance by reducing stuttering.
In conclusion, upgrading the SSD in your HP notebook can provide a noticeable boost in speed, reliability, and overall experience, making it a smart investment for both performance and longevity.
Upgrading your HP Notebook’s SSD can significantly improve performance. This guide will walk you through the process, broken down into three essential parts: initializing the new SSD, cloning data, and replacing the old SSD.
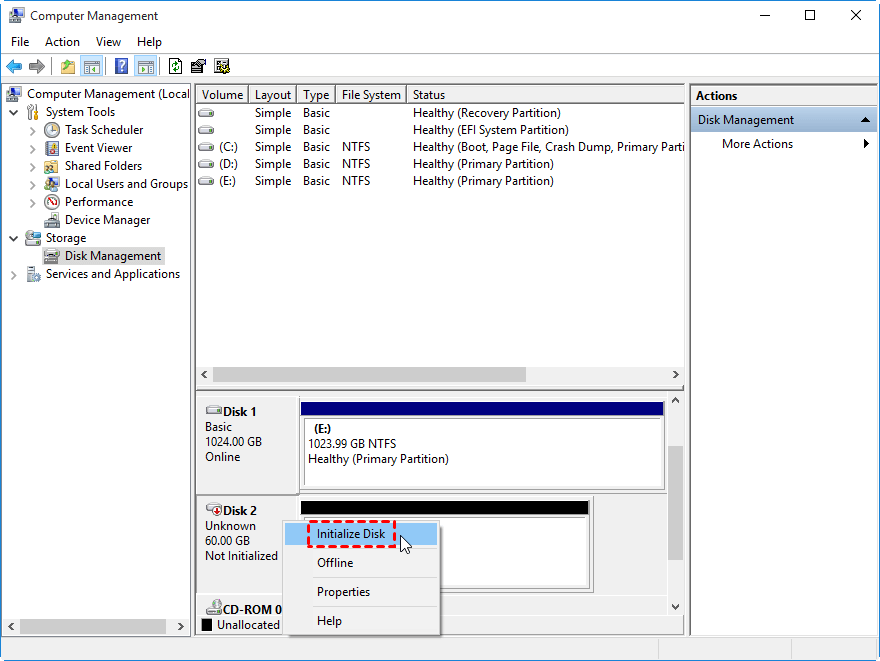
Before using your new SSD, it must be initialized. Uninitialized SSDs won’t show up in "This PC", but you can see them in Disk Management. Here’s how to initialize it:
Step 1. Use a USB adapter to connect your new SSD to your HP Notebook.
Step 2. Press Win + R to open the Run box, type diskmgmt.msc, and click OK.
Step 3. Right-click on the new SSD disk in Disk Management and select Initialize Disk.
Step 4. In the pop-up window, select the same partition style (MBR or GPT) as your current SSD and click OK.
Now that your new SSD is initialized, it's time to transfer your data. AOMEI Partition Assistant is a reliable tool for cloning your old SSD to the new one, ensuring your OS and files remain intact.
AOMEI Partition Assistant makes the process simple and efficient with its powerful Disk Clone feature. Whether you're switching to a larger SSD for more space or a faster one for better performance, this tool ensures a seamless data transfer.
Step 1. Install and launch AOMEI Partition Assistant on your running Windows. Click "Clone" in the main interface, and select "Clone Disk".
Step 2. Choose the hard disk that you need to clone as the source disk and click "Next".
Step 3. Select another drive as the destination disk, and then click "Next".
Step 4. Then, you can check the source and destination disk in the next window or change to "Sector to Sector clone", and click the "Confirm" button to continue if there is no problem.
Here, you can also click the "Settings" button to adjust the partition size on the destination disk or tick "4k alignment" to improve the reading and writing speed of the SSD.
Step 5. After returning to the main interface, check the pending operation and click "Apply" and "Proceed" to commit the operation.
With your data successfully cloned, it’s time to replace the old SSD. Follow these steps:
Step 1. Turn off your HP Notebook and disconnect all external devices.
Step 2. Flip the laptop over, unscrew all the screws using a screwdriver, and carefully remove the rubber strip with a crowbar. Then, use a hook to detach the bottom cover.
Step 3. Disconnect the battery cable from the system board to prevent any electrical damage.
Step 4. Unscrew the Phillips screws securing the SSD to the system board and carefully remove it.
Step 5. Place the new SSD into the slot and secure it with the screws.
Step 6. Screw the bottom cover back on and reattach all screws.
Now, you can power on your laptop and enjoy the enhanced performance with the upgraded SSD!
Upgrading the SSD in your HP Notebook is a smart move for faster performance, increased storage, and improved system reliability. Whether you're aiming for quicker boot times, smoother multitasking, or better support for demanding applications like gaming or video editing, a new SSD can make a big difference.
With tools like AOMEI Partition Assistant, the upgrade process—including initializing, cloning, and replacing your SSD—is straightforward and efficient. In just a few steps, you’ll transform your laptop’s speed, responsiveness, and overall user experience, making it feel like a brand-new machine.