Discover the common causes behind slow transfer speeds on WD external hard drives and explore effective solutions to speed up WD external hard drive slow transfer rate. Keep reading for a complete guide.
“WD elements slow transfer speed. 30-60mb/s, taking over a day to transfer a couple of terabytes. is this normal?"
An external hard drive slowing down during data transfer has become a common issue. Many users report facing problems such as:
● File copying is getting stuck
● Extremely slow data transfer speeds
● Unexpected file loss
● Drive crashes or unresponsiveness
● System freezes and lags
Looking for ways to speed up WD external hard drive slow transfer rate? Keep reading to discover effective solutions.
If your external hard drive slows down or freezes while copying files, halt the operation right away. Once stopped, try the following methods to boost the speed of your WD external hard drive:
To improve transfer speeds, connect your external drive through a USB 3.0 port by following these steps:
Step 1. Use the original USB 3.0 cable that came with your WD external hard drive.
Step 2. Find the USB 3.0 ports on your computer.
Step 3. Connect the external drive to your PC using the USB 3.0 cable and port.
Step 4. After reconnecting, attempt to transfer files again. If the speed returns to normal, your issue is resolved.
Still experiencing slow transfer rates? Don't worry—continue with the additional solutions below.
When an external hard drive becomes cluttered with large, unnecessary files, its performance can suffer, leading to slower transfer speeds. To restore optimal performance, use a reliable cleanup tool called PartitionAssistant Cleanup to scan and remove junk files from the disk. It is a powerful and user-friendly disk management tool designed to help Windows users optimize their hard drives for better performance and organization.
With the built-in "Clean Junk Files" feature, PartitionAssistant Cleanup makes it easy to scan your system for junk files, temporary files, log files, system cache, and even large files that may be taking up unnecessary space. This tool is especially useful if your computer is running slow or if your disk is nearly full.
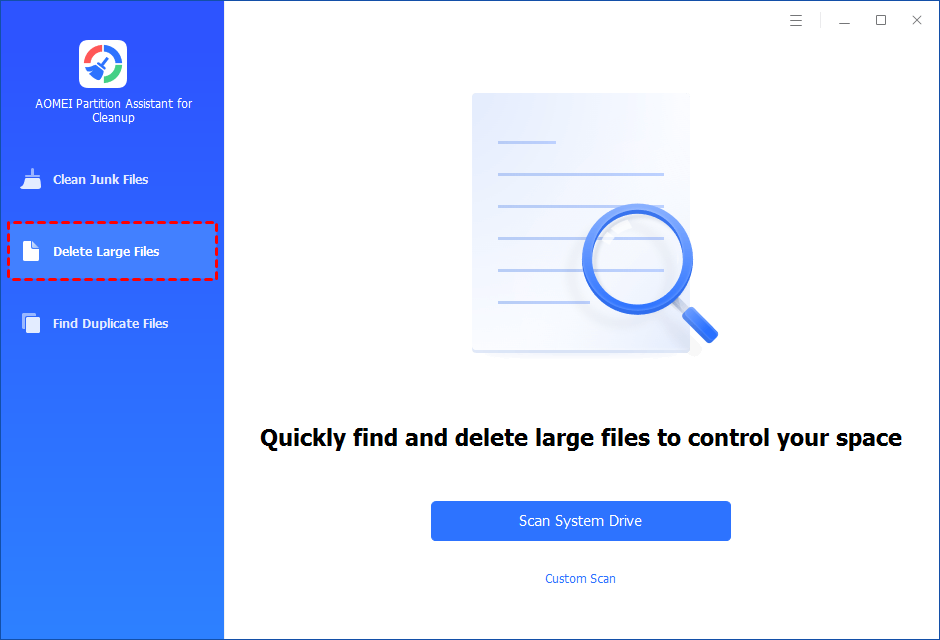
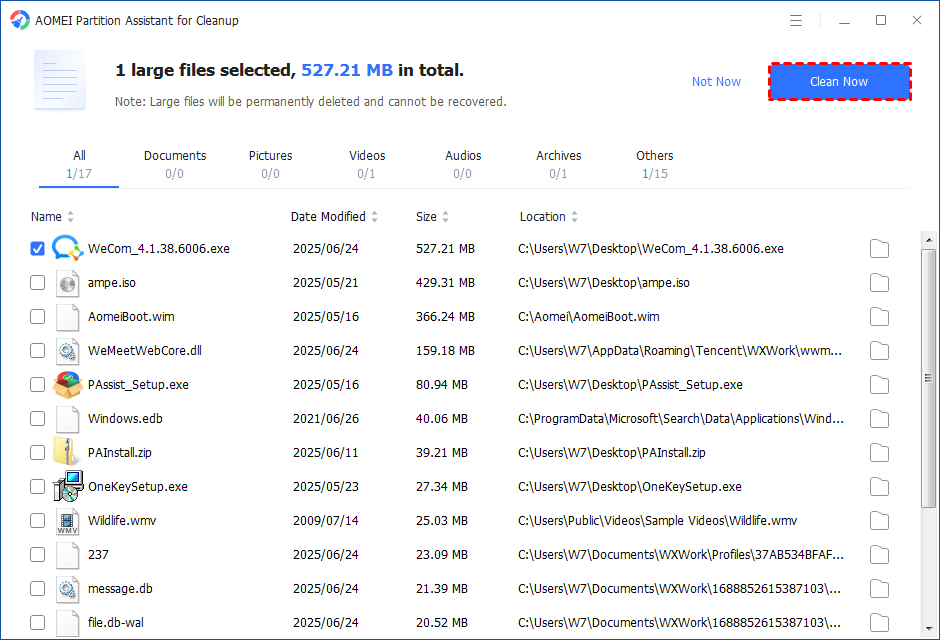
Step 1. Install and launch PartitionAssistant Cleanup. Click the "Delete Large Files" tab.
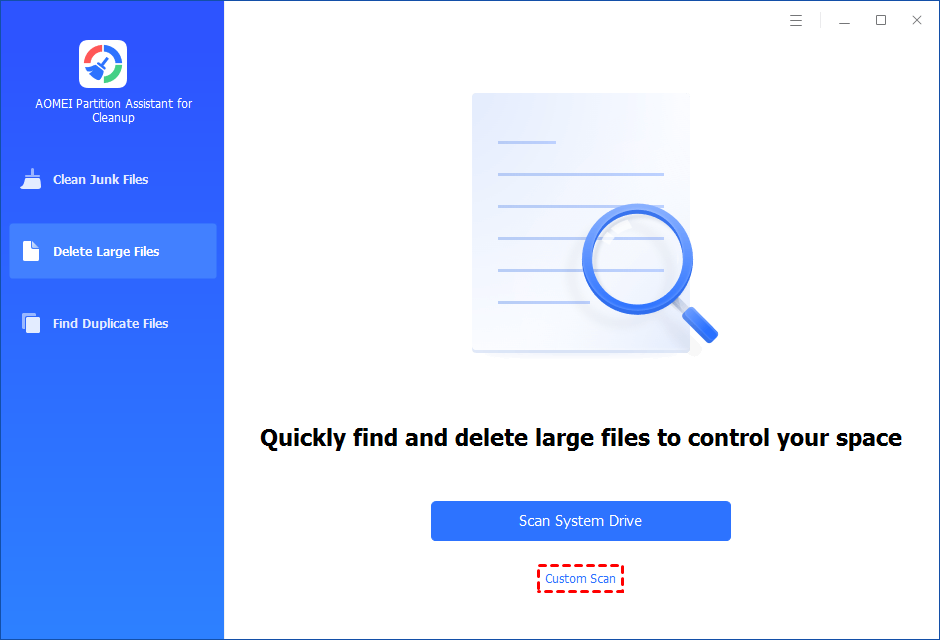
Step 2. You can either click "Scan System Drive" to start the scan of your system C: drive. Or, click "Custom Scan" to manually select paths to be scanned. (Here, we take the "Custom Scan" as an example.)
Step 3. After clicking "Custom Scan", all local and external drives on your PC and the common Desktop, Documents, and Downloads paths will be displayed. You can manually select paths to be scanned. Once necessary paths are added, you can click the "Scan Now" button to start the scan process.
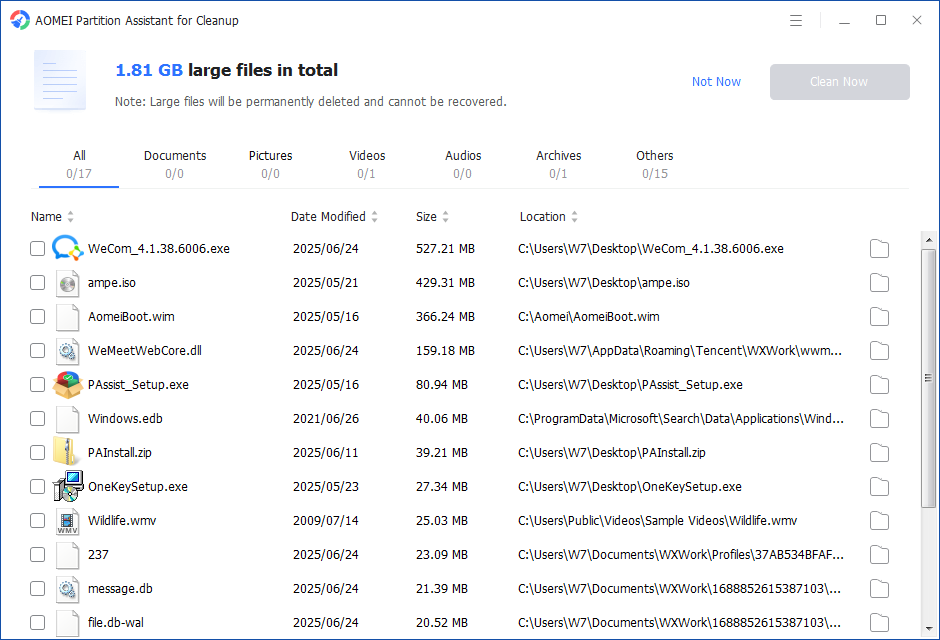
The scan process might take time. After the scan is complete, all large files found will be listed.
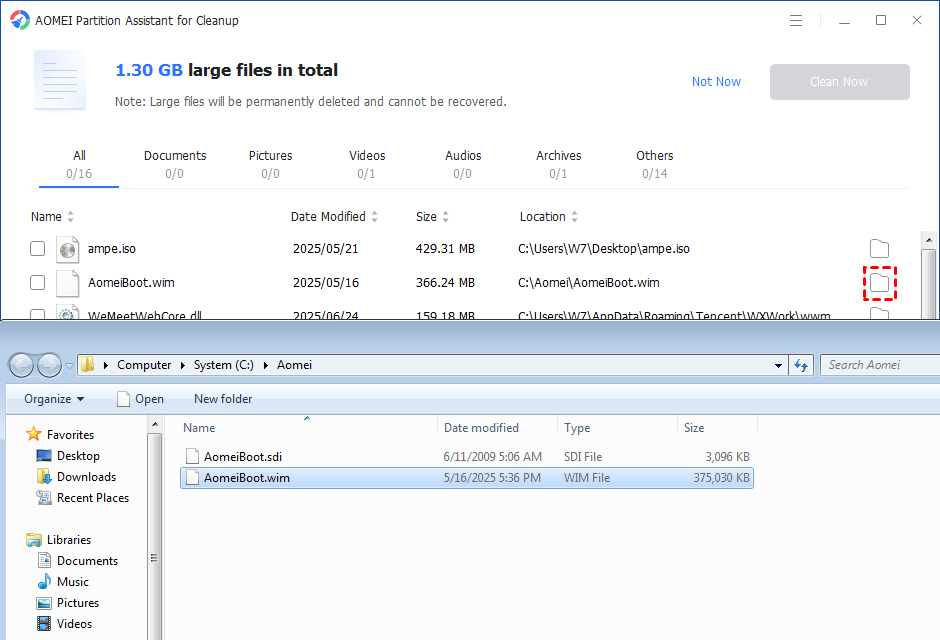
You can also check the large files and click the button behind to locate them.
Step 4. Tick the files you want to delete, and then click the "Clean Now" button to start the deletion.
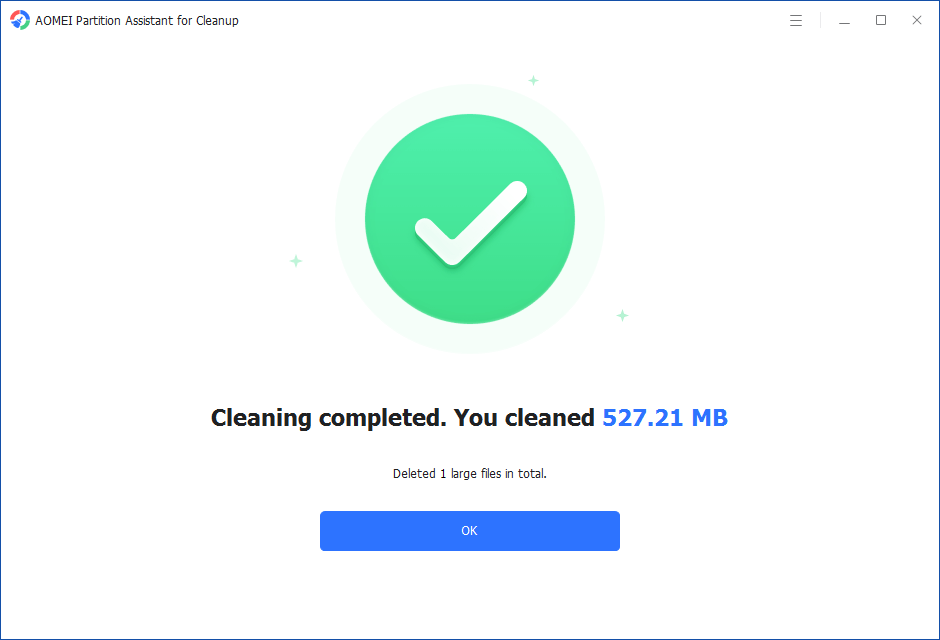
Step 5. The deletion might take time. After the process is finished, the selected files will be deleted, and you will get a cleaning completed window displaying how much data you deleted in total.
Step 1. Install and launch PartitionAssistant Cleanup. Click the "Clean Junk Files" tab.
Step 2. Click the "Scan Now" button to start the process of scanning junk files.
Step 3. After the scan process is finished. All system junk files (including recycle bin files, temporary files, log files, invalid shortcuts, and so on) and registry junk files (including DLL registry, system registry, and program registry) will be displayed.
You can also click the button behind to view the junk files details.
Step 4. And, you can click the button behind to locate the file.
By default, the program will select some junk files to clean up, for example, temporary files, log files, and so on. You can also manually check to select more or uncheck to deselect fewer listed junk files. Or, click "Select All" to select all junk files to clean up if you need to clean up all.
Step 5. After selecting junk files that are not needed anymore, you can click the "Clean Now"button to start the cleanup.
The process of the cleanup might take time, and the selected files will be cleaned up. After the process is finished, you will get a cleanup completed window displaying how many files you have cleaned and not yet cleaned.
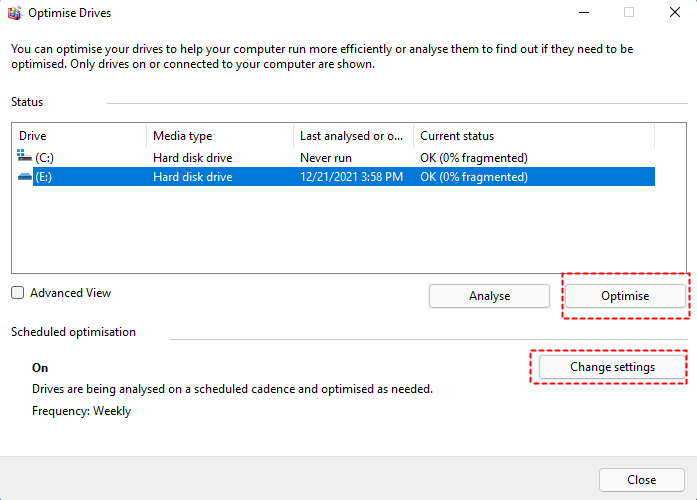
Over time, prolonged use of an external hard drive can lead to heavy fragmentation, occupying significant space and slowing down performance. To fix this, clean up the fragments by following these steps:
Step 1. Connect your WD external hard drive to the computer and open File Explorer.
Step 2. Right-click on the external drive and select "Properties".
Step 3. Navigate to the Tools tab and click "Optimize" under the "Optimize and defragment drive" section.
Step 4. Select "Remove customized settings".
Step 5. Choose your external drive and click "Optimize" to start the process.
Cleaning up the disk fragments can significantly improve transfer speed and overall performance.
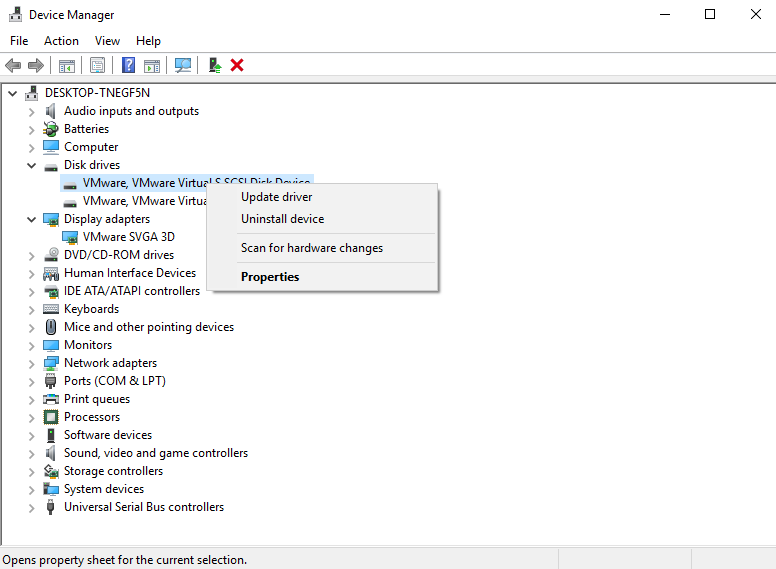
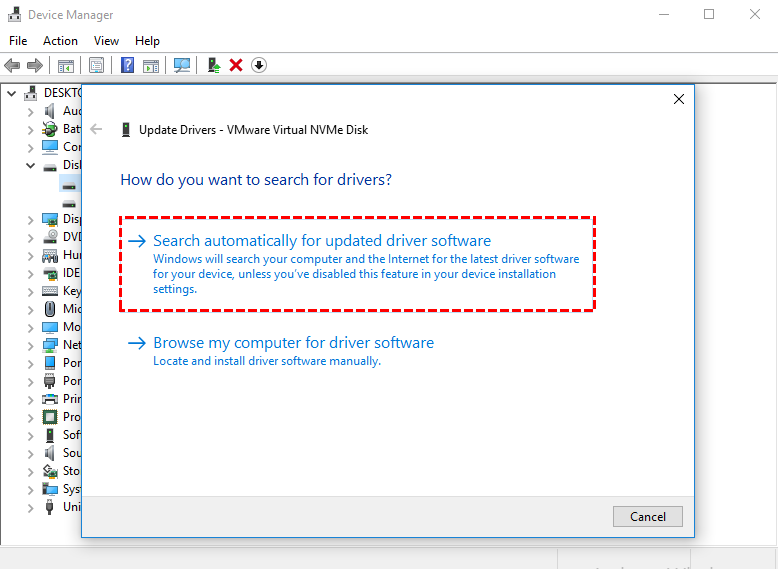
Outdated or corrupted drivers can cause your external hard drive to run slowly. To update the disk driver, you can:
Step 1. Press Windows + X and choose Device Manager.
Step 2. Expand the Disk Drives section.
Step 3. Right-click on your Local D drive and select Update Driver.
Step 4. Choose Search automatically for updated driver software.
Step 5. Follow the on-screen instructions to install the latest drivers.
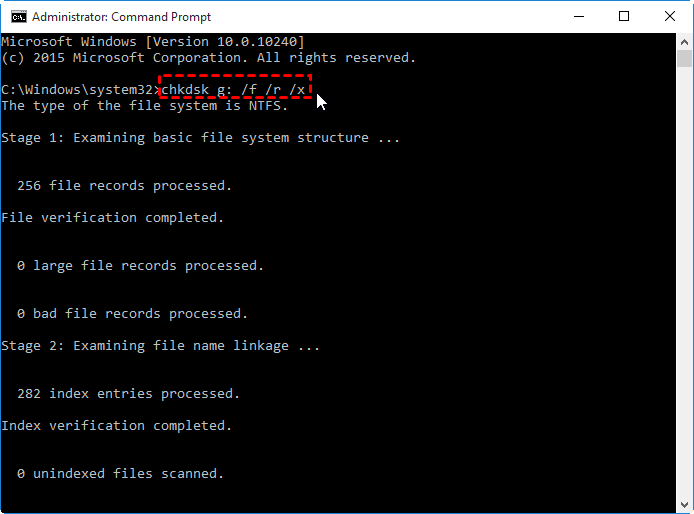
If your external hard drive has a corrupted file system or bad sectors, you might experience issues accessing or transferring files. Follow these steps to repair the disk:
Step 1. Connect your WD external hard drive to your computer.
Step 2. Press Windows + R, type cmd, and hit Enter.
Step 3. When prompted, click "Yes" to open Command Prompt with Administrator rights.
Step 4. In the Command Prompt window, type chkdsk g: /f /r /x and press Enter.
Note: Replace gwith the actual drive letter assigned to your WD external hard drive.
Running this command will scan for errors, repair corrupted file systems, and fix bad sectors, helping restore normal access and transfer capabilities.
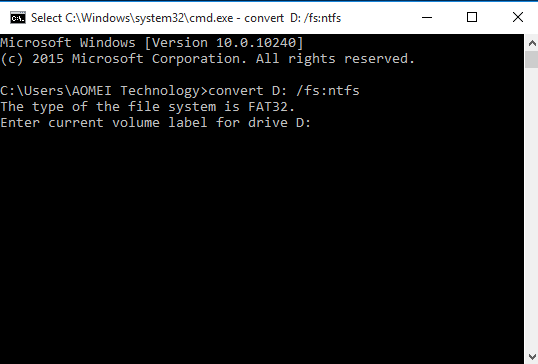
For large storage devices like external hard drives, the NTFS file system is generally a better choice compared to FAT32 or exFAT. If your WD external hard drive is still using an older file system, follow these steps to convert it to NTFS:
Step 1. Connect your WD external hard drive to your computer.
Step 2. Right-click the Start button and choose "Command Prompt (Admin)".
Step 3. If prompted, sign in using your Administrator account.
Step 4. Type convert D: /fs:ntfs and press Enter.
Important: Replace D with the correct drive letter of your WD external drive.
This process will convert your drive to NTFS without losing data, helping improve speed, stability, and compatibility.
To enhance the performance of your WD external hard drive and fix slow transfer issues, follow these steps:
Step 1. Connect your WD external hard drive to your computer.
Step 2. Right-click the Windows icon and choose "Device Manager".
Step 3. Expand the Disk Drives section, right-click your WD external hard drive, and select "Properties".
Step 4. Navigate to the Policies tab, select "Better performance", and click "OK" to apply the changes.
Once completed, your external drive should operate with a noticeably faster transfer rate, allowing smooth file saving and data transfers once again.
If you're experiencing slow read and write speeds on your WD external hard drive, there are seven effective methods worth trying. To prevent similar issues down the line, it's recommended to regularly scan and clean your hard drive, perform periodic defragmentation, and empty the Recycle Bin consistently.