This page will show you how to safely remove SSD, including SATA SSD and M.2 SSD. In addition, you can also learn how to transfer data from SSD to a new disk.
"I want to remove SSD from my PC, because I got a new PC. But I don't want to just trash the old PC, I still want to keep it just in case I need a back up PC. So how do I put everything on the old SSD into a new PC?
- Question from forums.tomshardware.com
Usually, when users decide to change to a new computer or replace the PC hard drive, they need to remove the SSD. Since there are many important files stored on SSD, they want to know how to safely remove SSD.
As we all know, installing a new SSD is a time-consuming and labor-intensive task. Similarly, removing an SSD is not as simple as imagined, especially removing the disk retains important data. Once the operation is improper, it will cause the hard disk to be damaged.
Therefore, in this article, we will share the detailed process to safely remove SSD from the PC.
In the market, there are several SSD with different interfaces, the common ones are M.2 and SATA.
M.2 is a new interface standard, it can support Non-Volatile Memory Express communication protocol, and is used to replace the old mSATA interface. It is more suitable for solid state storage than SATA, especially in small devices, like the ultrabooks.
SATA supports the Serial Advanced Technology Attachment communication protocol, it uses a serial connection. Since its release in 2000, the transmission rate of SATA I is 150MB/s; the SATA II is 300MB/s; and the SATA III is as high as 600MB/s.
Before removing the SSD, you need to distinguish its interface type, because SSD with different interfaces are installed in different positions on the computer. Next, we will discuss how to remove M.2 SSD, SATA SSD from your PC.
Here, you can see how to safely remove an SSD from your PC.
☎ Remove an M.2 SSD from a laptop
Step 1. Close all power supply, then turn off your computer.
Step 2. Open the side panel of the PC with a screwdriver.
https://www.diskpart.com/screenshot/en/others/others/desktop-remove-m-2-ssd-1.png
Step 3. Remove the components blocking the M.2 slot, such as the graphics card, etc. If the graphics card cannot be pulled up, double-check if all screws are detached.
Step 4. Then gently remove the M.2 SSD from your PC with the screwdriver.
☎ Remove an M.2 SSD from a desktop
If you want to safely remove an SSD from the laptop, please refer to the following steps:
Step 1. Turn off the PC and release the retained power. Then open the case and locate the M.2 SSD slot.
Step 2. Loosen the screws with a screwdriver, disconnect the PC and the M.2 SSD.
Step 3. Carefully remove the target M.2 SSD.
Step 4. You can see the M.2 SSD has been removed successfully. Put the case cover back on, the SSD removing task is finished.
If you want to remove SATA SSD from the PC, you can refer to the following step. We’ll share the process in 2 types of PC: desktop and laptop.
✿ How to safely remove an SATA SSD from a desktop
To take an SATA SSD out of your desktop, you can try these steps.
Step 1. Shut down your PC, then press and hold the power button for at least 10 seconds. When the remaining power is released all, open the case and locate the SATA SSD slot.
Step 2. Disconnect the SATA adapter and SATA SSD.
Step 3. Close the case cover, then the SATA SSD is successfully removed.
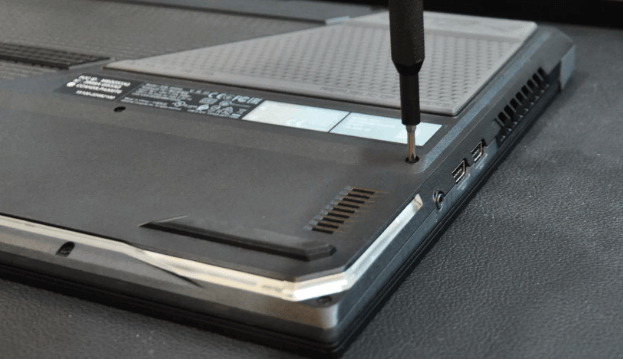
✿ How to safely remove an SATA SSD from a laptop
You can refer to the following steps to remove the target SATA SSD from a laptop:
Tip: You need to prepare a cross screwdriver, corresponding hard disk adapter and anti-static gloves in advance.
Step 1. Remove the PC back cover with a screwdriver. Take out the SATA SSD from this laptop.
Step 2. After removing the SSD, restore the back cover of the laptop.
Now, you may know how to safely remove SSD. However, no matter what the reason is, before removing the SSD, you need to migrate all the data on the current SSD to the new disk.
Here, you can try a perfect disk migrator - AOMEI Partition Assistant Professional. Its "Disk Clone Wizard" function can generate an exact copy of the target SSD, and successfully clone it to the new hard drive. It also supports cloning larger drive to smaller drive.
To keep your data safe, you can use this versatile tool to erase the old SSD before selling it. In addition, other advanced functions are also available, including Migrate OS to SSD, Move programs to another drive, Delete large files, etc.
Tips:
✌ Connect the new disk with different types of adapter, such as SATA to USB cable.
✌ If the file format cannot be compatible with the PC, please convert it to NTFS to FAT32, and vice versa.
Step 1. Install and launch AOMEI Partition Assistant, click "Clone" in the main interface and select "Clone Disk".
Step 2. Choose the hard disk that you need to clone as the source disk and click "Next".
Step 3. Select the destination disk to store the data on the source disk, and then click "Next".
Step 4. Then, you can check the source and destination disk in the next window or change to “Sector to Sector clone”, and click the "Confirm" button to continue if there is no problem.
Here, you can also click the "Settings" button to adjust the partition size on the destination disk or tick "4k alignment" to improve the reading and writing speed of SSD if the target disk is an SSD drive.
Step 5. At last, click "Apply" and "Proceed" in the main interface to start cloning the hard drive.
Note: To migrate the SSD on Windows Server, you can turn to the Server Edition.
As you can see, in this tutorial, we share the detailed steps on how to safely remove SSD. Besides, to ensure all data can be reserved, we also provided the powerful AOMEI Partition Assistant to clone it to a new disk.