This post tells how to restore Windows 10 laptop to factory settings and how to format the laptop without CD/DVD if it won’t reset to factory settings.
When you use your Windows 10 laptop, there might be many occasions where you need to format the laptop. For example, the laptop runs slowly and you want to format it to factory settings for restore performance. Or you want to format the laptop for a clean Windows installation.
Here is the detailed guide on how to format Windows 10 to factory settings
Step 1. Click “Start” and choose “Settings”.
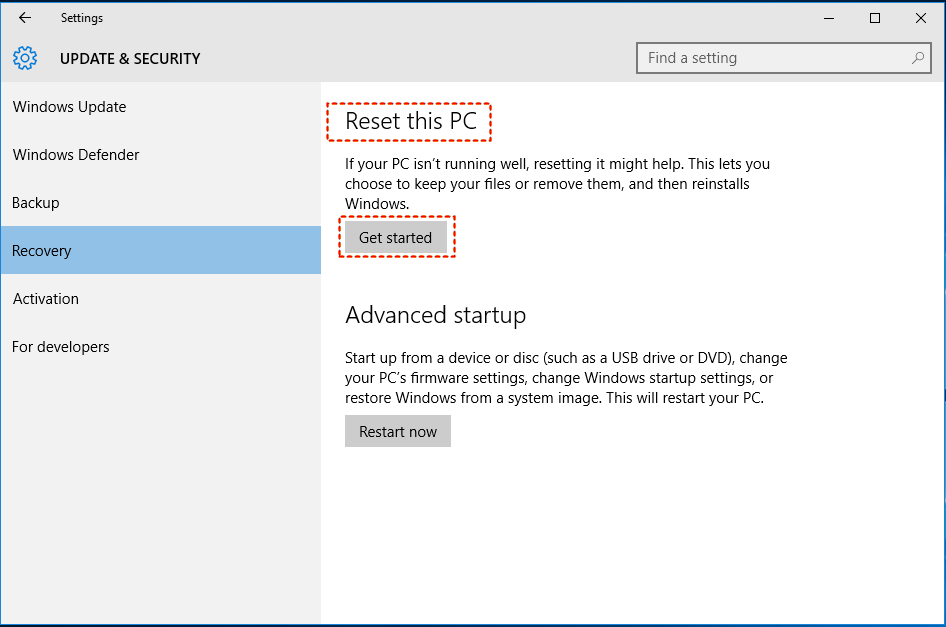
Step 2. In the pop-up window, click “Update and Security”.
Step 3. Click “Recovery” and click “Get started” under “Reset this PC”.
Step 4. Choose “Keep my files” or “Remove everything” based on your own situation. Then, follow the prompts to complete the reset operation.
Note: If you choose “Keep my files”, only installed apps and settings on the laptop will be removed and your files will be intact. If you select “Remove everything”, personal files, apps, and settings will be deleted.
If your Windows 10 laptop is unbootable, you can’t reset it to factory settings use the way aforementioned. If there is Windows installation or system repair disc, you can format the PC with the disc. However, what should you do if there is no Windows installation CD/DVD or system repair disc?
Don’t worry, a free bootable USB creator, AOMEI Partition Assistant Standard will be useful! With it, you can create a bootable USB drive and then use the drive to format the Windows 10 laptop. Now, free download it and see how it works:
Part 1. Create a bootable USB drive with AOMEI Partition Assistant Standard
Warning: All data on the USB drive will be erased, you can back up your necessary data in advance.
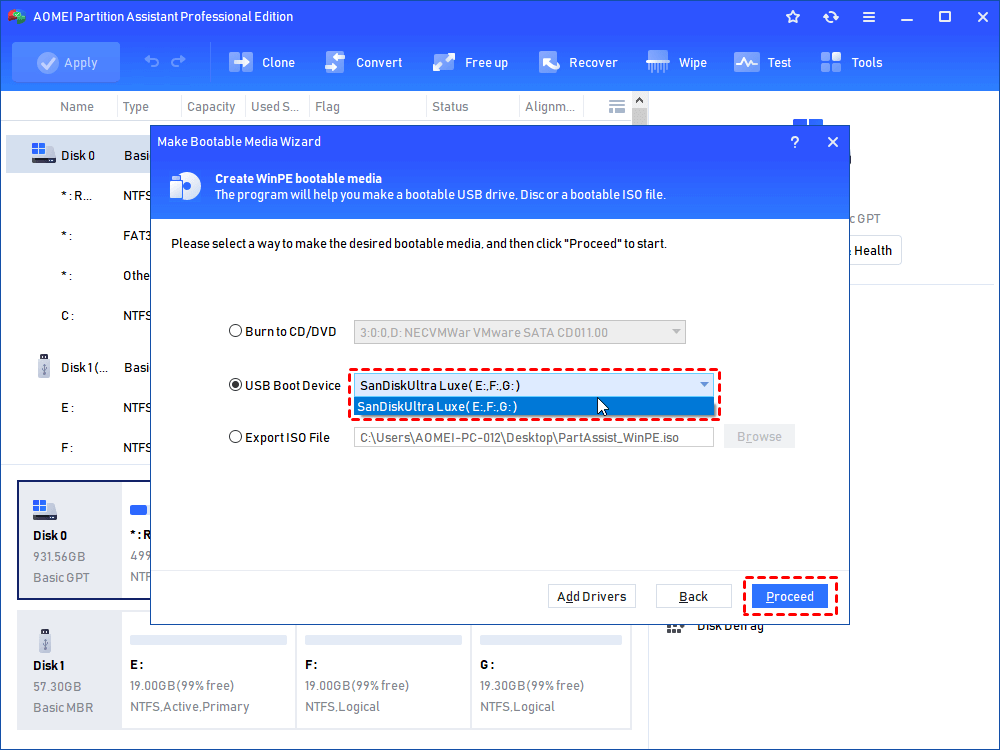
Step 1. Install and run it on a working computer. In the main interface, click "Tools" > “Make Bootable Media”.
Step 2. In the pop-up window, choose “USB Boot Device” and click “Proceed”.
Step 3. A message saying that all the data on the USB drive will be formatted pops up, click “Yes” to start the operation.
Part 2. Boot from the USB drive and format Windows 10 laptop
After making bootable USB media via AOMEI Partition Assistant, insert the drive into the PC that you want to format and boot from it. Once logged in, you’ll be in the main interface of AOMEI Partition Assistant. Then, follow the steps to format the Windows 10 laptop or desktop.
Step 1. Click the “Wipe“ tab and choose “Wipe Hard Drive“.
Note: To wipe data on SSD and prevent data recovery, please use SSD Secure Erase function in AOMEI Partition Assistant Professional.
Step 2. Select the disk you want to wipe and click “OK“ to continue.
Step 3. Choose “Fill in 0” and click “OK”.
Step 4. Click “Apply” and “Proceed” to commit the operation.
This way will wipe all data from the Window 10 hard drive and prevent data recovery. If you just want to format C drive, you can right-click it and choose “Format Partition”.