When seeing BitLocker drive encryption is enabled on the selected partition message, you can follow this guide to remove BitLocker from a drive.
I got a new Lenovo laptop about a month and a half ago. My PC shut down while I was using it this evening, wouldn't start back up.I found several lists of steps on the Microsoft Community forums. The last thing to try is a clean Windows install from a USB, which I'm in the middle of now. Now I'm presented with "select location to install windows 11". The disk has several partitioned spaces, it looks like I'm supposed to install in Partition 3 (the one marked "primary")?
But I get a dialogue box saying "Installation is not supported for the file system on the current partition. BitLocker Drive Encryption is enabled on the selected partition. Suspend (also known as disable) BitLocker in the Control Panel, and then restart the installation." How am I supposed to disable anything in the Control Panel if I can't get Windows to boot up in the first place? I've been at this for a few hours, at my wit's end. Can anybody provide some guidance?
- Question from Reddit
BitLocker is a built-in encryption tool in Windows that helps protect your data by locking the drive with a password or recovery key. It is commonly used to secure system drives, external hard drives, or USB devices. While BitLocker is useful for protecting your files, it can also cause problems when trying to reinstall or clean install Windows.
In short, this message appears because BitLocker is still active on the partition you selected. To proceed, you must first turn off BitLocker and decrypt the drive. Once the encryption is removed, the partition becomes available for a clean Windows installation.
How to remove BitLocker from a drive? Using AOMEI Partition Assistant is a great option. It has a clear and user-friendly interface that lets you disable BitLocker in just three simple steps.
This tool also makes it easy to manage BitLocker in other ways. You can back up your recovery key, change the password, and even lock or unlock a drive without entering the password or recovery key. In addition, if you are using Windows 11 or Windows 10 Home, which does not include BitLocker by default, this software allows you to enable it as well.
The Best Windows Disk Partition Manager and PC Optimizer
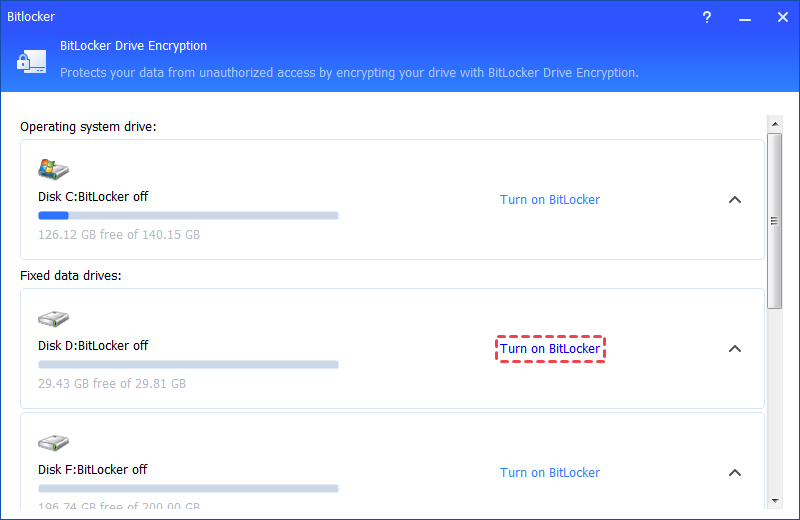
Step 1. Locate the encrypted drive you wish to decrypt and choose the option "Turn off BitLocker".
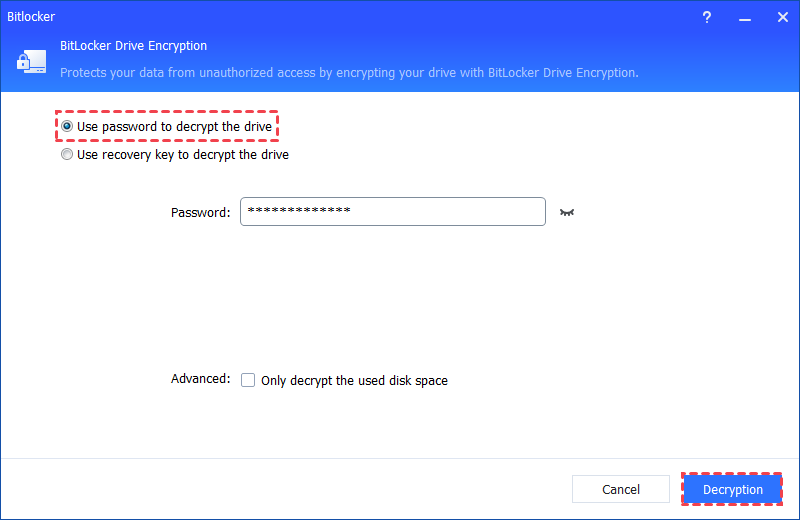
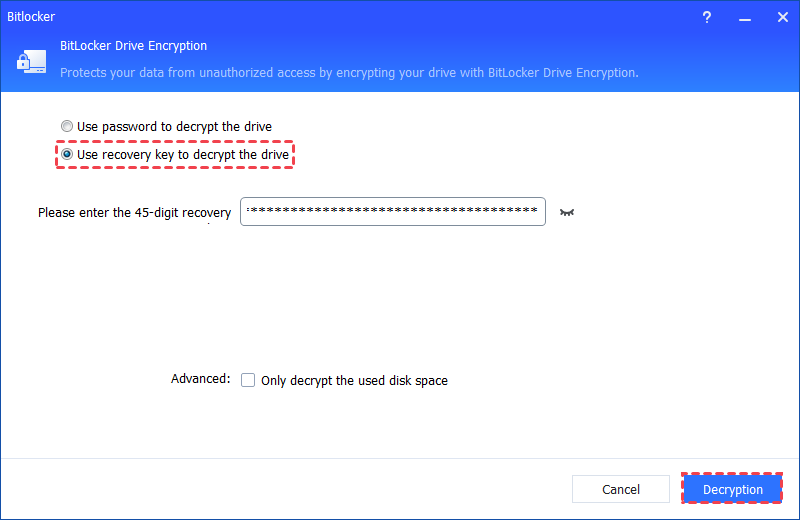
Step 2. There are 2 available methods for decrypting the drive: Use a password for decryption or Use a recovery key for decryption. Please select the appropriate method based on your requirements.
If you opt for "Use a password to decrypt the drive," enter the correct password and then click the "Decrypt" button.
If you choose "Use a recovery key to decrypt the drive," input the recovery key saved in the TXT file or printed when you initially encrypted the drive, and then click the "Decrypt" button.
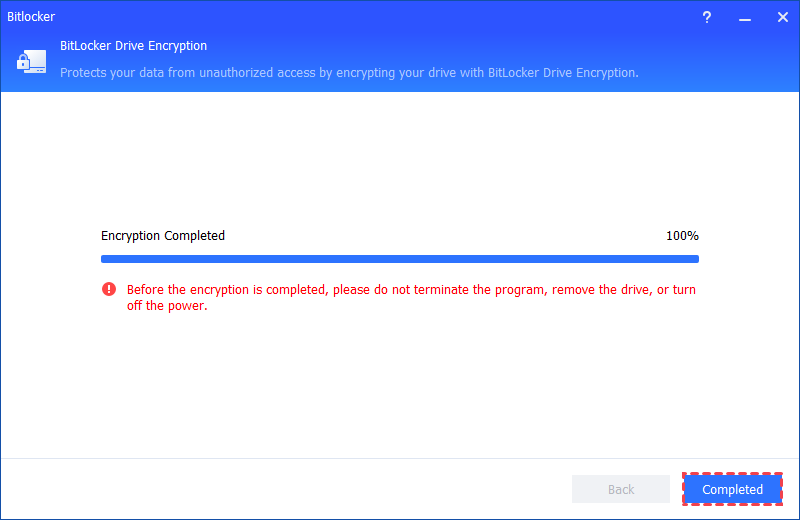
Step 3. Subsequently, the decryption process will commence, and it may take some time to complete. During this period, it is essential not to close the program, eject the drive, or power off the system.
Once the decryption process concludes, click "Completed". At this point, the BitLocker on the drive is successfully decrypted.
If you don’t mind losing data, you can choose to wipe the locked hard drive and install Windows on the BitLocker-encrypted partition. Otherwise, you may remain stuck on the recovery screen asking for the BitLocker recovery key.
Step 1. Use the Windows Media Creation Tool to create a Windows 11 installation USB. You can find the tool on Microsoft’s official website and follow the instructions to set up the bootable media. Insert the USB into your computer and restart. Enter your BIOS or boot menu and select the USB drive as the primary boot device.
Step 2. When the setup screen appears, press Shift + F10 to open Command Prompt. Then enter the following commands based on your goal:
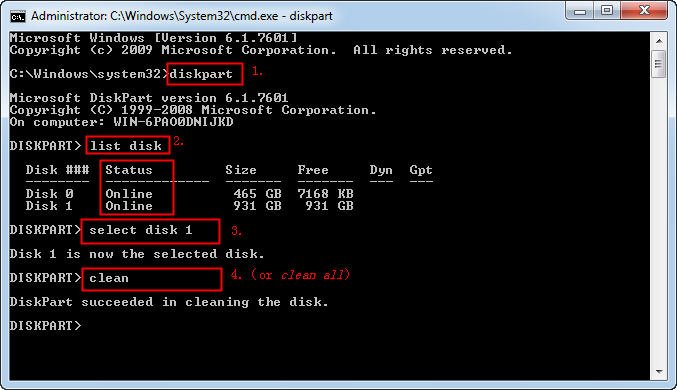
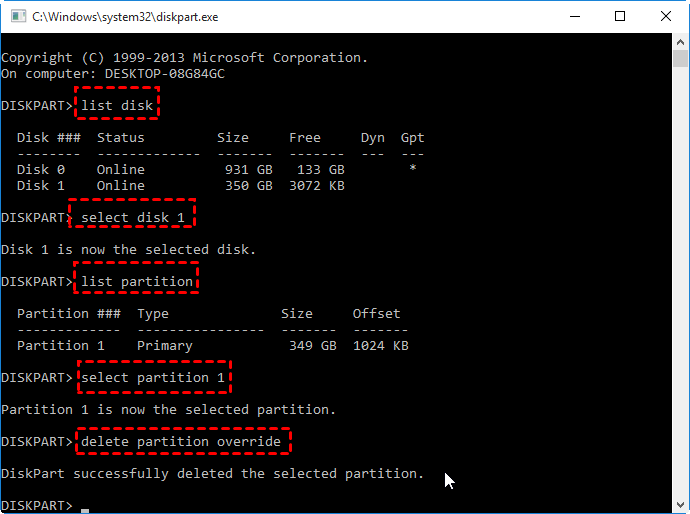
To clean the entire encrypted drive:
To delete only the encrypted system partition while keeping other partitions:
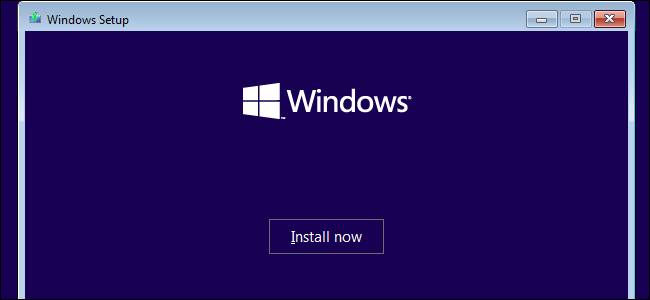
Step 3. After cleaning the drive or partition, type exit to close the Command Prompt and restart your computer. Boot again from the Windows installation USB. Once the Windows Setup screen appears, click Next> Install now> Select I don’t have a product key> Accept the License Terms.
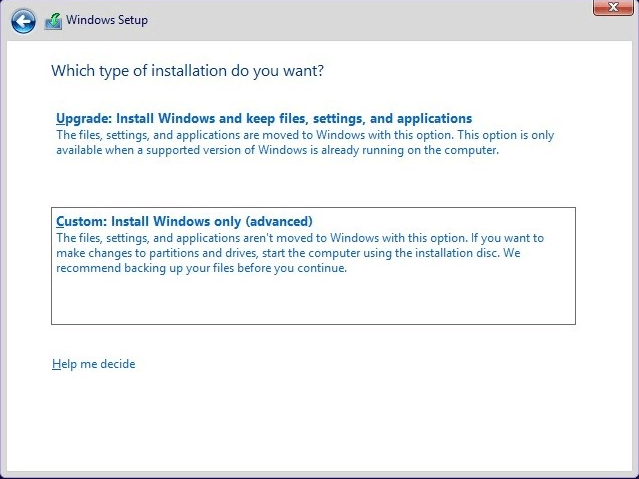
Step 4. Choose Custom: Install Windows only (advanced). Select the partition or unallocated space where you want to install Windows 11 and click Next. Follow the prompts to complete the installation.
When you see the message “BitLocker drive encryption is enabled on the selected partition,” it means the partition is encrypted with BitLocker, and you won't be able to install Windows until the encryption is removed. Since you can’t access the Control Panel when Windows won’t boot, using a tool like AOMEI Partition Assistant can help you turn off BitLocker through a bootable USB. Once the drive is decrypted, or if you're willing to wipe the drive and lose your data, you can proceed with a clean Windows installation. Just follow the steps carefully, and you’ll be able to set up your system again without the BitLocker error getting in the way.
The Best Windows Disk Partition Manager and PC Optimizer