How to turn on or off Hardware Acceleration Windows 11 to make your PC run faster? This post will guide you to easily do hardware accelerated GPU scheduling.
When it comes to hardware acceleration on Windows 11, some users might know about it, while others might not. What exactly is it, what can it do for you, and should you enable it or not? If you're curious about these questions, keep reading – we've got the answers right here.
Hardware Acceleration also refers to Hardware-accelerated GPU scheduling. It is a technology that utilizes specialized hardware components like the GPU and CPU to offload specific tasks from the software or central processing unit. By leveraging dedicated hardware resources, it enhances the speed and efficiency of these operations, bringing a smoother and faster user experience.
This technology also ensures seamless rendering of graphics. Normally, processors execute instructions sequentially, one after the other. However, by employing certain techniques, you can modify the process to execute them faster. The concept behind hardware acceleration is to transfer the responsibility of graphics and text rendering from the Central Processing Unit to the Graphics Processing Unit, thus leading to improved performance.
Whether you should enable Hardware-Accelerated GPU Scheduling depends on your specific requirements and system configuration. Generally, turning on Windows 11 Hardware accelerated GPU scheduling allows you to gain these advantages:
However, according to the users’ feedback, this function also has several cons that need pay attention to:
So, if you regularly use applications that heavily rely on graphics processing, this function will help you a lot, while for basic tasks, enabling the feature may bring a negative impact all the more.
Now, if you decide to enable or disable the Windows 11 Hardware-accelerated GPU scheduling, here is step-by-step guidance.
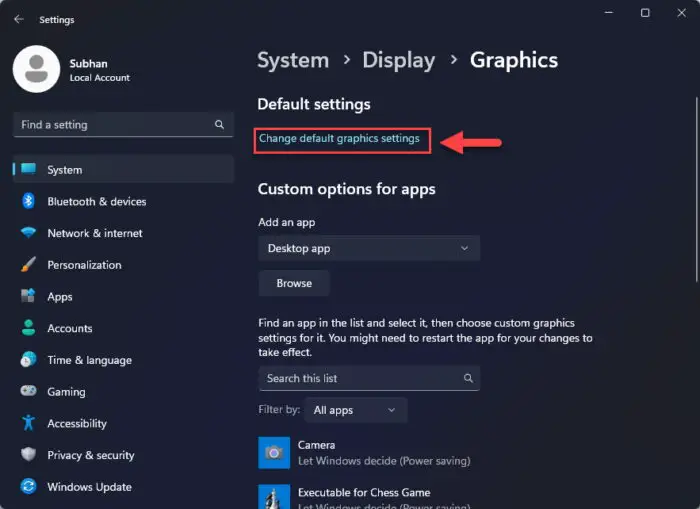
Step 1. Open Settings window, and click “System” > “Display”.
Step 2. Choose the “Graphics” icon and click “Change default graphics settings”.
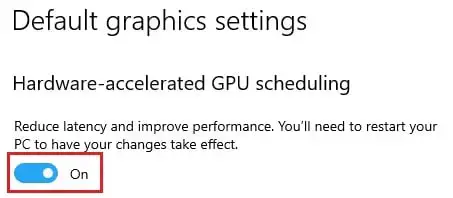
Step 3. In the new interface, toggle the “Hardware-accelerated GPU scheduling” on.
▌Case 1. Disable Hardware Acceleration Windows 11 in normal case
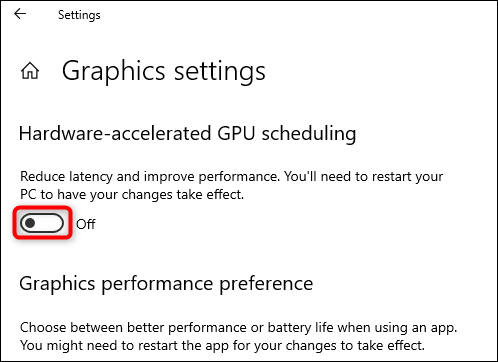
The Step 1 and Step 2 are the same as the above. You just need to toggle the button of “Hardware-accelerated GPU scheduling” off, and you can disable Hardware Acceleration Windows 11.
Then, please restart your computer to bring the change into effect.
▌Case 2.Disable Windows 11 Hardware-accelerated GPU scheduling when it in Error
However, if the compatibility issues happen, the system may notice with errors like SYSTEM_THREAD_EXCEPTION_NOT_HANDLED or DRIVER_IRQL_NOT_LESS_OR_EQUAL. In these situations, you may also need to disable Hardware Acceleration Windows 11.
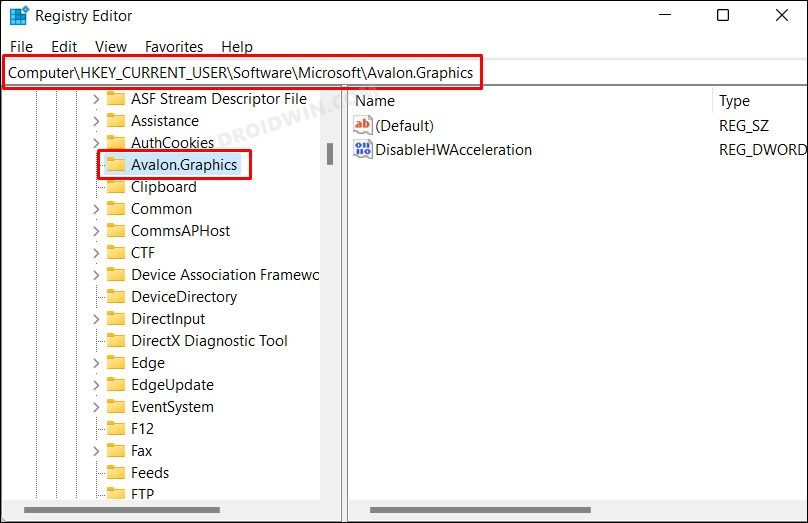
Step 1: Open Registry Editor and navigate to the following location by copying and pasting it into the address bar: Computer\HKEY_CURRENT_USER\Software\Microsoft\Avalon.Graphics
Step 2: On the right-hand side of the window, locate the entry called DisableHWAcceleration and double-click on it. This will open the entry for editing. Enter the value "1" in the Value Data field and click OK to save the changes.
By completing these steps, you will successfully turn off Hardware Acceleration Windows 11.
For users who just run basic tasks like web browsing, document editing, or other casual activities, there is less need to turn on Hardware-accelerated GPU scheduling Windows 11. If you want to speed up your PC and enjoy better and smoother performance, actually, you have a better choice.
PartitionAssistant Cleanup is a free disk and partition manager for Windows OS, supporting Windows 11/10/8/7 and Windows Server and continues to receive updates. It boasts many practical features for users to enhance performance or monitor computer health.
To make your device run faster, cleaning junk files is a good way. On the main interface, you can choose "PC Cleaner" to remove temporary files, system cache, and other unnecessary files that accumulate over time. By the way, this function can also help you remove potential viruses and malware.
The Best Windows Disk Partition Manager and PC Optimizer
Step 1. Install and launch PartitionAssistant Cleanup. Click the "Clean Junk Files" tab.
Step 2. Click the "Scan Now" button to start the process of scanning junk files.
Step 3. After the scan process is finished. All system junk files (including recycle bin files, temporary files, log files, invalid shortcuts, and so on) and registry junk files (including DLL registry, system registry, and program registry) will be displayed.
Step 4. You can also click the button behind to view the junk files details.
Step 5. And, you can click the button behind to locate the file.
Step 6. By default, the program will select some junk files to clean up, for example, temporary files, log files, and so on. You can also manually check to select more or uncheck to deselect fewer listed junk files. Or, click "Select All" to select all junk files to clean up if you need to clean up all.
After selecting junk files that are not needed anymore, you can click the "Clean Now"button to start the cleanup.
Step 7. The process of the cleanup might take time, and the selected files will be cleaned up. After the process is finished, you will get a cleanup completed window displaying how many files you have cleaned and not yet cleaned.
You can directly use “PC cleaner” to clean up and remove potential risks like virus or malware, thus protecting your data safe and improving computer performance.
It is quite simple to enable and disable Hardware Acceleration Windows 11. Given the cons, for basic task users to speed up their computer, try the multifunctional tool like PartitionAssistant Cleanup can be an ideal choice.