Five Effective Ways to Improve Windows 11 Performance
If you want to improve Windows 11 performance, you can take a look at this post. We gather some easy but effective ways to speed up Windows 11. So, read it on and learn how to make Windows 11 better.
By AOMEI / Updated on March 5, 2026
Need to improve Windows 11 performance
Since Microsoft officially released Windows 11 on October 5, 2021, many users have upgraded from Windows 10 to Windows 11. Windows 11 introduces new and enhanced looks as well as new and improved functions. Naturally, the system requirements of this new operating system are more stringent. If your PC fulfills the minimal system requirements for Windows 11, you can install this new operating system.
However, after a while of use, Windows 11 becomes sluggish. Windows 11 operates much slower on somewhat older PCs and devices with low configuration. You may encounter some problems after the upgrade, such as freezes, delays, crashes, or other problems that affect the performance of Windows 11. Therefore, this article will show you how to improve the performance of Windows 11.
How to improve the performance of Windows 11
To optimize Windows 11, improve its performance. You can try to uninstall uncommon software to free up space, and use professional anti-virus software to scan your PC for viruses. If the problem is still not solved, you can try to solve it one by one according to the solutions I gave below.
│Method 1. Turn off visual effects
Turning on the visual effects can present a better visual experience, but this will take up more graphics processor load. If the PC’s hardware is older, it will reduce your performance. Therefore, disabling high visual effects can help to improve Windows 11 performance.
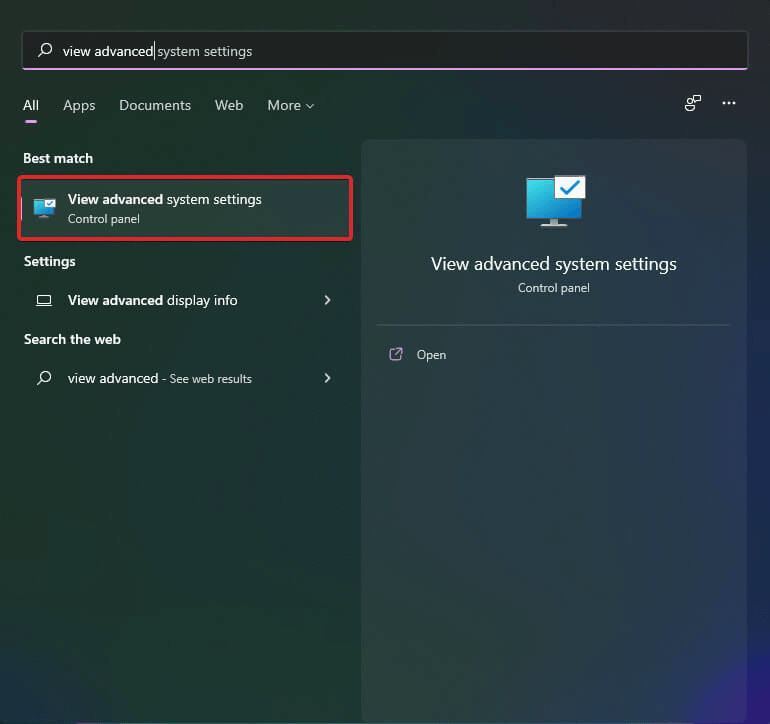
Step 1. Click the Windows icon at the desktop, type in View advanced system settings and open it.
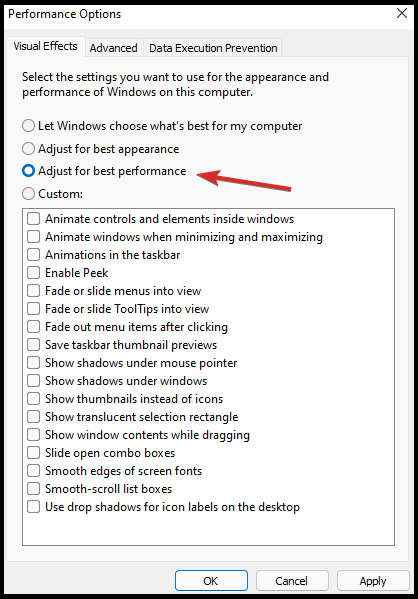
Step 2. Click Advanced and select Performance Settings.

Step 3. Tick Adjust for best performance option.
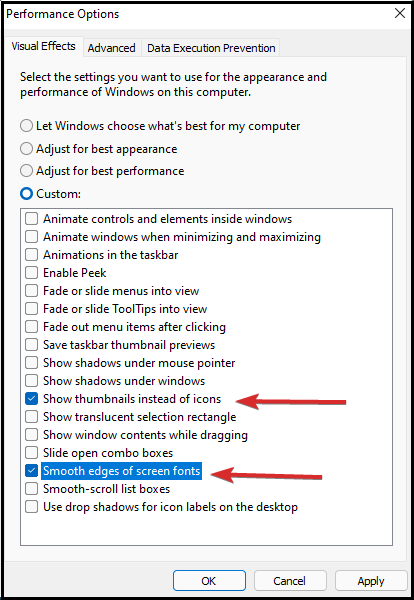
Step 4. From the Custom shown list, checkmark the following options: Show thumbnails instead of icons and smooth edges of screen fonts.
Step 5. Click Apply and OK to save these operations.
│Method 2. Disable automatic startup programs
Some unnecessary programs will start automatically when you boot, and they will always run in the background. In this case, they will consume storage and memory. You can prevent them from automatically starting at boot time by disabling startup programs.
Step 1. Right click Search icon at the desktop, select Task Manager.
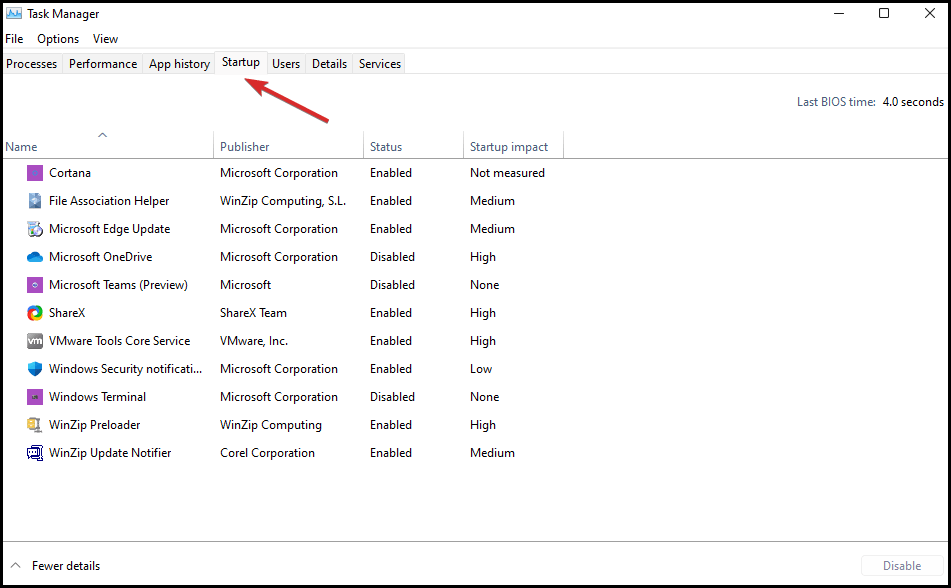
Step 2. Click on the Startup tab.
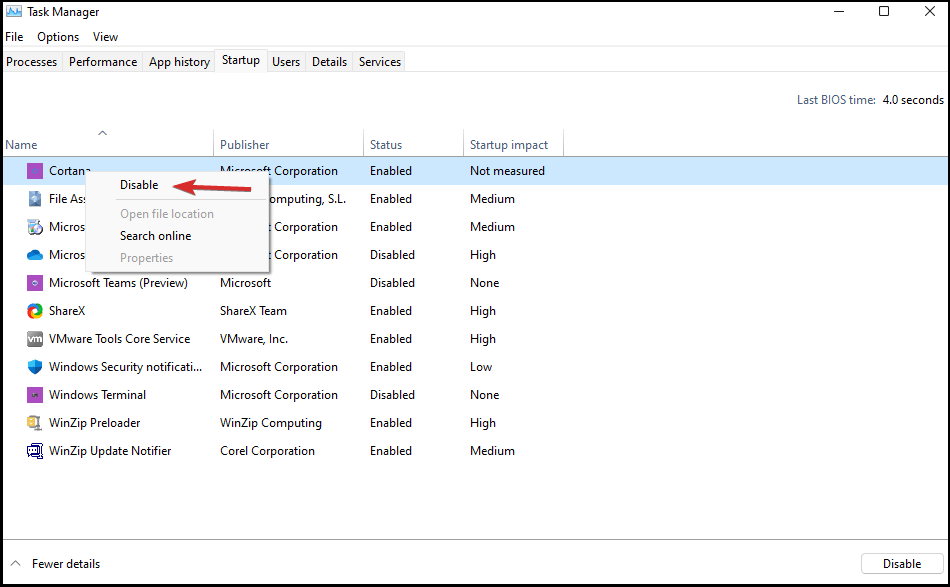
Step 3. Right-click any program that you don’t want to load in startup and select Disable.
│Method 3. Open Storage Sense
Windows 11 still has the Windows 10 Storage Sense function. Its main function is to manage the storage of the computer and release space by deleting temporary system files, items in the recycle bin, etc. when needed, to achieve the purpose of improving the performance of Windows 11.
Step 1. Click the Search icon at the desktop, select Settings.
Step 2. Click on Storage and tap Storage Sense.
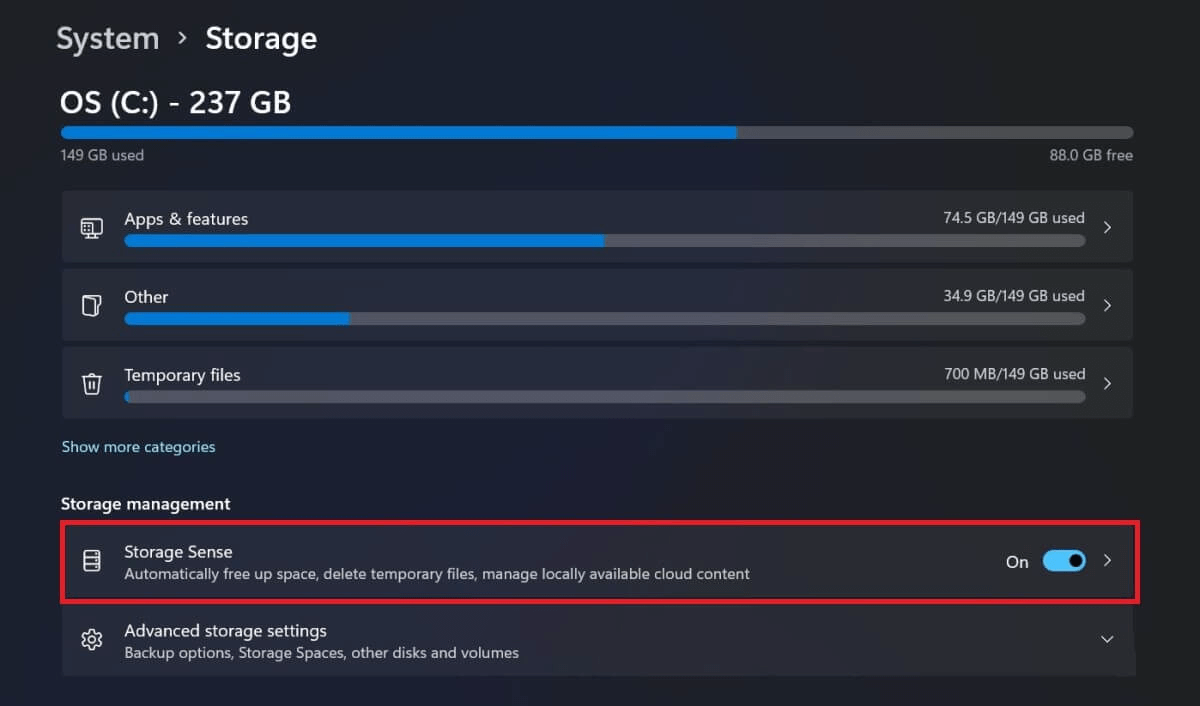
Step 3. Turn on the Storage Sense feature. Select the desired automatic cleanup schedule.

│Method 4. Turn off fast startup to resolve Windows 11 Slow
Windows 11 operating system has a Turn on Fast Startup capability. You may use it to improve your system's boot-up timing. However, if you have this option selected, you may encounter the problem of Windows 11 delayed boot. As a result, you may want to disable the Fast Startup option to enhance system efficiency. To disable the Fast Startup option, perform the following steps.
Step 1. Write "Control Panel" in the search box and click on it.
Step 2. Select the "Hardware and Sound" option, then select the "Power Option." If you can't find the power option immediately, put "Power Options" into the Control Panel.
Step 3. Select the "Choose what the power button does" option. If the "Turn on fast startup" is enabled, uncheck the box to turn it off.

Step 4. Tap on the "Save Changes" option.
Restart your computer and see if you're able to fix the Windows 11 slow performance problem.
│Method 5. Clean unneeded files
The Windows operating system creates temporary files in memory whenever a job is done, as the name implies. It enables the computer to maintain things smooth and speedy for users when they attempt to repeat the same action. Windows 11 sluggish performance might be caused by corrupted or old temporary files.
Step 1. By pressing the "Windows + R" keys together, open the "Run" dialog box.
Step 2. Here, type "%temp%" and press the Enter button to access the "Temp folder" from C: drive.
Step 3. By pressing the "Ctrl + A" keys to select the temp files. Press the "Delete" key to remove the temporary files.
Step 4. If a dialog box appears, click on the "Do this for all current items" option and tap the "Continue" button.
Note: Wait for the deletion process, and if some temporary files are not getting deleted, then skip those files.
│Method 6. Upgrade HDD to SSD
The read and write speed of SSD is faster than HDD. Therefore, when Windows 11 runs slowly on HDD, you can try to install Windows 11 on SSD rather than HDD. This can greatly improve startup time, file access time and overall response speed.
To upgrade to SSD safely and quickly, I recommend that you use AOMEI Partition Assistant Professional to clone the entire HDD to SSD. It is designed to solve various disk partition problems and supports Windows 11/10/8/7/Vista/XP users. You don’t have to worry about any difficulty in operation, because its operation is effortless and suitable for any people.
In addition, you can also perform Scheduled Disk Defragmentation to clean up fragmented files to improve the running speed of Windows 11.
Step 1. Install and launch AOMEI Partition Assistant, click "Clone" in the main interface and select "Clone Disk".

Step 2. Choose the hard disk that you need to clone as the source disk and click "Next".

Step 3. Select the destination disk to store the data on the source disk, and then click "Next".

Step 4. Then, you can check the source and destination disk in the next window or change to “Sector to Sector clone”, and click the "Confirm" button to continue if there is no problem.

Here, you can also click the "Settings" button to adjust the partition size on the destination disk or tick "4k alignment" to improve the reading and writing speed of SSD if the target disk is an SSD drive.
Step 5. At last, click "Apply" and "Proceed" in the main interface to start cloning the hard drive.

│Method 7. Install a new RAM
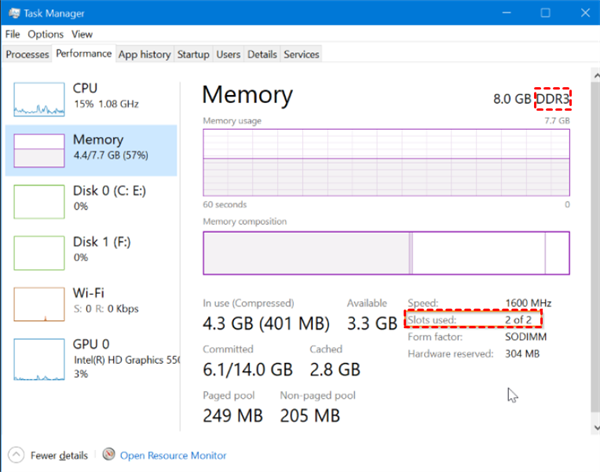
RAM is short for Random Access Memory, which stores temporary data when performing tasks. The operation of the memory also determines the speed of the overall operation of the computer. If your budget is sufficient, you can add a 4/8 GB memory stick to your PC.
Before doing it again, you need to open the Task Manager and click “Performance”. The system will display the memory type and the number of slots used. Then purchase compatible RAM and install it on your computer.
Conclusion
From what has been discussed above, this article introduces five very useful methods to teach you how to improve Windows 11 performance, including free and paid. You can choose according to your needs.

