[Solved] Cortex XDR Prevent Not Supports BitLocker Disk Encryption Visibility
When BitLocker disk encryption no visibility happens on Cortex XDR Prevent, this post may offer you more inspirations to solve this problem.
By Lucas / Updated on February 19, 2024
Scenario: Bitlocker Disk Encryption Visibility = Not Supported on Cortex XDR Prevent
“I'm currently in the process of transitioning from our previous antivirus and disk encryption systems to Cortex and BitLocker for our older PCs. I've observed that all the systems I worked on today are showing "Not Supported" in the Status column. Upon hovering over, it indicates that the OS is not supported. Interestingly, I've identified a few other systems with the same status, although not all systems are affected. It's worth noting that we only use one version of Win10, making this situation peculiar.”
Cortex XDR and BitLocker disk encryption are two powerful protectors of data security and endpoint devices. One can realize threat visibility to help users conveniently manage all security problems, the other can protect Windows disks and drives from privacy leaks.
However, sometimes they may have some compatible problems. This case is a typical scenario. If you also encounter a similar problem to this user, this post will give you some advice.
Know more about Cortex XDR and BitLocker disk encryption
If you don’t know much about Cortex XDR and BitLocker disk encryption, here, we’ll give you a quick knowledge base to help you.
▍Extended detection and response (XDR)
Extended detection and response (XDR) is a SaaS (software as a service) technology that provides comprehensive, enhanced protection by combining security products and data into simplified solutions.
As companies face an expanding threat landscape and complicated security concerns with multi-cloud, hybrid workforces, XDR security provides a more efficient, proactive solution. Unlike endpoint detection and response (EDR) solutions, XDR broadens the area of protection.
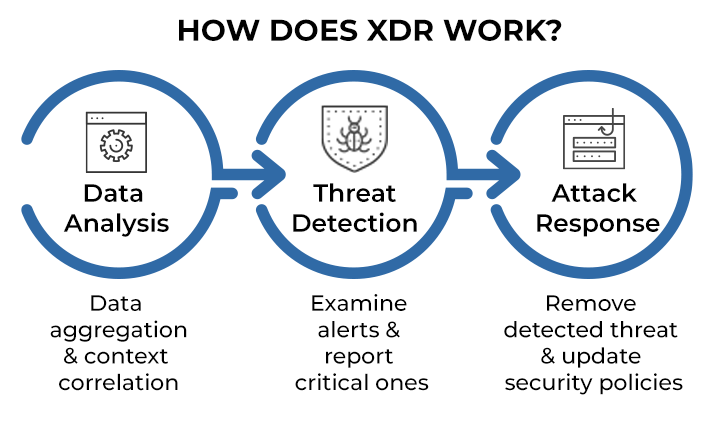
In all, XDR software unifies security across a broader variety of products, including endpoints, servers, cloud apps, emails, and more. XDR then integrates prevention, detection, investigation, and response to improve data security and battle attacks by providing visibility, analytics, linked incident alerts, and automated replies.
▍BitLocker disk encryption
BitLocker is a full-volume encryption tool that comes standard with Microsoft Windows. It is intended to secure data by encrypting full volumes. When BitLocker is enabled, TPM and BitLocker can maintain the integrity of the trusted boot path, hence preventing most offline physical assaults and boot sector malware.
The primary purpose of BitLocker is to protect the confidentiality and integrity of the operating system and user data by encrypting the entire disk.
BitLocker uses various encryption methods, including AES (Advanced Encryption Standard), to provide robust protection. It can be configured to require authentication methods such as a password, PIN, smart card, or a combination of these. Additionally, BitLocker supports the use of TPM (Trusted Platform Module) for hardware-based security, which further enhances the protection of encryption keys.
Why is BitLocker disk encryption visibility not supported on Cortex XDR Prevent?
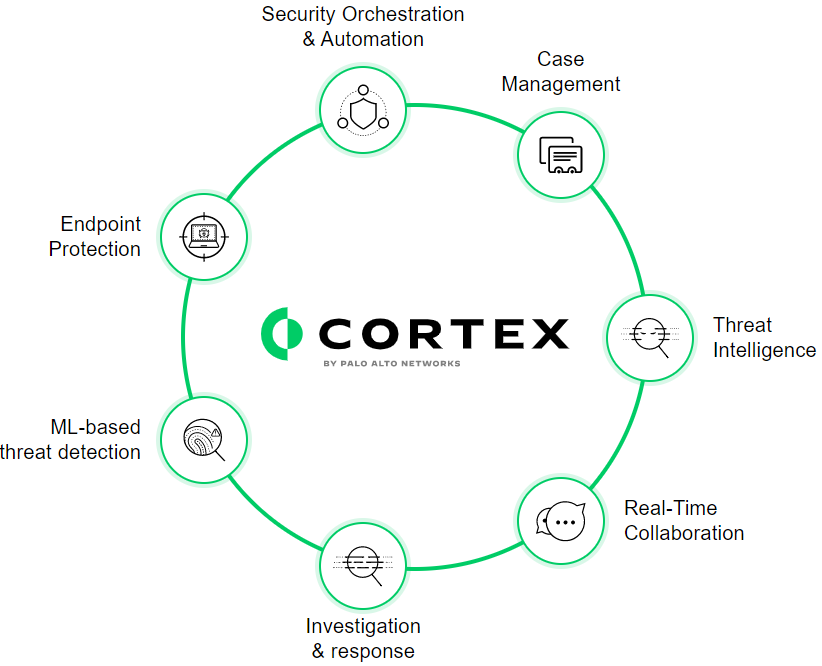
Cortex XDR solution delivers cloud-based and on-premises endpoint security features, including event tracking, log management, root cause analysis, and malware protection. This platform achieves comprehensive visibility by aggregating data from various sources, including endpoints, networks, and cloud environments.
Functioning as a management service control platform, Cortex XDR provides APIs for integration with third-party services or applications to display security events and aid teams in analyzing relevant logs.
So, the most possible reason is unsupported versions between Windows tools and third-party tools. The version of Cortex XDR Prevent may not support or be compatible with the version of BitLocker encryption being used on the protected devices. Or, certain configurations or settings within BitLocker might not be compatible with the visibility features provided by Cortex XDR Prevent.
Updates to either BitLocker or Cortex XDR Prevent may introduce changes that affect the compatibility between the two systems. Thus, ensuring that both systems are updated to the latest versions may resolve compatibility issues.
How to fix BitLocker disk encryption visibility not supported
In this part, we’ll help you fix BitLocker disk encryption visibility not supported issue. You can update both the Cortex XDR console and Windows OS, or try to redo the BitLocker disk encryption with Windows or via third-party tool to eliminate any possible errors caused by the process from system built-in encryption.
Way 1. Check and update Cortex XDR and Windows OS
Since the problem may be caused by incompatible versions of Windows system and Cortex XDR Prevent, so, the first measure is to update both to the newest versions.
Part 1. Upgrade Cortex XDR Agents
Before updating a Cortex XDR agent, make sure the System Extensions on the endpoint have been allowed. Otherwise, if the extensions were not allowed, they would stay on the endpoint after the update with no way to delete them, which may cause the agent to behave unexpectedly.
To determine whether the extensions were allowed, check that the endpoint is in the Fully Protected state in Cortex XDR, or use the systemextensionsctl list command on the endpoint to display the extensions. (More information from: Upgrade Cortex Agents)
If all endpoints are ready, you can upgrade your Cortex XDR.
Step 1. Log in to the Cortex XDR management console using valid credentials.
Step 2. Navigate to the Updates Section
Locate the "Updates" or "Software Updates" section within the Cortex XDR management console. This section is typically where you manage updates and upgrades.
Step 3. Check for Updates
Look for an option to check for updates. Some systems may automatically check for updates periodically, while others may require manual initiation.
Step 4. Review Release Notes
Before initiating the update, it's crucial to review the release notes for the latest version. This documentation provides information about new features, improvements, and any known issues.
Step 5. Initiate the Update
Follow the prompts or options to initiate the update. This process may involve downloading the update package and applying it to the Cortex XDR Prevent environment.
Step 6. Verify Post-Update Functionality
After the update is complete, verify that Cortex XDR Prevent is functioning as expected. Check critical features and ensure that there are no issues with the updated version.
When you upgrade to a Cortex XDR agent 7.2 or a later release on an endpoint with Cortex XDR Device Control rules, you need to reboot the endpoint for the rules to take effect.
Part 2. Update Windows OS version
Now we can check our Windows system.
Step 1. Go to "Settings" > "Update & Security" > "Windows Update." Click on "Check for updates." Windows will search for available updates.
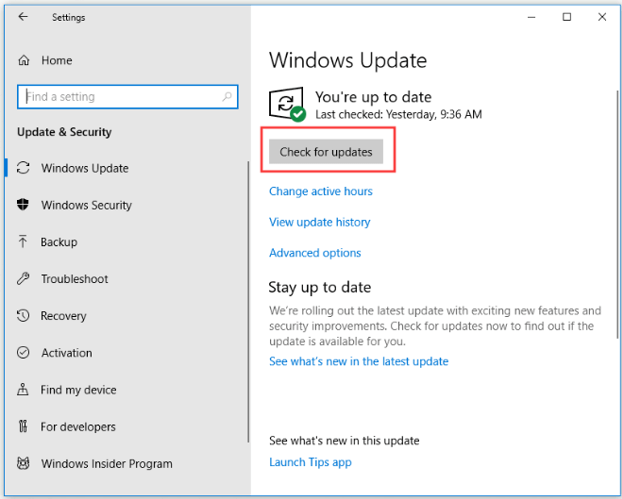
Step 2. If updates are available, click on "Download" and "Install." Your computer may need to restart to complete the installation.
Major updates, known as feature updates, might not be installed automatically. If a feature update is available, it will appear under "Optional updates available." You can choose to download and install it from there.
When Windows update is finished, you can try Cortex XDR Prevent again to check if it can monitor and visualize the BitLocker disk encryption.
Way 2. Redo BitLocker encryption via third-party tool
Another solution is to redo BitLocker encryption. If there are no problems with Cortex XDR version and Windows OS version, the problem might arise from BitLocker encryption. So, you can also try another application to execute encryption.
In this case, we introduce you to AOMEI Partition Assistant Standard, a versatile and robust Windows computer manager. This free tool can BitLocker encrypt disks, drives, USB, external devices and manage your key in different ways just like built-in tool. When built-in tool confronts any errors, like sometimes BitLocker not working after Windows 10 update, you can use this handy tool to address emergent encryption.
What’s more, the Professional edition of this tool enables Windows Home users to BitLocker encrypt their devices without any limitation.
Step 1. Install and launch AOMEI Partition Assistant. Click the "Tools" main tab and select "BitLocker".
Or, right-click the partition you want to encrypt and click the "BitLocker"->"Turn on BitLocker" option in the Context Menu.

Step 2. All drives on the system will be displayed, including operating system drives, fixed data drives, and removable drives. Please find the partition you would like to encrypt BitLocker and click the "Turn on BitLocker" option. (Here, we take the drive D: as an example.)
▶ Tip: Currently, it only supports encrypting NTFS partitions. Other partition file systems, for example, FAT or FAT32 cannot be encrypted.
Step 3. Please set and confirm a password to encrypt the drive and click "Next".
▶ Tip: It requires a password combination of 8-256 digits, letters, and symbols, which can be a purely numeric/alphabetic combination (needs to be case-sensitive).
Step 4. Select a way to back up your recovery key. You can either select "Save to a file" or "Print the recovery key". If you select "Save to a file", please choose a location on your PC to save the recovery key.
▶ Tip: It is not allowed to save the recovery key on the drive you want to encrypt. For example, it is unable to encrypt D: and save the recovery key on your D:.
It will generate a TXT file with the name: Bitlocker Recovery Key + 45-bit Key. The recovery file will be saved in the TXT file. You can open the file to view the recovery key. Please keep the file.
If you select "Print the recovery key", it will enable the print function on your PC to print the recovery key. Then, please click the "Next" button to start the encryption process.
If you would like to encrypt your current system drive, you will be asked to restart your PC into Windows PE mode to execute the operation because it is a current system drive. The program will first create Windows PE and then boot the PC into Windows PE mode to encrypt the drive. After the encryption is finished, you can restart your PC.
Step 5. The encryption process might take time to encrypt the drive. Before the process is finished, please do not terminate the program, remove the drive, or turn off the power.
When the encryption process is finished, please click "Completed". Finally, the drive is BitLocker encrypted.
Now you can open Cortex XDR Prevent to check if it supports BitLocker disk encryption visibility or not.
Conclusion
These are what you can do when BitLocker disk encryption visibility not supported on Cortex XDR Prevent. Both tools can help you protect your devices, you just need to check more points, and you can easily solve the problem. AOMEI Partition Assistant will always offer you bits of help. You can also use it to manage disk and partition space, clean junk files, clone disks, test disks, and so on. And if you want to use it to help your business management, you can choose its Server edition or Unlimited edition.

