Best Format Tool for Kingston DataTraveler Workspace USB
This tutorial details how to format Kingston Windows To Go USB – DataTraveler Workspace 32GB with Windows Diskpart as well as powerful DataTraveler format tool.
By Lucas / Updated on November 7, 2024
About Kingston DataTraveler Workspace
Kingston built its own Windows To Go USB drives, and DataTraveler Workspace is one of them. The other is IronKey W700. This USB drive is a bootable USB 3.0 flash drive which designed to be used Windows 8 and Windows 10 Enterprise on-the-go. The DataTraveler Workspace is certified by Microsoft which allows users to realize BYOD (bring your own device) or bring your own PC.

It is quite easy to use Kingston DataTraveler Workspace: plug and play. Plug the USB drive into a computer, change boot priority to this USB drive and you start with it. DataTraveler Workspace now is available in 32GB, 64GB and 128GB capacities. Its incorporate SandForce SSD controller technology brings high-performance and low-latency to users.
Why Need DataTraveler Format Tool?
Now that Kingston DataTraveler Workspace brings so much efficiency and convenience, why would we format it? As covered before, this Kingston USB drive is available in three capacities, and the smallest one is 32GB. Generally speaking, 32GB is not enough for frequent computing. To gain larger capacity, you may have purchased bigger Windows To Go USB drive. Thus, if you want to use it as a normal USB drive, a DataTraveler Workspace 32GB format is necessary since it is intended to be used as a bootable fixed device.
In another case, you may have more than one Windows To Go drives and plan to abandon DataTraveler Workspace. Except for Kingston Windows To Go USB, there are many other brands of certified Windows To Go drives like WD My Passport Enterprise 500GB portable hard drive. As a result, Kingston DataTraveler Workspace format happens naturally. Anyway, you might have other reasons to do the format. But what counts next is finding a way out.
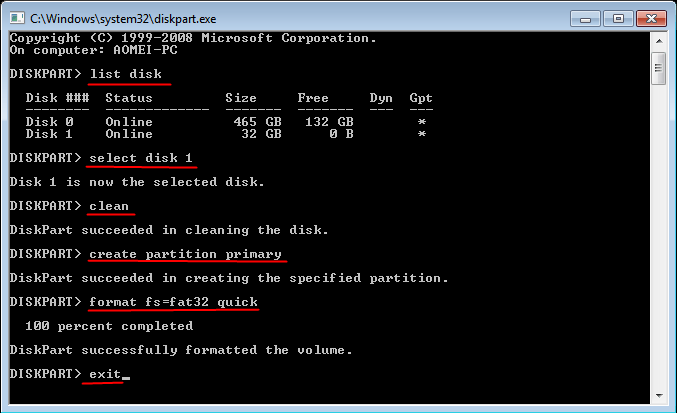
Format Kingston DataTraveler using Diskpart
1. Connect your DataTraveler Workspace to your PC in running state and make sure it can be detected by Windows.
2. Press Windows + R to start Run box. Then type “diskpart”.
3. In Command Prompt, input following commands in turn to format this bootable DataTraveler Workspace USB drive.
-
list disk
-
select disk 1(it is important that you know your USB drive disk number)
-
clean
-
create partition primary
-
format fs=fat32 quick or format fs=ntfs quick
-
exit
Diskpart is a helpful format tool yet you still may encounter Kingston DataTraveler format error like “DataTraveler cannot format” or “it is write-protected”. Speaking of write-protected issue, you actually have 4 ways to remove USB write-protected. Try them with the provided link if you facing such issue. Besides, all operations in Command Prompt take effect immediately, so you cannot step back if you find something went wrong. Alternatively, you can try another great Transcend DataTraveler format utility – AOMEI Partition Assistant Professional. This format tool allows you to format Kingston USB to NTFS, FAT32 and Ext2/Ext3. What’s more, to format DataTraveler Workspace throughout, AOMEI Partition Assistant provides “Wipe Partition” to erase partition up to 100 times. It has a user-friendly interface and is supported by Windows 10, 8.1, 8, 7, XP and Vista.
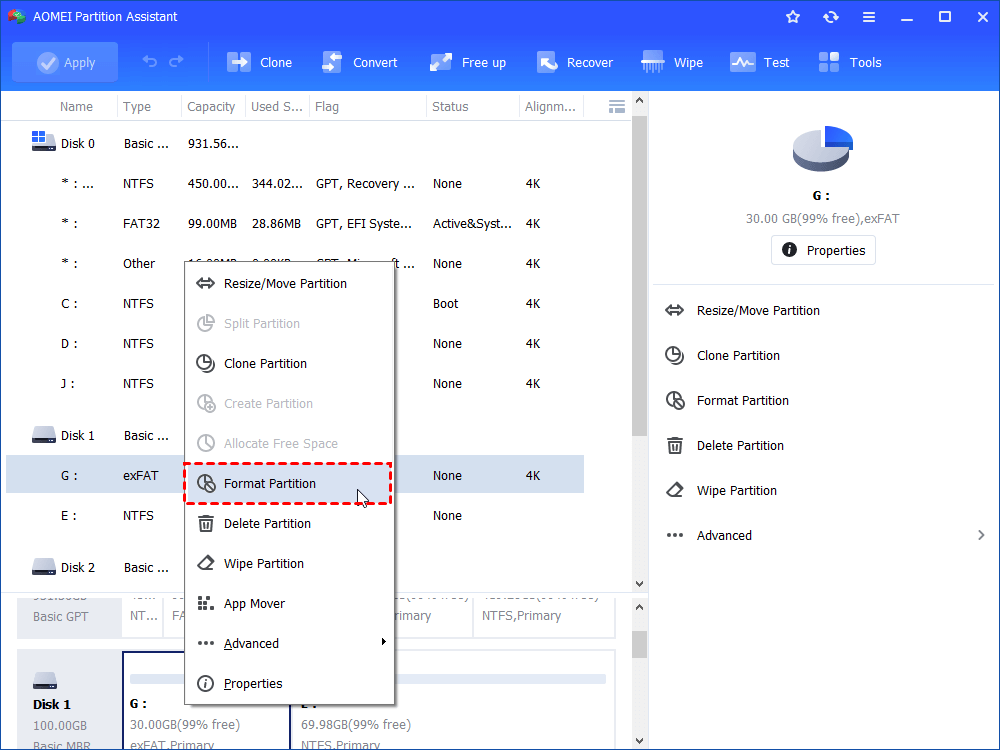
How to Format DataTraveler Workspace via AOMEI Partition Assistant?
1. Again, plug in your DataTraveler into the computer. Install and launch AOMEI Partition Assistant.
2. Right-click the Kingston USB drive and select “Format Partition”.
3. Select file system and cluster size for your USB drive.
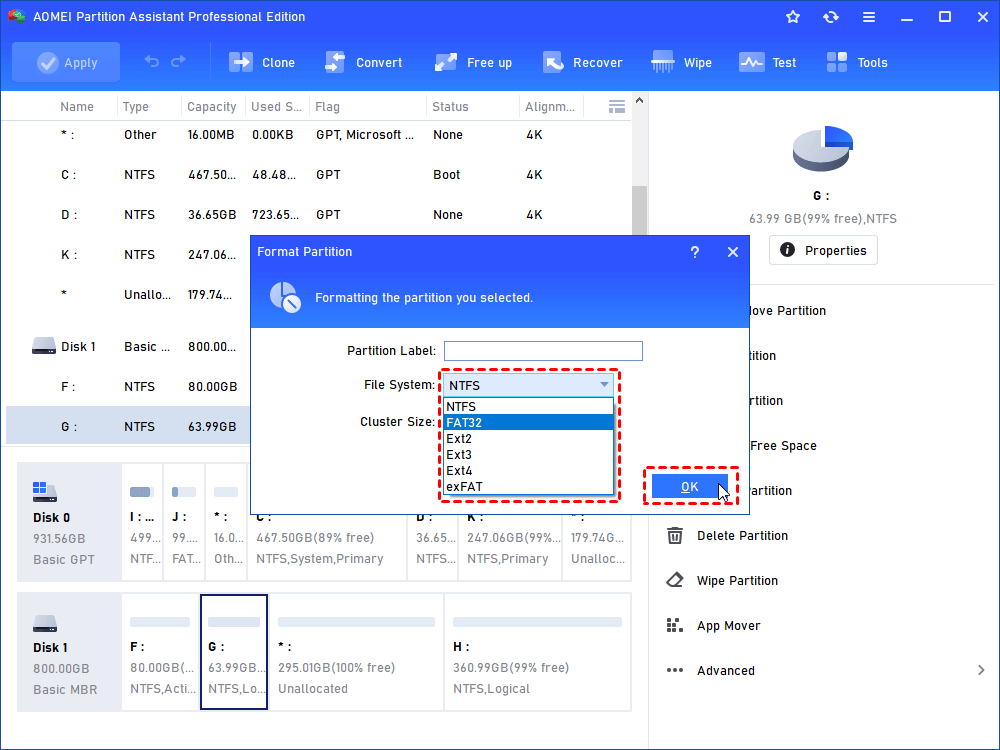
4. Click “Apply” to execute the pending operation.
Tips: If you want Windows To Go back, you can create another one based on your current operating system with “Windows To Go Creator” in AOMEI Partition Assistant. You can refer to make SanDisk USB bootable for more information.
No matter which DataTraveler format tool you choose, the goal is the same. For user who has less computer knowledge, the second method is the most suitable one. Actually, you can format Intenso USB stick using above methods as well. Furthermore, the Disk Copy Wizard in AOMEI Partition Assistant can assist you clone hard drive to Kingston SSD, too.

