How to Use Hirens Boot CD for Low-Level Format
How can I use Hirens Boot CD to low-level format? Is there any other method that can achieve the same purpose? Not only can I teach you how to do it, but also shows you an easier way.
By AOMEI / Updated on April 3, 2025
What is Hirens Boot CD?
Hiren’s Boot CD is an all-in-one emergency toolkit packed with over 100+ Windows repair utilities. Originally distributed as a bootable CD (now often used via USB), it’s designed to rescue systems when they’re at their most vulnerable—whether from hardware failures, malware attacks, or accidental data loss.
If you encounter a hard drive failure, a computer infection with annoying viruses, forget your password, don’t know how to recover it, or accidentally lose all your data, then Hiren’s Boot CD will be your savior. And here are the situations that you need a Hirens Boot CD.
🔶Virus Removal: Clean infections even when Windows won’t boot.
🔶Password Recovery: Reset forgotten admin or user passwords.
🔶Data Rescue: Recover lost files from damaged disks.
🔶Disk Formatting: Perform low-level formats to wipe drives completely (ideal for erasing sensitive data or troubleshooting severe errors).
Next, I will teach you how to use it for low-level format.
The easiest way to replace Hirens Boot CD for low-level format
Using AOMEI Partition Assistant to complete the low-level format is a simpler method than the Hirens Boot CD. The most important thing is that it does not need to download the ISO file or create a bootable USB, which saves a lot of time.
AOMEI Partition Assistant is a completely free disk management tool, it supports Windows11, 10, Windows 8.1/8, Windows 7. This software provides a simple interface that allows everyone to easy to use. But the Standard version can only be used for low-level format HDD(This article takes low-level format HDD as an example). If you want to low-level format SSD, please upgrade to AOMEI Partition Assistant Pro and refer to the specific steps in this article: How to Low-Level Format SSD Easily and Safely in Windows?
The Best Windows Disk Partition Manager and PC Optimizer
Step 1. Install and launch AOMEI Partition Assistant, click the "Wipe" main tab and select "Wipe Hard Disk" option. (You can also right-click the Disk you want to wipe and select the "Wipe Hard Drive" option.)

Step 2. Select the disk you want to wipe and click "OK" to continue.

In this stage, you can also select a wiping method to wipe the selected hard drive according to your requirements and click "OK". (By default, the wiping method is Fill in 0.)

-
Fill in 0: Overwrite all sectors with zeros. It is common to wipe a personal hard drive. It is safe and fast.
-
Fill in random information: It overwrites the hard drive with random data. It is more secure than the first one.
-
DoD 5220.22-M: It will overwrite addressable locations on the hard disk with binary 0's, binary 1's, and a random bit pattern from once to seven times. The more times you choose to overwrite, the longer the process will take. Three times to five times are recommended. It is more secure than "zero-filling" and "random data filling" and faster than the Guttman. Thus it is often adopted by companies and organizations.
-
Gutmann: It overwrites a hard drive with 35 passes. It is the safest way here, but it also takes the longest time.
Step 3. You can preview the shrink operation by viewing the "Pending Operations". To commit the "Pending Operations", please click "Apply" and "Proceed".

How to low-level format with Hirens Boot CD
First, you need to download the Hirens boot CD. But please note that the downloaded file is an ISO file, and the ISO file cannot be opened directly on the computer. You need to burn the ISO file to bootable CD/USB (because nowadays computers rarely have CD-ROM, so in this article, I will introduce you to how to burn ISO to bootable USB). After the burning, set the bootable USB as the boot program in the BIOS, so that after restarting the computer, you can enter the Hirens boot CD interface and perform the low-level format. I will explain to you in three parts below.
▶ Part 1. How to create Hirens bootable USB
Step 1. Download the Hirens boot CD(Click the link, scroll down to File name, and click download)
Step 2. Download Rufus, Rufus is a tool for creating bootable USB, with the help of Rufus you can burn ISO to Bootable USB. Then, insert your USB device and run the app. If you encounter the Rufus-related problem like Rufus Windows To Go missing, you can click to get solutions.
Step 3. In the main interface, select FAT32 for the file system. Check the Format Options, then change the option next to Create a bootable disk using ISO Image. Select the little CD icon next to this box and browse to the location of the ISO file in the HBCD folder.
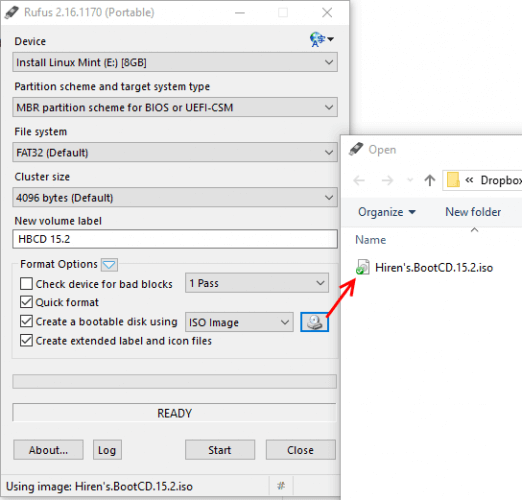
Step 4. Finally, click Start when ready.
Step 57. After that, you've installed HBCD on your USB.
▶ Part 2. The way to set USB as boot drive
In this part, we need to allow the bootable USB to boot the computer. The specific operations are as follows:
Step 1. When the computer shows the startup screen, then press the "Esc" key to enter the BIOS settings. (Some computers may be Delete, F2, or F6)
Step 2. Enter BIOS FEATURES SETUP and set Boot (boot sequence) to USB.

Step 3. After the setting is completed, return to the main BIOS interface, and then select Save and Exit.
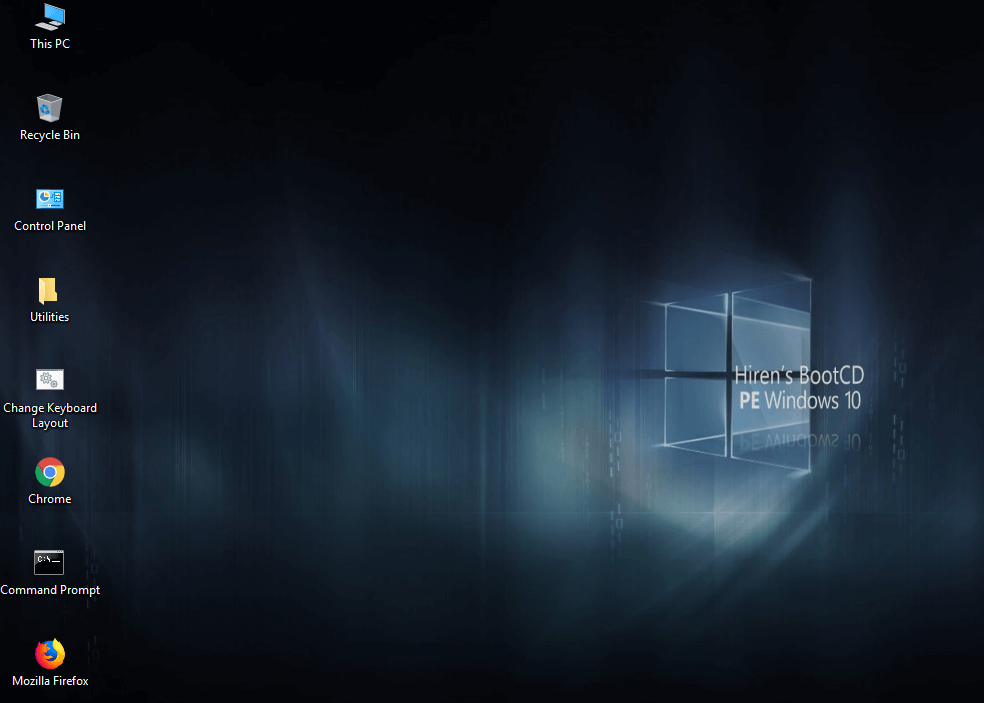
Step 4. Insert the bootable USB created in Part 1 into the USB port. After restarting the computer, you will enter the main interface of Hirens Boot CD.
▶ Part 3. Low-level format with Hirens Boot CD
After completing the above steps, we can perform low-level format on Hirens Boot CD.
Step 1. Open "Utilities" on the desktop, find "Security" in "Hard Disk Tool", and double-click "HDD Low Level Format Tool"
Step 2. Choose the hard drive you want to format. and click “Continue”.

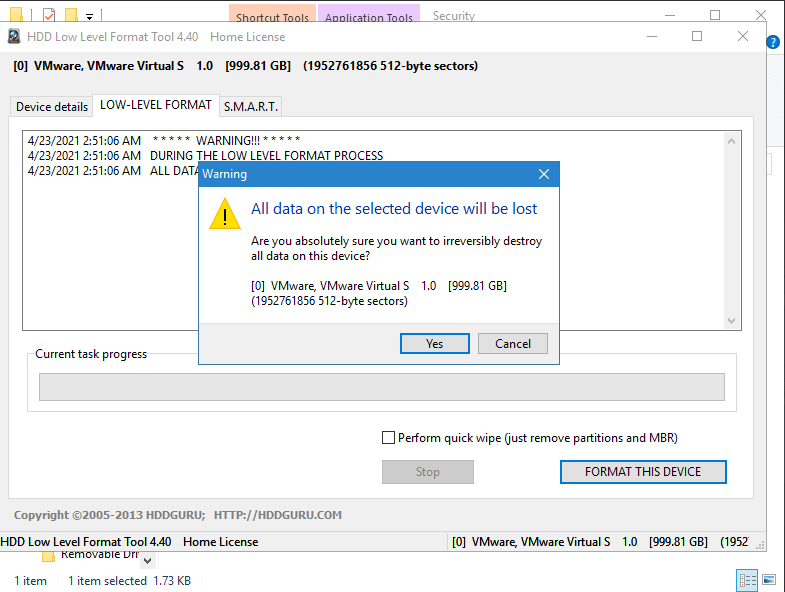
Step 3. In the "LOW-LEVEL FORMAT" option, click "FORMAT THIS DEVICE" in the lower right corner.
Step 4. Confirm the hard disk you want to format again and click "YES".
This is the whole process of using the HDD LOW-LEVEL FORMAT TOOL built-in Hirens Boot CD.
Tip: The above is the whole process of using Hirens Boot CD for low-level format. But do you think it is too troublesome to have to do so much preparatory work to perform low-level format, most users are not professionals after all, and the operation is too cumbersome. I will introduce you to another alternative method below, the effect is the same as using Hirens Boot CD, and the operation is simple and less time-consuming.
Further reading: How to use HDD after low-level format
After low-level formatting, you also need to partition and high-level format the hard drive. Because in simple terms, low-level formatting is to empty the hard disk. The hard disk after the low-level format is blank. You need to partition the hard disk. Use the high-level format to create the Boot area (Boot), File Allocation Table (FAT), and Data storage area (DATA). Only after these treatments, The system can recognize and use the hard disk. Fortunately, the operations mentioned above can be completed by AOMEI Partition Assistant.
The Best Windows Disk Partition Manager and PC Optimizer
▶ How to create partition
● In the main interface, select the target hard disk and choose “Create Partition”.
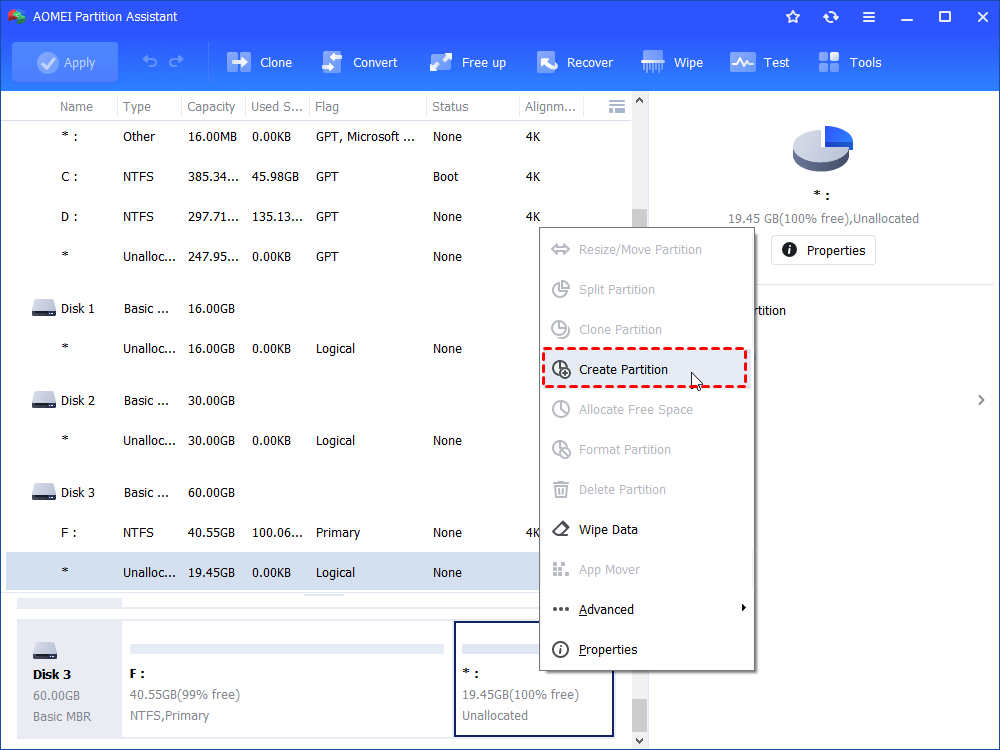
● In the pop-up window, you can decide the size, drive letter, file system (NTFS, FAT, or EXT), partition label as well as partition type (primary or logical) of the new partition. Finally, click “Apply” on the upper left to start the creation of the new partition.
▶ How to high-level format
After creating the partition, you can high-level format the new created partition.
● Right-click on the partition and select “Format Partition”.
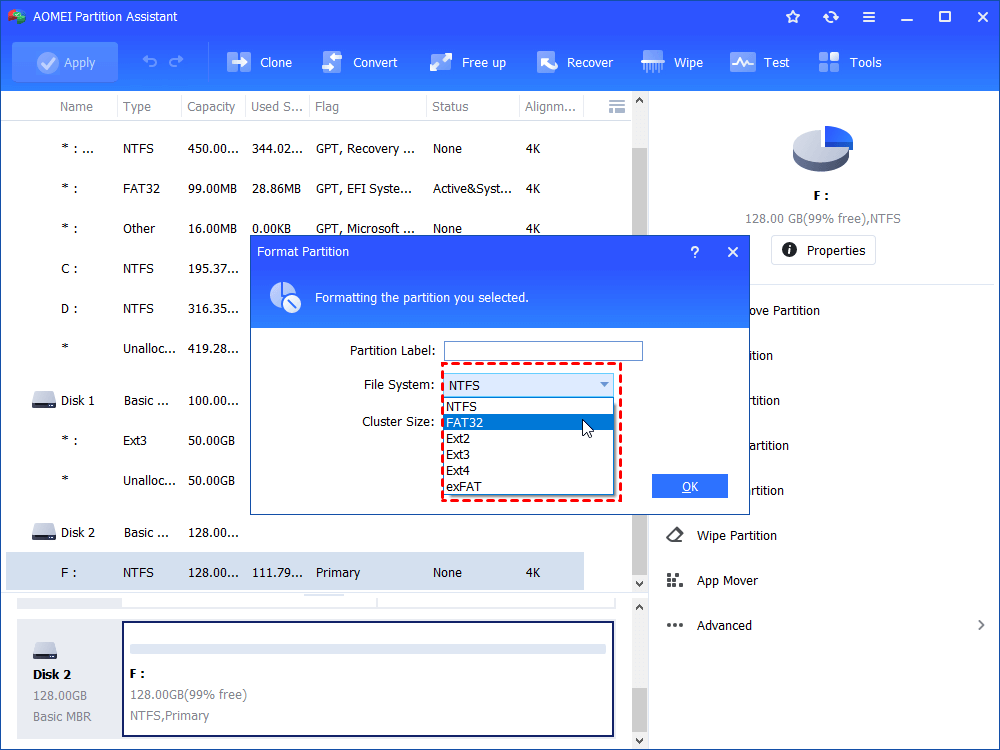
● You can change the Partition Label, File System, and Cluster Size. Click “OK”. Finally, click “Apply”. Now, your hard disk can be used normally.
Conclusion
In summary, I believe you have a clear understanding of how to use Hirens Boot CD in low-level format. In addition to using the built-in tools of Hirens Boot CD, the AOMEI Partition Assistant I introduced for you can help you complete the low-level format more quickly and conveniently. I sincerely hope that this article will help you.
The Best Windows Disk Partition Manager and PC Optimizer

