How to Fix 100% Disk Usage on Windows 10? 5 Easy Ways Are Here
How to fix 100% Disk Usage on Windows 10? Here are 5 easy ways for fixing Windows 10 100% Disk Usage problems.
By Irene / Updated on June 12, 2024
Overview of Disk Usage
Disk Usage (DU), signifies the part or percentage of your computer's storage that is currently in operation. It's necessary to differentiate between Windows 10 disk usage and disk storage space, which is a common point of confusion for users. Disk usage refers to the portion of the disk engaged by the system. For instance, a portion of the disk might be allocated for running an application or managing read/write tasks. Disk Storage refers to the quantity of information that the disk can hold.
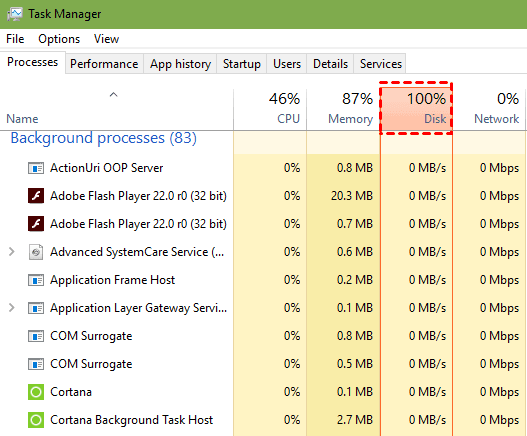
When Disk Usage reaches 100%, your computer may experience performance problems. Lag becomes apparent. Your computer runs slowly all of a sudden, and tasks such as launching Windows PowerShell and executing commands within it might take significantly longer. Disk usage could rapidly jump from a minimal 0-1% to a substantial 50-100% or even higher, involving just 0.1 megabytes of usage spread across various programs. If you encounter this issue, how to fix that?
How to fix 100% Disk Usage on Windows 10?
Firstly, let’s explore some possible reasons, the 100% disk usage problem on Windows 10 can stem from various sources. These include antivirus software, system glitches, excessive virtual memory usage, and commonplace combinations like Skype alongside Google Chrome. And, hard drive errors could be contributing factors.
However, take comfort in the fact that sometimes, nothing is fundamentally amiss with your computer – apart from minor configuration settings. Now, try the 5 methods to fix 100% Disk Usage on Windows 10.
Method 1. Reconfigure settings in Google Chrome and Skype
If you often use Skype and Google Chrome together and notice your Windows 10 reaching 100% usage, try changing settings for both Skype and Google Chrome. This could help fix the issue.
▌1. Google Chrome
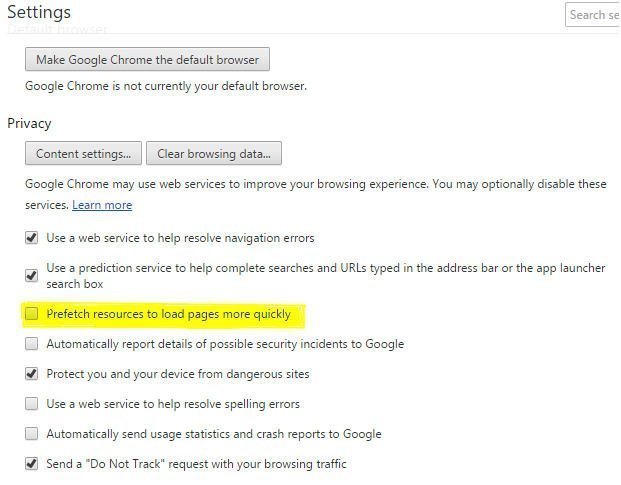
In Google Chrome, go to Settings >Show Advanced Settings... > Privacy > Prefetch resources to load pages more quickly, and untick it. Like the following screenshot:
Step 1. Click on Settings and choose "Show Advanced Settings..."
Step 2. Then go to Privacy section.
Step 3. Find "Prefetch resources to load pages more quickly" and uncheck it like the example in the screenshot below:
▌2. Skype
Step 1. Make sure you have exited Skype and it is not running in the Taskbar, if it is running in the Taskbar, quit it.
Step 2. Now, launch Windows Explorer, and access the directory: "C:\Program Files (x86)\Skype\Phone" (without quotes). Right-click on the "Skype.exe" file, then select "Properties." Open the "Security" tab and click on "Edit."
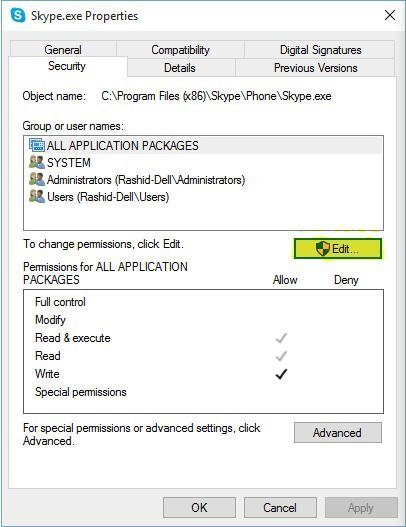
Step 3. Then, Highlight “ALL APPLICATION PAKAGES” and place a tick in the “Write” box. Click Apply and then click OK.

Step 4. After the procedure, run Skype and check the Disk Usage in Task Manager, it will not show you 100% disk usage on Windows 10 Task Manager.
Method 2. Temporarily disable Antivirus software
Once encounter a 100% disk usage indication in the Windows Task Manager, it becomes crucial to examine the existence of antivirus or anti-malware applications such as Norton, Kaspersky, AVG, Avast Behavior Shield, Malwarebytes, and similar software. Should these tools be present, it is recommended to consult their user guides and proceed by temporarily disabling them.
Method 3. Reset Virtual Memory
Virtual memory forms a section of your hard drive and operates as an expansion of your real computer memory. It serves as an extra component that might add to the problem of your disk usage reaching full capacity. Address this concern by following the subsequent series of steps.
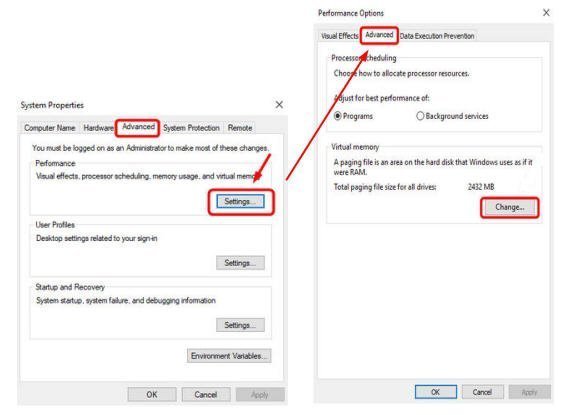
Step 1. Click on Control Panel, then go to System and Security, and finally choose System. Pick Advanced system settings from there.

Step 2. In the window that pops up, click on Advanced, and then choose Settings. After that, in the second pop-up window, navigate to the Advanced tab, and pick Change in the Virtual memory section.
Step 3. First, check that the box for "Automatically manage paging file size for all drives" is not marked. Next, pick the drive where Windows 10 is and put in a starting size and biggest size for the virtual memory. After that, hit the Set button and then OK.
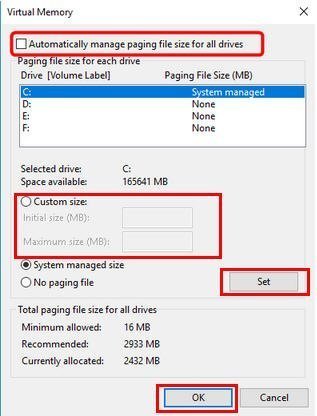
- Note:
- Initial size: This value varies, depending on your computer. If you’re not sure what value to use, just enter whatever the number is in the Recommended category.
- Maximum size: Don’t set this value too high. It should be about 1.5 times the size of your physical RAM. e.g. A PC with 4 GB (4096 MB) of RAM should have no more than about 6,144 MB virtual memory (4096 MB x 1.5).
Step 4. Next, get rid of all the temporary files on your computer: Press the “Win + R” together, type in “temp”, and press Enter. This will open up the Temp folder in Windows Explorer. Choose all the files in the Temp folder and remove them.
Method 4. Check your disk
100% Disk Usage in Windows 10 could also stem from potential hard disk issues. Therefore, it is better to perform a disk examination. You can accomplish this task by employing the built-in Windows CHKDSK utility or by opting for the third-party solution AOMEI Partition Assistant Standard. It streamlines the process, making it a user-friendly experience with just a few clicks.
This software helps you customize checks for various types of partitions and disks, which can meet your different needs. It's clean without any bundled software. Here we will share two methods for disk checking, and you can download and try it out by following the guidance.
▌Opt 1. Check Partition
Step 1. Install and launch the software. Right-click the target partition you want to check, and click Advanced > Check Partition in turn.
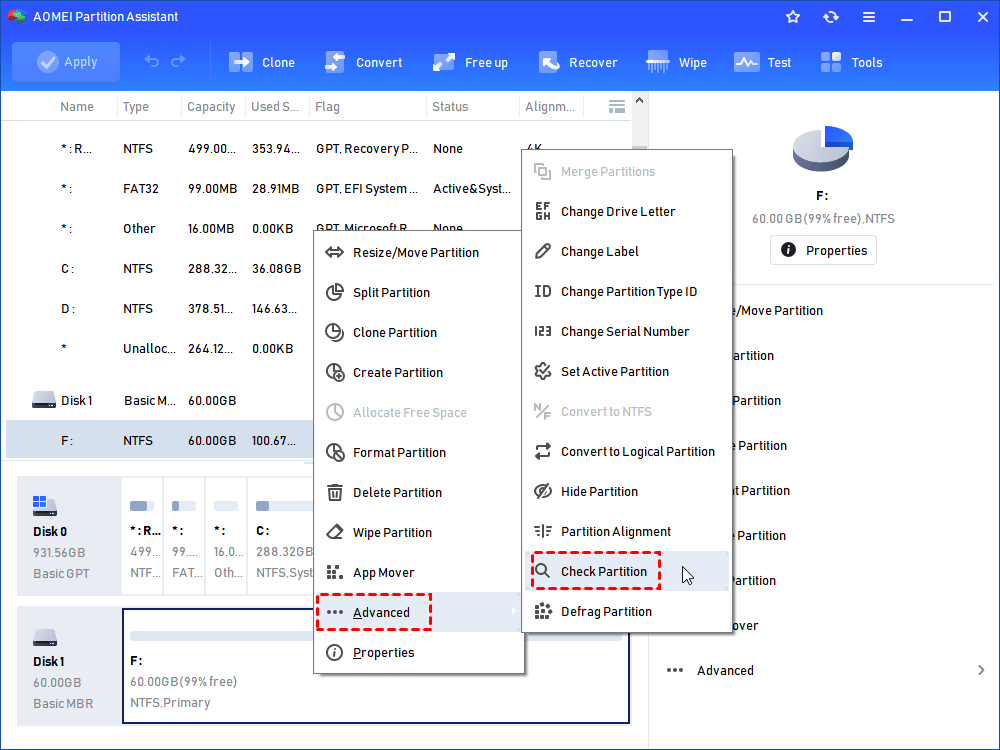
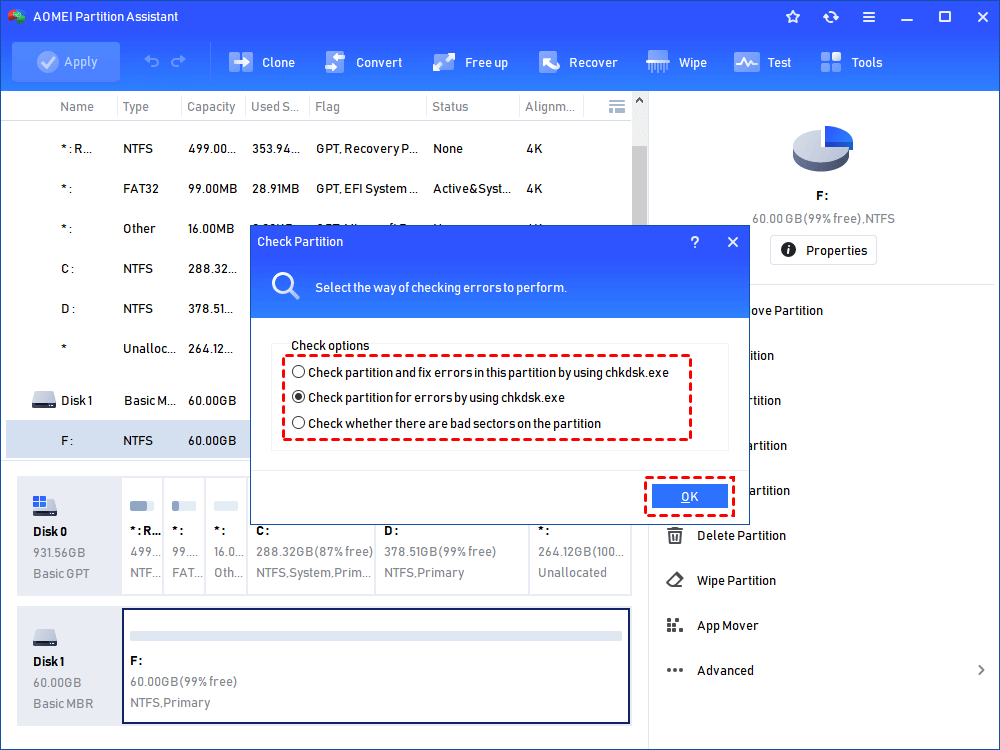
Step 2. Choose a way for partition checking and fixing errors here. Hit OK to back to the main interface and choose Apply in the toolbar.
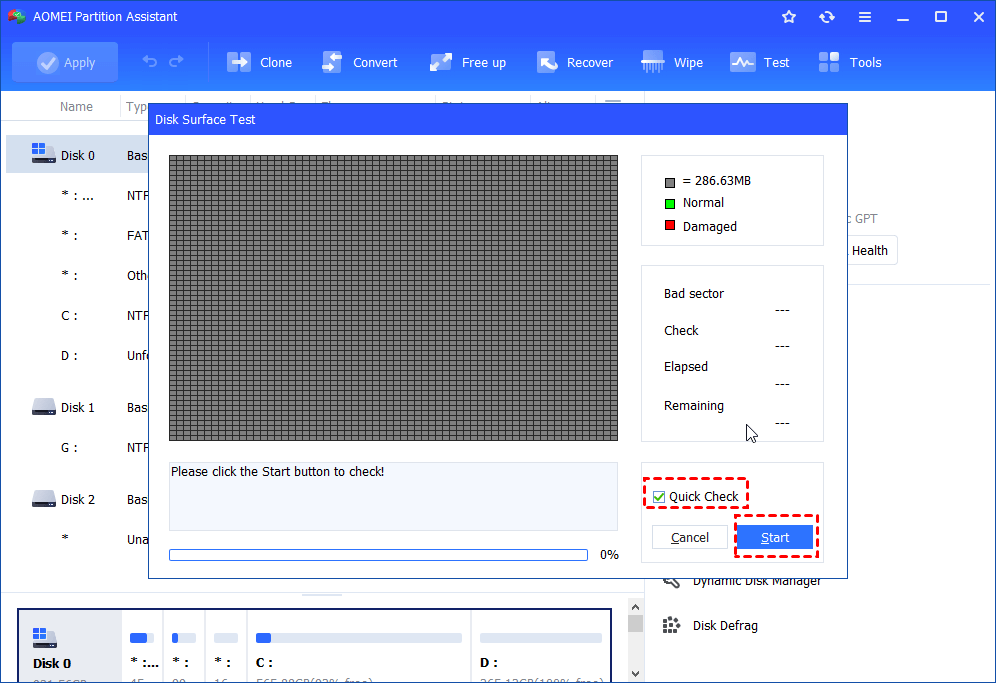
▌Opt 2. Run Disk Check
Step 1. Click the hard disk, select Test > Disk Surface Test.

Step 2. It will show you the Disk Surface Test window, click Start to launch the progress.
Method 5. Upgrade your disk to a bigger one
If you find the all of the provided methods cannot effectively fix this issue, may be the problem happens in your hard drive space. It is time to consider upgrading to a larger HDD or SSD.
A convenient solution is provided by AOMEI Partition Assistant Professional, which facilitates the cloning of your existing hard drive onto a larger one. This eliminates the necessity of reinstalling all your applications, software, and even the operating system following the disk replacement. Beyond this capability, this versatile software offers additional functions like partition cloning and hard disk erasure.
Note
✍ If you want to clone MBR system disk to GPT, or vice versa, you should enter BIOS to change the boot mode.
Step 1. Install and launch AOMEI Partition Assistant, click "Clone" in the main interface and select "Clone Disk".

Step 2. Choose the hard disk that you need to clone as the source disk and click "Next".

Step 3. Select the destination disk to store the data on the source disk, and then click "Next".

Step 4. Then, you can check the source and destination disk in the next window or change to “Sector to Sector clone”, and click the "Confirm" button to continue if there is no problem.

Here, you can also click the "Settings" button to adjust the partition size on the destination disk or tick "4k alignment" to improve the reading and writing speed of SSD if the target disk is an SSD drive.

Step 5. At last, click "Apply" and "Proceed" in the main interface to start cloning the hard drive.

To sum up
How to fix 100% Disk Usage on Windows 10? This passage recommend 5 common ways. With AOMEI Partition Assistant, you can easily do these on your own. If you do not know how to do that, just visit the official website, and you can get clear guidance. If you are Windows Server users, you can also choose the Server Edition.

