How to Install Windows 11 – Easiest Guide for Beginners
Since Windows 11 will be released soon, many computer owners are wondering how to install Windows 11 at that time. Windows 11 will bring us so many attractive new features and in this tutorial, I’ll explain how to install this OS on your PC in a correct way.
By AOMEI / Updated on May 12, 2023
How can I install Windows 11 on my PC?
Hi mates, I think you’ve heard Windows 11 is coming out. I’m so excited and can’t wait to check all those new features. However, I’m a beginner in computer knowledge and I still have no idea how to install Windows 11 on my old PC. I have never done it before. Can anybody give any suggestions?
What’s new about Windows 11?
Windows 11 is coming soon and what changes will it bring compared with Windows 10? It has been long rumored that the UI is currently being redesigned. Alongside with the new UI, there is also the implementation of rounded corners coming up which removes the sharp edges across the whole of the user interface and brings a softer appearance to Windows 11. Meanwhile, it has also been reported that Microsoft will be including battery usage statistics to the Settings app similar to them in smartphones and taskbar and the File Explorer process usually seen in Task Manager looks to be separated finally.
How to install Windows 11 from USB?
Since Windows 11 has so many impressive new features, you can’t wait to try it on your own? But how to install Win 11 correctly? There’re to many tutorials on doing it but as a beginner, you can’t understand those cumbersome steps very well. So, in the following contents, I’ll walk you through every step and use the most explicit words to explain how to get it done.
In the past, users prefer to install Windows with CDs while nowadays, as many laptops contain no CD drives, people tend to use a USB flash drive for the Windows installation. Compared with CD, USB is more portable and secure for data storage because USB won’t be damaged due to scratches. This time, let’s learn how to install Windows 11 for free by using a USB installation media.
Please note that Windows 11 only supports UEFI boot mode, which means that your system disk must be a GPT disk. If it is MBR, you need to convert MBR to GPT.
Step 1. Create a Windows 11 USB installation media
If you’ve created a USB installation media earlier, you can skip to Step 3 directly. Otherwise, you must create one by using Microsoft media creation tool.
1. Download the media creation tool from the Microsoft’s official website and run it as administrator.
2. Hit “Accept” after going through applicable notices and license terms.
3. Tick “Create installation media” and hit “Next”.
4. Preset language, edition, and architecture. After finished, click on “Next”.
5. Tick “USB flash drive” and hit “Next”.
Note: Your USB drive should be no less than 8GB to ensure a successful installation.
6. Select your USB drive under “Removable drives” and hit “Next”.
Note: Attention, all data on the USB flash drive will be lost in the course of the creation, so, please make a backup first if there is important data.
7. When it’s done, Windows 11 will be transferred to the USB device and now, the installation media is created.
Step 2. Boot the PC from the USB installation media
Since we already have a bootable USB for Windows 11 installation, what to do next?
1. Power off your computer and insert the USB stick.
2. Boot the computer and keep hit the BIOS key (F2, Del, or F12 depending on the manufacturer) until the BIOS screen pops up.
3. In the BIOS window, navigate to Windows Boot Manager and set the USB device as the first boot device.
4. Save the settings and quit BIOS. Then, your computer will boot from the installation USB.
Step 3. Start installing Windows 11 from the bootable USB
Now, we’ve come to the final part – how to install Windows 11 on your computer?
1. You’ll boot into Windows Setup screen where you’re supposed to select language, time and currency format, and keyboard or input method. After finished, hit “Next” to go ahead.
2. Hit “Install Now”.
3. To activate Windows 11, you should have a product key otherwise, just hit “I don’t have a product key” and you can still finish the installation and boot into your system. However, some features will be limited.
4. Select the Windows 11 edition you want from the list.
5. Tick “I accept the license terms” and hit “Next”.
6. Select the custom installation.
7. Select the drive where you’d like to install Windows 11.
8. Now, the Windows 11 installation has started. Just wait until it’s completed.
9. When it’s done, your computer will be rebooted again.
10. Once Windows 11 reboot, press and hold the BIOS key F2, Del, F10, or F12, (depending on who is the manufacturer) immediately to enter the BIOS screen. Then, select the drive where you installed Windows 11 as the first boot drive.
11. After Windows 11 reboot, you will be prompted to select a region and then, hit “Yes”. In the next window, select a keyboard layout and hit “Yes”.
12. Finally, follow the onscreen guide to finish what’s left and then, set up an account to log into Windows 11. Pay attention that both Microsoft or a local offline account is allowed.
Wait several seconds and Windows 11 will get all things ready and log you onto the desktop automatically.
How to partition hard drive on Windows 11
After successfully installing Windows 11 on your computer by following the guide above, you may find there is only one drive, namely the C drive, on the hard drive and in this case, if you don’t make any changes, everything will be installed to the C drive and over time, the C drive full issue could occur which causes many problems including constant system crashes and black screen.
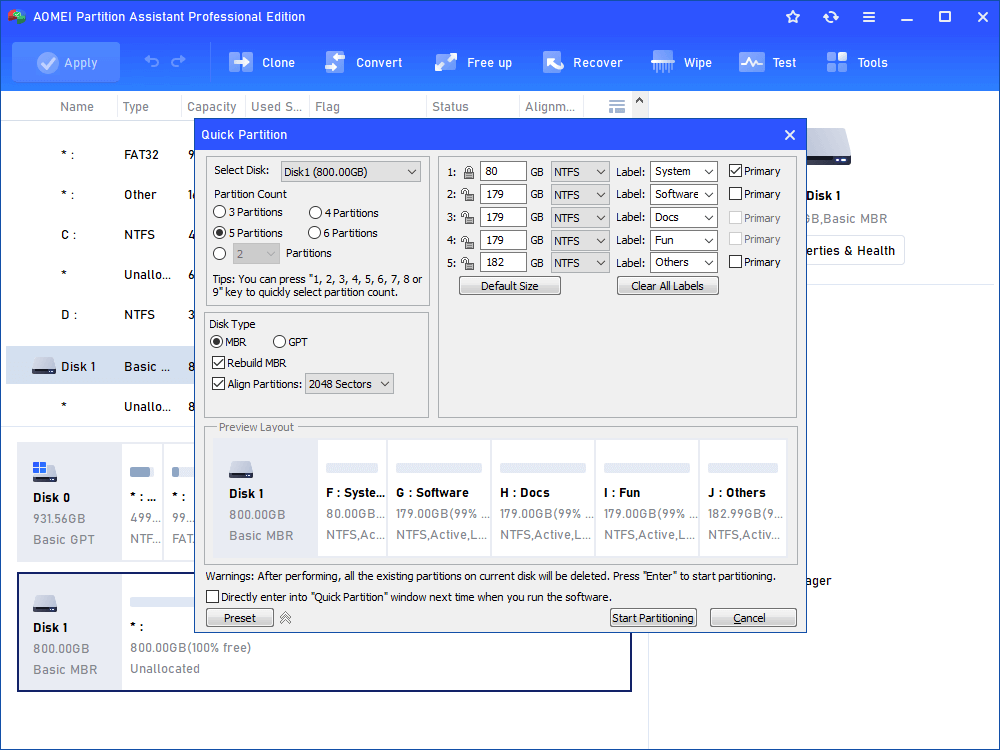
So, how to create more partitions for your machine? Of course, you can resort to Windows inbuilt free utility Disk Management to shrink a volume, create unallocated space, and use the unallocated space to create a new volume. However, there’s also a simpler way by using AOMEI Partition Assistant Professional. Instead of create partitions one by one, with this powerful software, you’re able to create several partitions at once with the “Quick Partition” feature.
Step 1. Install and launch AOMEI Partition Assistant Professional and wait until you see all the disk info appear.
Step 2. Select the disk you want to partition and right-click on it. Select “Quick Partition”.
Step 3. Here, in the popup window, you can preset the partition count and file system.
Step 4. After finished, hit “Start Partitioning” to launch the partition process.
It only takes several seconds before it’s completed. If you only hope to create one partition every time, you can try “split partition” to directly create one partition from an existing partition.
Conclusion
Windows 11 is coming, bringing plenty of brand-new features and you can’t wait to have a try. So, in this tutorial, I explained how to install Windows 11 for free. I divided the contents into 2 parts. In the first part, I gave the detailed steps on how to do it while in the second part, I introduced another third-party software AOMEI Partition Assistant Professional and explained how to partition the hard drive after the installation of Windows 11.

