Steps of Upgrading & Installing Windows 11 on Unsupported Hardware PC
In this post, we’ll show you steps of installing Windows 11 on unsupported hardware PC and how to upgrade it. If you need Windows 11 but your PC doesn’t support, then this guide will help you a lot.
By Lucas / Updated on May 12, 2023
We are all aware that Windows 11 is not compatible with all PC hardware combinations. Microsoft has changed the criteria for installing Windows operating systems, such as making Secure Boot and TPM 2.0 necessary. No one will accept liability for any harm to your device or data. This is why Microsoft does not advise installing Windows 11 on incompatible hardware.
Can I install Windows 11 on unsupported hardware?
However, the truth is that numerous users may need Windows 11 for daily work or study but not all of them whose PC can satisfy the strict system requirements of Windows 11.
Therefore, Microsoft allows users to use a bootable USB flash drive or ISO file to manually perform a clean install or in-place upgrade.
However, anybody can update at their own risk, understanding that system stability and driver compatibility are not guaranteed.
In other words, if you opt to install Windows 11 on unsuitable hardware, you may proceed with the setup manually. You must, however, certify that the update will be in an "unsupported status." An "unsupported state" is defined by Microsoft as a device that does not match the minimum system requirements and, as a result, is not eligible for Windows Update upgrades. Although these devices may still receive updates, the manufacturer is not required to offer security and driver upgrades, as well as technical assistance.
So in this post, we will show you how to install Windows 11 on unsupported hardware, but we suggest you’d better not keep important data on your Windows 11 for the safety of your data and devices.
How to install Windows 11 on unsupported hardware
Installing Windows 11 on unsupported hardware via USB
To begin the setup procedure with a USB flash drive after using the ISO file to complete a clean installation, you will need to generate a bootable media through Command Prompt. You must also ensure that the device can be started through USB, which requires changing the UEFI settings. Because most computers have different settings, you should see your manufacturer's support page for more precise information.
Stage 1. Download Windows 11 ISO files
To do a clean Windows 11 installation, please download Windows 11 ISO from Microsoft web.
Stage 2. Create Windows 11 bootable USB via CMD
Section 1. Delete data on your USB
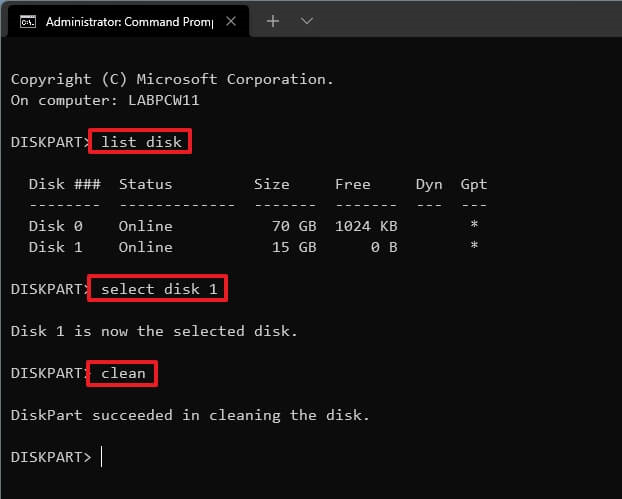
Step 1. Type “diskpart”, press “Enter”.
Step 2. Type “list disk”, press “Enter”.
Step 3. Type “select disk 1” (You need to change“1” to the number of your USB), press “Enter”.
Step 4. Type “clean”, press “Enter”.
Section 2. Create a primary partition
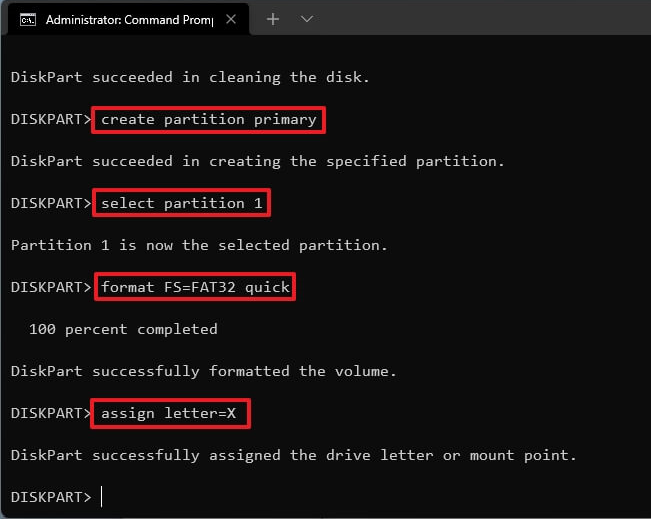
Step 1. Type “create partition primary”, hit “Enter”.
Step 2. Type “select partition 1”, hit “Enter”.
Step 3. Type “format FS=FAT32 quick”, hit “Enter”.
Step 4. Type “assign letter=X” (“X” is the letter of the partition, change it to the letter you wish to use.), hit “Enter”.
Step 5. Type “exit” and hit “Enter” to quit the tool.
Section 3. Move ISO files to USB
Step 1. Open CMD again, type “PowerShell Mount-DiskImage -ImagePath "C:\path\to\Windows11.iso"(make sure the path is right), press “Enter”.
Step 2. Type “diskpart”, press “Enter”.
Step 3. Type “list volume”, press “Enter”.
Step 4. Type “exit” to exit Diskpart, press “Enter”.
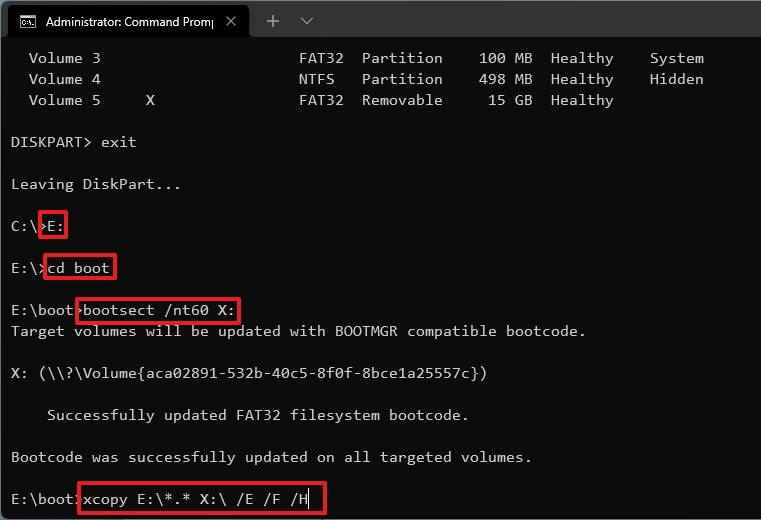
Step 5. Type “E:” to access ISO files, press “Enter”.
Step 6. Type “cd boot”, press “Enter”.
Step 7. Type “bootsect /nt60 X:”, press “Enter”.
Step 8. Type “xcopy E:\*.* X:\ /E /F /H”(change E and X to the drives with Windows 11 ISO image and your USB.)
Stage 3. Bypass TPM and SecureBoot check
Plug the USB into your PC, and press any key to continue. Use the Shift + F10 keyboard shortcut to open Command Prompt. Type regedit and press Enter.
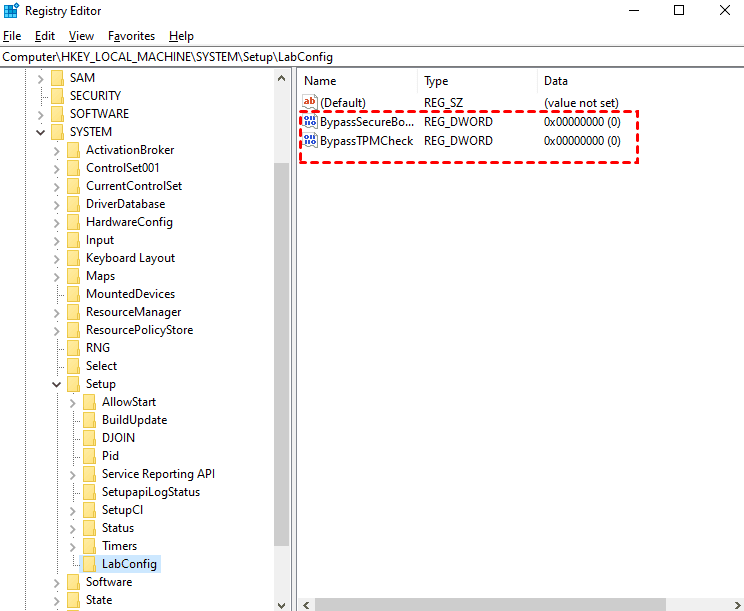
Step 1. Navigate the following path: HKEY_LOCAL_MACHINE\SYSTEM\Setup
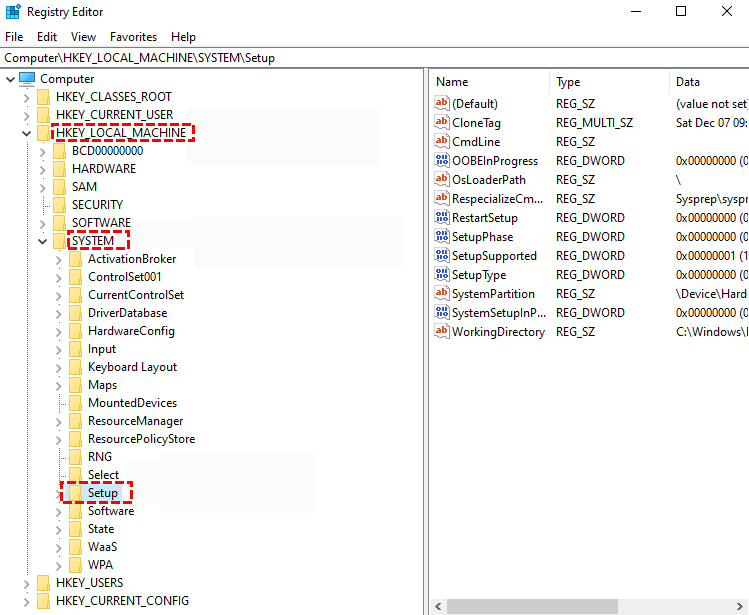
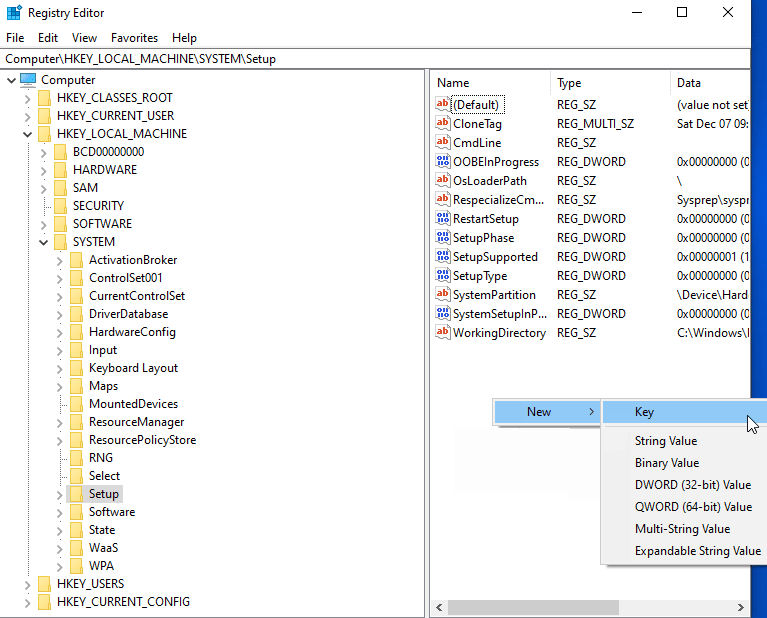
Step 2. Right-click on the right, and select “New” > “Key” to add a new registry key on the left side of the editor. Please name it “LabConfig”.
Step 3. Under the “LabConfig” key, right-click to create two “DWORD (32-bit) Value” options to create a new DWORD value.
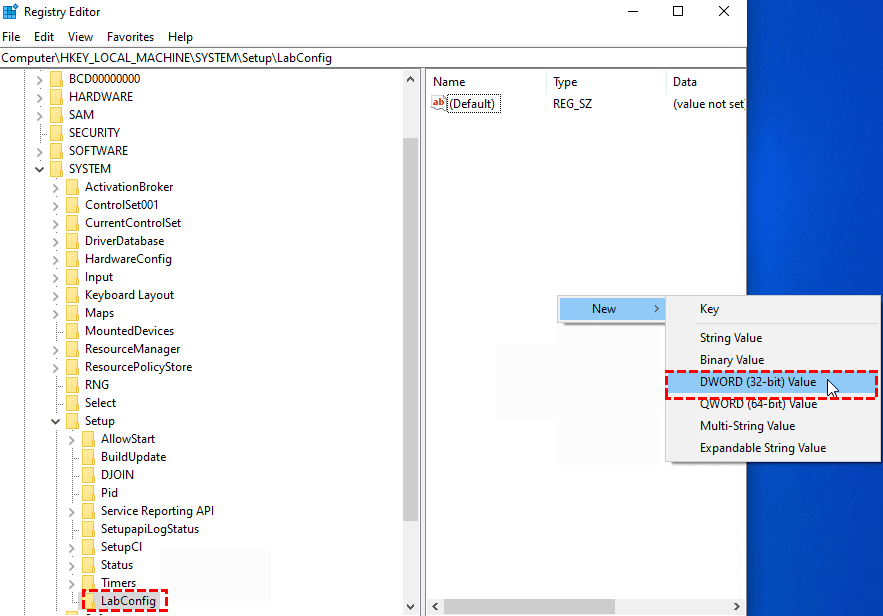
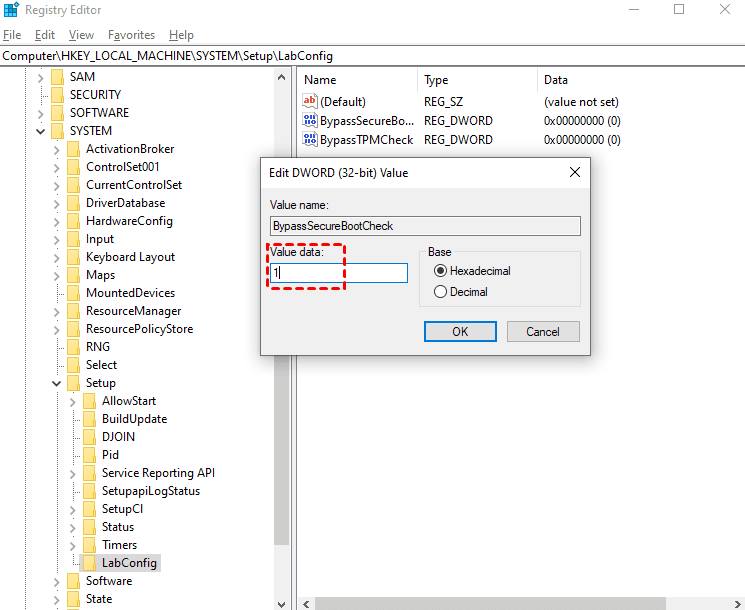
Step 4. Name them as “BypassTPMCheck” and “BypassSecureBootCheck”, then click these two each twice, changing the “Value data” from “0” to “1”.
Stage 4. Install Windows 11
Then you’ll back to the Windows Setup window, please follow the order to finish the settings.
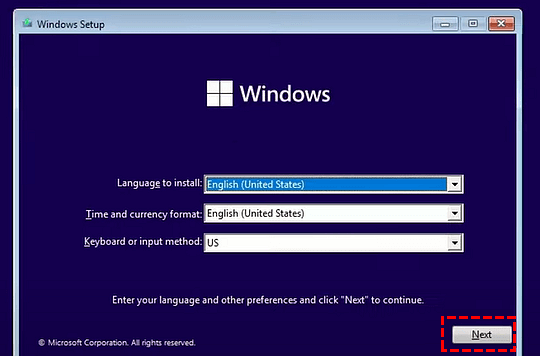
Step 1. Click “Install now”.
Step 2. Choose “I don’t have a product key”.
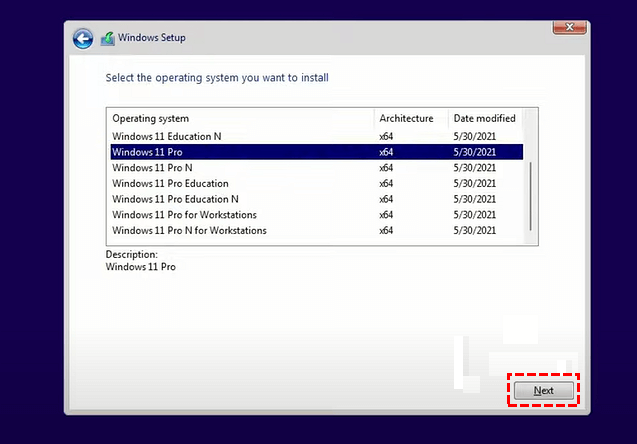
Step 3. Choose an OS edition you wish to install and click “Next”.
Step 4. Accept the License Term and click “Next”, click “Custom: Install Windows only (advanced)” in the next window.

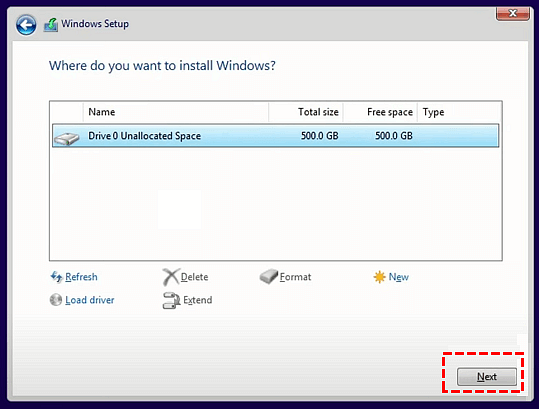
Step 5. Choose the target disk you wish to install Windows 11 OS, then click “Next”.
Step 6. Please wait for the process and your PC will reboot.
Then you can continue the settings according to your needs and situation.
Upgrade to Windows 11 from Registry
You can also bypass the check by changing Registry settings and upgrading to Windows 11. But your computer needs a TPM 1.2 chip, and UEFI firmware with Secure Boot enabled. And this method may not work absolutely. Make sure you have a system backup.
Stage 1. Edit Registry to bypass official checks
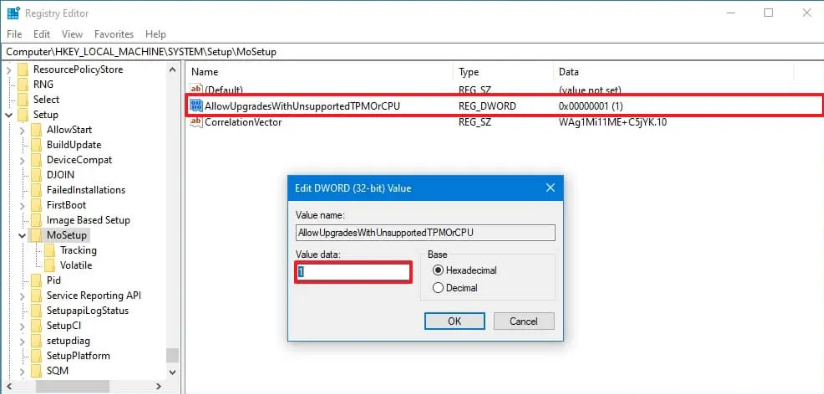
Step 1. Open Start. Search for regedit and click the top result to open the Registry Editor. Navigate to the path: HKEY_LOCAL_MACHINE\SYSTEM\Setup\MoSetup
Step 2. Right-click the MoSetup (folder) key, select the New submenu and choose the DWORD (32-bit) Value option.
Step 3. Name the key AllowUpgradesWithUnsupportedTPMOrCPU and press Enter.
Step 4. Double-click the newly created key and set its value from 0 to 1.
Once you complete the steps, we can upgrade to Windows 11.
Stage 2. Upgrade to Windows 11 using the ISO file
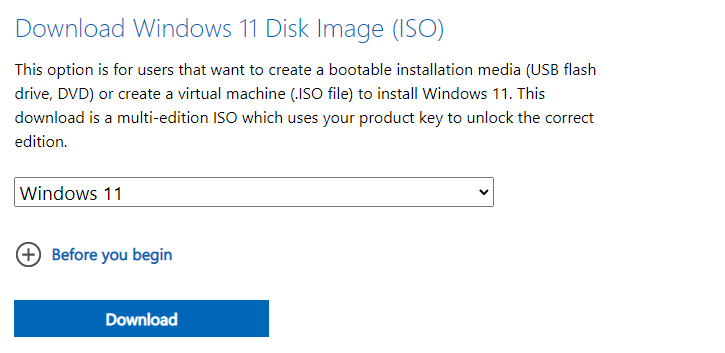
Step 1. Open the Microsoft Support website. Under the “Download Windows 11 Disk Image (ISO)” section, select the Windows 11 option. Click the Download button.
Step 2. Select the installation language. Click the Confirm button. Click the Download button to save the Windows 11 ISO file on the device.
Step 3. Right-click the ISO file, select the Open with submenu and choose the Windows Explorer option. Click on the mounted drive from the left navigation pane.
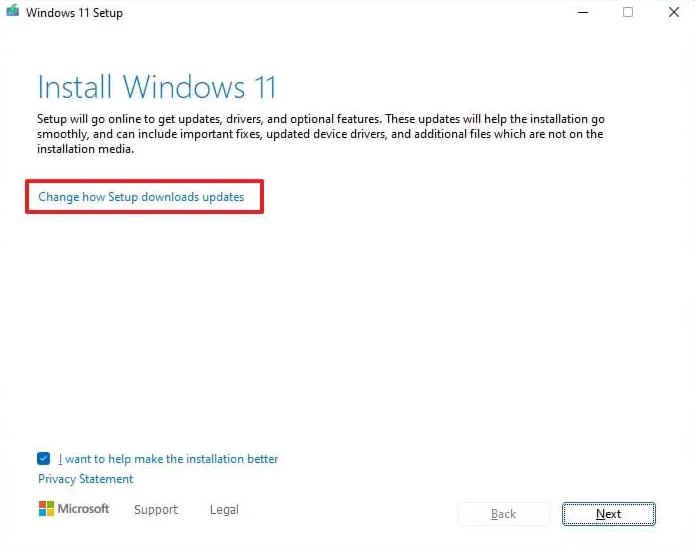
Step 4. Double-click the Setup file to begin the Windows 11 upgrade process. Click the “Change how Windows Setup downloads updates” option.
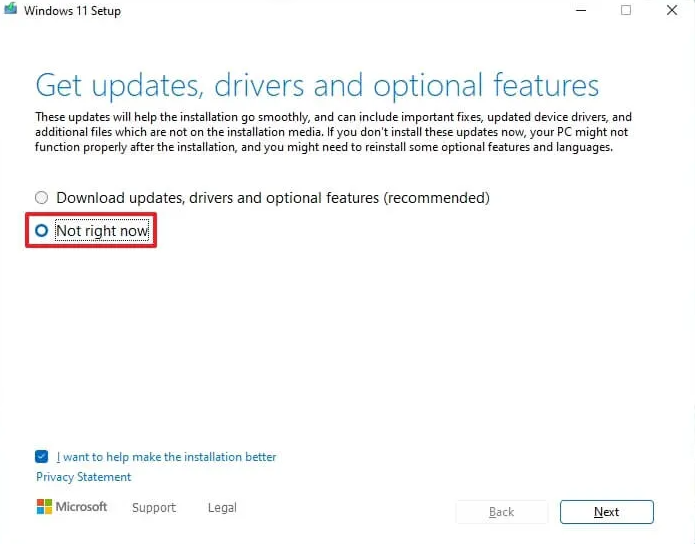
Step 5. Select the “Not right now” option, and click the Next button.
Step 6. Click the Install button to upgrade while keeping files and apps.
After you complete the steps, the setup will continue to upgrade the laptop or desktop computer to the Windows 11 update.
An easier & safer way to run Windows 11 on unsupported hardware
As you can see, no matter which method you choose between the above options, your PC and data are in danger of unpredictable failure of installation or upgrading. After all, both methods can’t guarantee system stability, and both will put your devices at risk.
However, there’s always another way to reach your goal. Although Windows 11 cancels the Win to go function, a handy tool can help you create a Windows 11 to go drive for running Windows 11 on unsupported PC.
AOMEI Partition Assistant Professional is a disk and partition manager for Windows 11/10/8/8.1/7/XP. It has a “Windows To Go Creator” function with which you can make a portable drive with a dependent Windows OS. After your run this drive on the target PC, it’s like a normal system, you can upgrade it like a common Windows OS. With this drive, you can run your own Windows 11 on any other PC, even Mac PC.
Step 1. Connect a USB drive larger than 13GB and download Windows 11 ISO file on your current computer.
Step 2. Install and launch AOMEI Partition Assistant Professional. Then click "Tools" > "Windows To Go Creator".

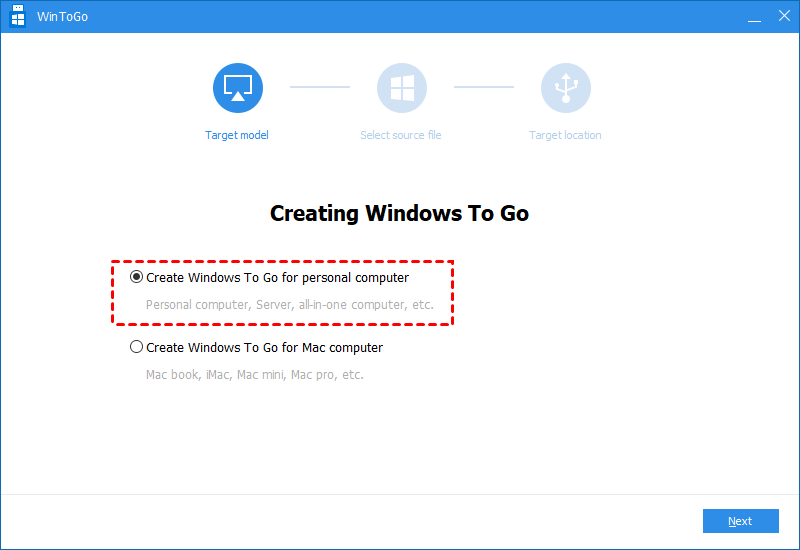
Step 3. Choose "Create Windows To Go for personal computer" and click "Next". If you want to boot Windows from USB on Mac, just tick the second option.
Step 4. Choose the first option and click the folder icon to select Windows 11 ISO file you downloaded before manually. After that, click "Next" to continue.

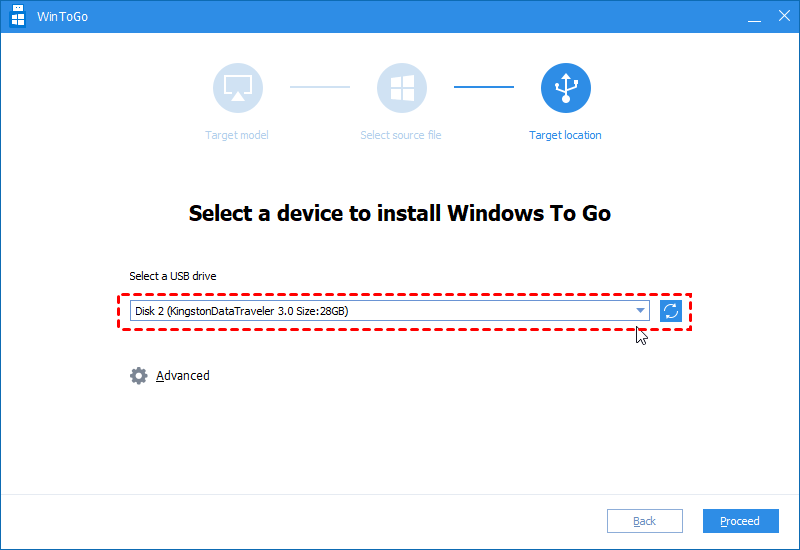
Step 5. Select the prepared USB drive as your target drive and click "Proceed".
Step 6. Read the warning about all data will be erased carefully, and then click "Yes" to start creating.

After that, any time when you need to use Windows 11, you can boot the computer from this Windows 11 To Go device.
To sum up
It’s risky to install Windows 11 on unsupported hardware, but you can use AOMEI Partition Assistant to install Windows 11 on unsupported CPU, or even on an old PC. The operation is also easy for all users. There’s no complex step. And as an all-around disk tool, users can also clone disk, convert to MBR/GPT without data loss, move installed apps and large folders to another location, allocate free space, and so on.
What’s more, it has the Server Edition for Windows Server users to support Windows Server 2025/2022/2019/2016/2012(R2)/2008(R2)/2003.

