Easily Resize Your exFAT Partition Without Data Lose
You may find that exFAT partition can not be resize directly, and don’t know how to resize it. Go through this article and find the solution.
By AOMEI / Updated on June 6, 2025
Scenario: I want to shrink the existing exFAT partition and then create a new smaller partition, but for some reason, I cannot resize the exFAT partition, and the extend/shrink volume is grayed out.
Brief description of exFAT partition
exFAT(Extended File Allocation Table) is a Microsoft file system introduced in 2006, optimized for flash memory such as USB flash drives and SD cards. A file system provides a way of organizing a drive. It specifies how data is stored on the drive and what types of information can be attached to files—filenames, permissions, and other attributes. Windows supports three different kinds of file systems. NTFS is the most modern file system. Windows uses NTFS as its system driver and by default for most non-removable drives. FAT32 is an older file system that’s not as efficient as NTFS and doesn’t support as big a feature set, but it offers greater compatibility with other operating systems. exFAT is a modern replacement for FAT32, and more devices and operating systems support it rather than NTFS, but it’s not as popular as FAT32. exFAT supports very large files and storage devices, it adds support for improved performance, and also future innovative extensibility support for flash media. exFAT is also supported in a number of media devices such as modern flat-panel TVs, media centers, and portable media players.
Why extend/shrink volume grayed out?
Many people have encountered this situation: When trying to use Windows Disk Management to resize your partition, the extend/shrink volume sometimes grayed out. Why? The common reasons may be as follows:
A: The target partition is a FAT/exFAT partition; the Windows Disk Management extend/shrink volume does not support FAT16, FAT32, exFAT partitions; it only works on NTFS partitions.
B: There’s no contiguous unallocated space behind the partition you want to extend, or no continuous free space behind the logical drive you want to extend.
C: The disk fragment causes you to be unable to shrink the partition.
How to Resize exFAT Partition?
Thus, if your target partition is formatted as exFAT, you cannot extend or shrink it directly using Windows' built-in tools. In this case, your only option is to:
-
Back up the files to another location
-
Resize an exFAT partition via NTFS conversion
-
Restore the files to the partition
This workaround allows you to resize an exFAT partition using Windows Disk Management. However, the process can be troublesome. For instance, if there are unmovable files or data located at the end of the partition, you won’t be able to shrink it, even if there is sufficient free space.
Fortunately, there's a more effective alternative to Disk Management: AOMEI Partition Assistant. This free and powerful tool offers greater flexibility in managing your disks. It supports almost all Windows operating systems, including Windows 11/10/8.1/8/7, and allows you to resize partitions easily and efficiently.
Stage 1. Back Up the Files to Another Location
Before making any changes, copy all files from the exFAT partition to another safe storage device, such as an external hard drive, cloud storage, or another partition. This ensures your data won’t be lost during formatting. Alternatively, you can use AOMEI Partition Assistant to copy an exFAT partition to another drive with a few clicks. Then follow the specific steps below.
Stage 2. Resize an exFAT Partition via NTFS Conversion
➤ Format the partition from exFAT to NTFS
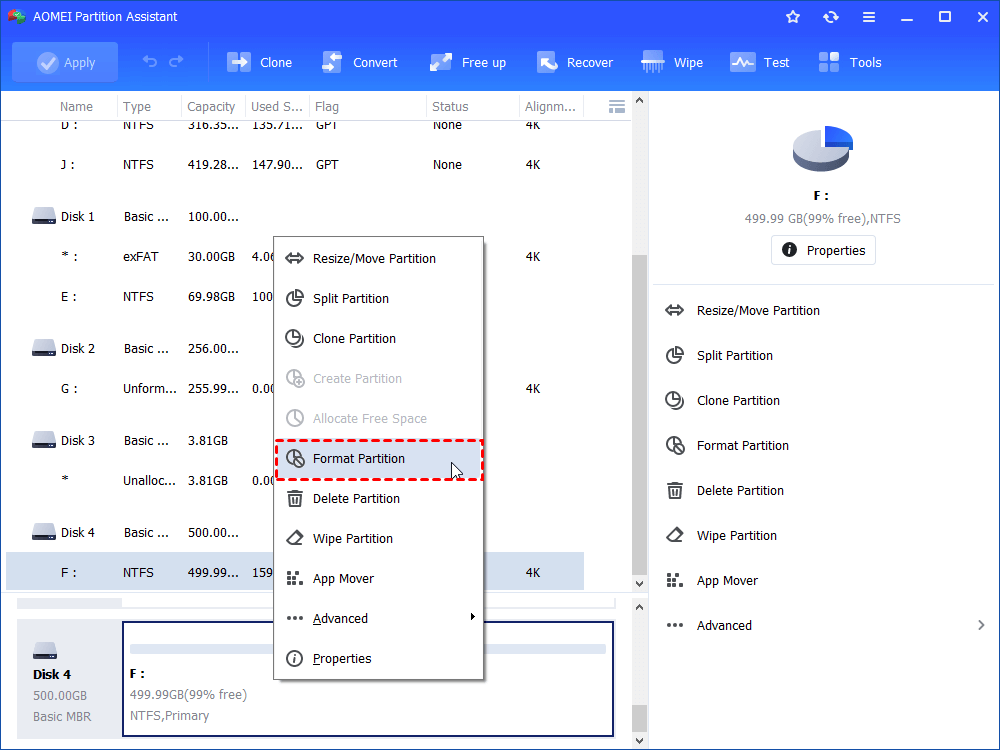
Step 1. Download and run AOMEI Partition Assistant. Your partition information will be displayed on the main interface. To resize the exFAT partition with AOMEI Partition Assistant, you also need to format it to the NTFS file system first. Right-click the exFAT partition, select “Format Partition”.

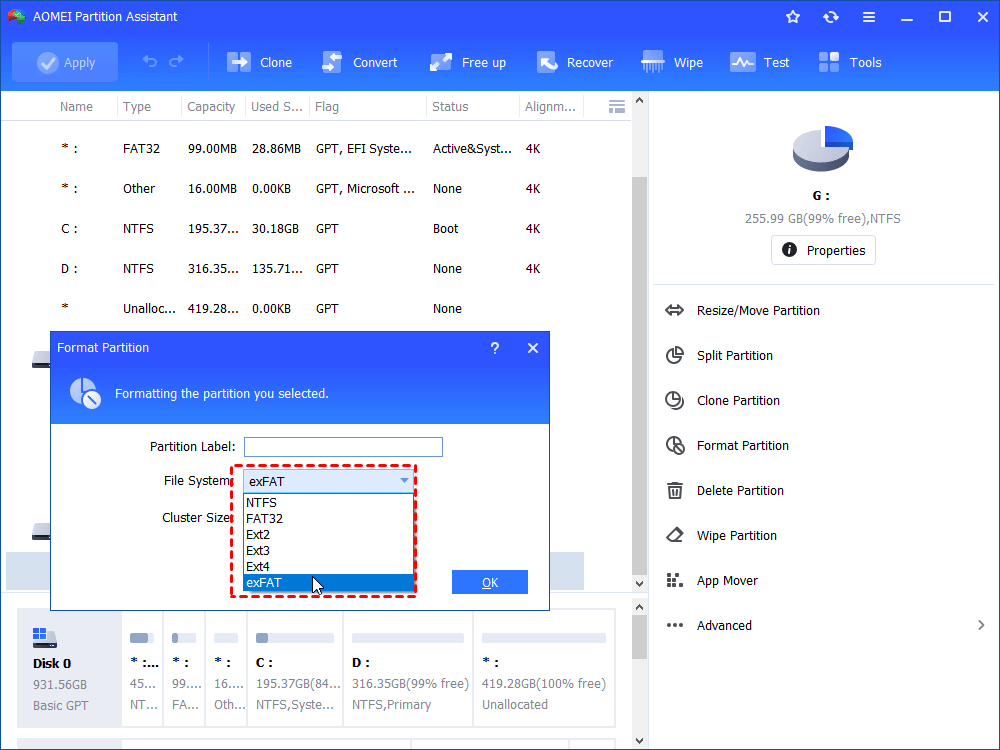
Step 2. In this pop-up window, select “NTFS”, and click “OK” to continue.
Step 3. Click “Apply” on the toolbar to commit the operation.
➤ Resize the NTFS partition
Step 1. Right-click the partition you want to resize. Select “Resize/Move Partition”.
Step 2. In the pop-up window, position the mouse pointer on the left/right border of the partition, drag the border to extend or shrink the partition, or enter the size you want in "Partition size", and then click "OK".
*If you want to extend the partition, make sure there is unallocated space beside the partition.
Step 3. Click “Apply” on the toolbar to commit the operation.
*After shrinking the partition, there will be an unallocated space. And you can use this unallocated space to create a partition or extend other partitions with AOMEI Partition Assistant.
➤ Convert the partition from NTFS to exFAT
Step 1. Right-click the NTFS partition and choose “Format Partition”.
Step 2. Choose exFAT in the drop-down menu of File System. In this window, set “Partition Label” and “Cluster Size” as you like. Then, click “OK”.
Step 3. Click “Apply” on the toolbar to commit the operation.
Stage 3. Restore the Files to Your Partition
After you've successfully resized and reformatted your partition back to exFAT, the final step is to restore your data. You can either use File Explorer to manually copy the files back to the partition or clone the data from the backup to the current partition.
Follow this simple steps, you can effectively resize exFAT partition without data loss. AOMEI Partition Assistant is such an excellent software, you can use it to resize partition in Windows 7/8/10/11. It's a great tool for you to manage your partition for Windows 7/8/10/11. Besides changing partition size, you can also use it to create partition from unallocated space, change file system, as well as convert disk between MBR to GPT for the upgrade to Windows 11, migrate OS to HDD/SSD and so on. If you want to convert system disk between MBR and GPT partition styles, you can upgrade to AOMEI Partition Assistant Professional.

