Diskpart: Format Drive to NTFS in Windows 11, 10, 8, 7
In this article, we will show you how to use DiskPart to format drive to NTFS file system in Windows 11, 10, 8, 7. Besides, a GUI tool will also be shared to help format NTFS more easily.
By AOMEI / Updated on May 12, 2023
Scenario
“I just got a 32GB USB flash drive from my brother, formatted to be FAT32. When I was transferring a 5 GB files to it, it failed and popped up an error message saying ‘File is too large for the destination file system’. I googled it and knew that is about file size restriction. And I need to format it to NTFS to break out its 4GB size limitation on a single file. So can I use Diskpart to format NTFS in Windows computer and how to do it in detail?”
What is the use of DiskPart command?
DiskPart commands is a command-line disk partitioning utility available for Microsoft operating system. It allows you to view, create, delete, format a computer’s disk partition. Before you can use DiskPart commands, you must first list, and then select an object to give it focus. When an object has focus, any DiskPart commands you type will act on that object.
Use Diskpart to format drive to NTFS (Command Line)
Generally speaking, when Windows users fail to format hard drive to NTFS via Disk management or File Explorer and get various formatting errors like “Windows was unable to complete the format” “The format did not complete successfully” or some else, Diskpart will be an alternative. How to format disk to NTFS using Diskpart Command? Below are elaborate steps you can refer to.
Warning: formatting operation will erase everything on the drive you select. It is crucial that you correctly choose the drive you decide to format. It is always advised to back up data before proceeding.
1. Press the “Windows key + X” on your keyboard to open the Power User menu and select “Command Prompt (Admin)” to launch Command Prompt.
In Windows 7, you need to launch it in a different way: click “Start” button, input “cmd” in the “Search” box, right click the Command Prompt icon and select “Run as administrator”.
2. Type “Diskpart” in the Command Prompt and press “Enter”.
3. Then execute the following commands in sequence:
-
list disk: list all disks recognized by OS.
-
select disk 1: select the disk which contains the partition you need to format to NTFS using CMD. Here we select disk 1.
-
list partition: list all partitions on the selected disk.
-
select partition 1: select the target partition. Here we select partition 1.
-
format fs=ntfs quick: format partition to NTFS file system.
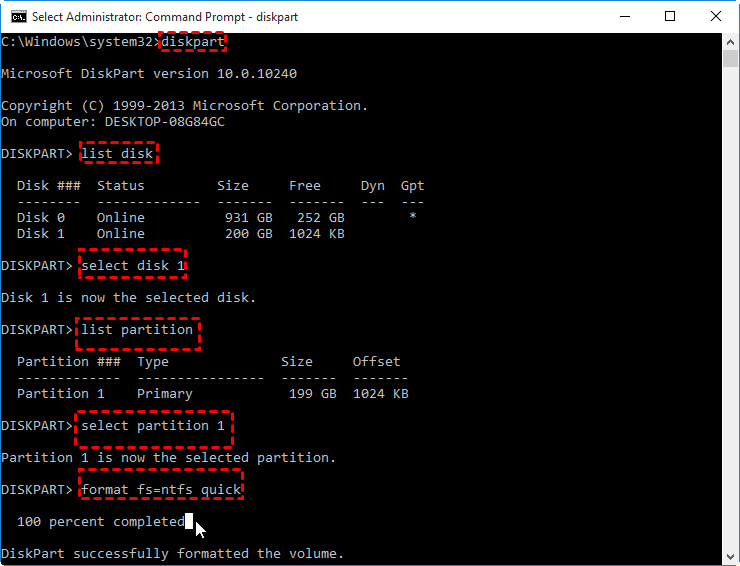
When the formatting process is completed, you can run the “exit” command to close DiskPart.
Notes:
▸If the hard drive is now of FAT32, and you want to format it to NTFS, you can enter Command Prompt and directly run "convert [drive letter of the target partition] : /fs:ntfs” (ex: convert e: /fs:ntfs) to convert FAT32 to NTFS without formatting/losing data.
▸If you want to format C drive in Command Prompt, you have to boot your computer from the installation media and perform the formatting task in WinPE mode.
Alternative to DiskPart: format partition to NTFS more easily
Under common situations, you can successfully format hard drive to NTFS, FAT32 via Diskpart. However, when the hard disk is corrupted or stuck in RAW file system, there are chances that you will be disappointed. Then you can turn to the free partition manager: AOMEI Partition Assistant Standard.
It is a free yet powerful disk formatting tool for Windows 10/8/7 users to format hard drive to NTFS, FAT32, Ext4, Ext3, Ext2 and exFAT even when the selected hard drive is RAW or write-protected because of the damaged file system. Now you can download the freeware and follow the steps to format a disk partition to NTFS.
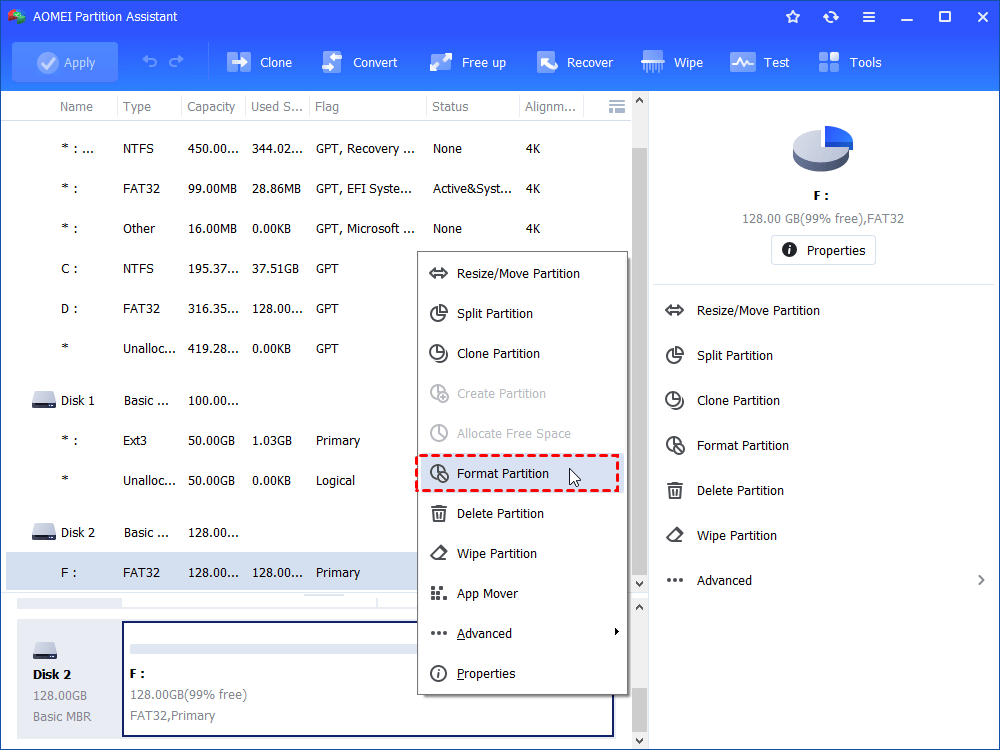
1. Install and launch AOMEI Partition Assistant. Right-click the partition you plan to format and choose “Format Partition”.
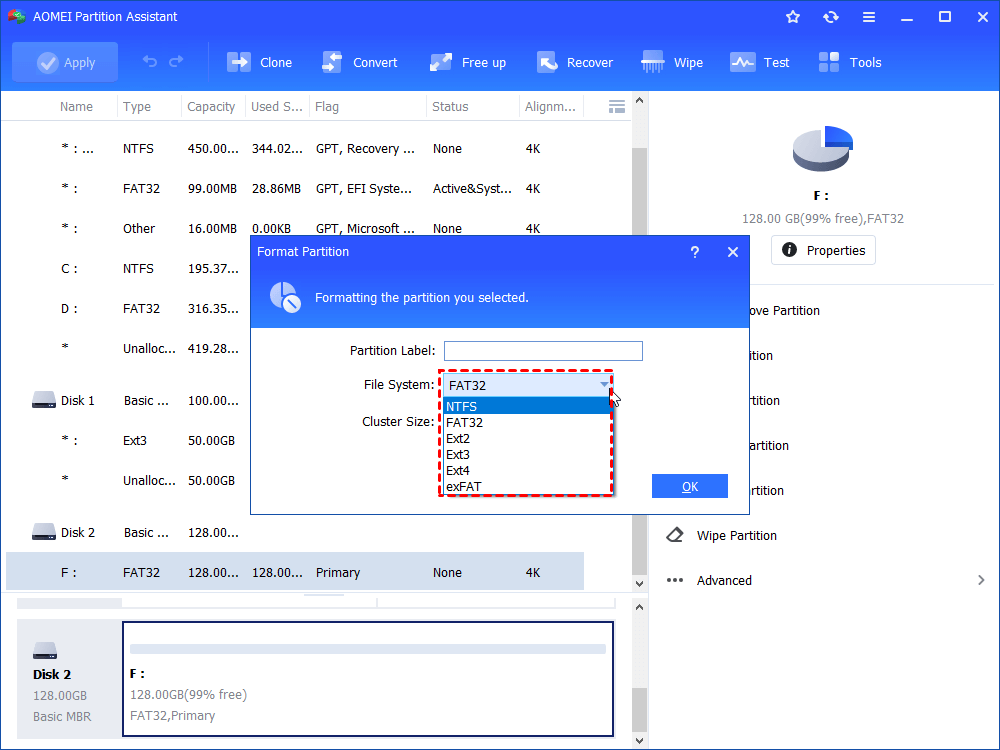
2. In the mini window, choose “NTFS” from the given File System options and click “OK”.
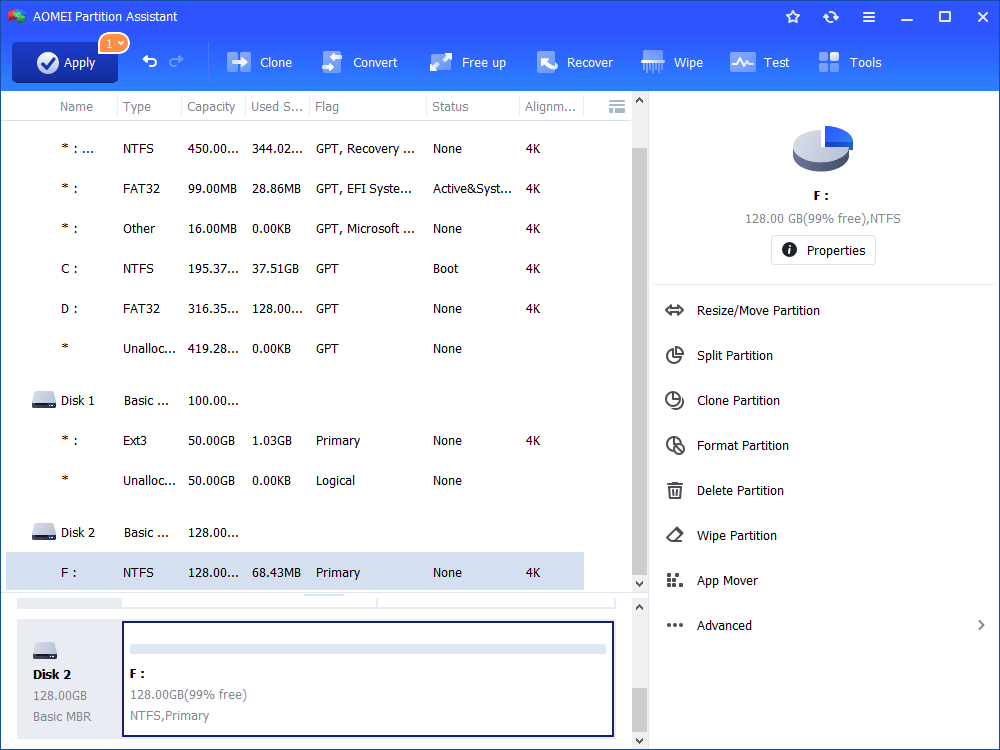
3. Back to the main interface, click “Apply” and then “Proceed” to start the formatting process.
If you are formatting FAT32 to NTFS file system, you can use “NTFS to FAT32 Converter”, which allows you to change file systems between NTFS and FAT32 by converting instead of formatting so that the inside data won’t get lost.
✦✦✦✦✦Other amazing functions of AOMEI software:
1. Merge Partition: combine two adjacent partitions, or merge one, two or more pieces of unallocated space into another existing partition.
2. Create a new partition on either unallocated space or an existing partition.
3. Clone Partition: copy partition to another hard drive
4. Move Partition: change the location of a partition.
5. Migrate OS from MBR to MBR disk and ensure you can boot from the destination disk afterward.
6. Convert data disk between MBR and GPT partition styles without deleting existing partitions or losing important data.
Sum up
If you think running Diskpart to format NTFS is too complicated to learn, it is highly recommended to use AOMEI Partition Assistant. If you upgrade to Professional edition, you can enjoy more advanced features, such as allocating free space from one partition to another, converting system disk from MBR to GPT for Windows 11, extending system drive, recovering lost partition and more.
If you are a Windows Server user, you can make use of AOMEI Partition Assistant Server. It is not only compatible with Windows 10/8/7, but also compatible with Windows Server 2019/2016/2012/2008/2003.

