The Solution to Expand VMware Disk without Resetting the Machine
How to extend entire virtual disk size is a technical matter for most users. Be different from physical disk, we could increase VMware disk size by ourselves.
Many server administrators are preferred to use VMware Workstation as their test machine. However, when they complete the setting of the VMware they always find that the original virtual disk is so small that can not meet their need. How to extend entire virtual disk size becomes a technical matter. Luckily, be different from physical disk, we could increase VMware disk size by ourselves.
Several ways to achieve VMware expand disk size
Through search most technical forums, you could find there are three widespread methods.
-
Method 1: Using VMware Converter
-
Method 2: Using VM Disk Manager
-
Method 3: Using VM Disk Manager GUI (only on VMware Workstation 7.0 edition or later)
The method 1 is not always recommend because there's a disadvantage that VMware Converter will create a new (many GB) copy of your VM. And the method 3 is the easiest way to use, unfortunately, this feature is only added into the VMware Workstation 7.0 edition or later. Therefore, VM Disk Manager is the master key that increases virtual disk size. Here we have a tutorial about "How to extend VMware Disk step by step".
Increase VMware virtual disk size by VMware Disk Manager
Note: Before the tutorial you should notice some important points, otherwise the mission may failed.
-
Ensure the virtual machine is turned off
-
Ensure the clone is full, if you use link clone VM machine you need to make a new full clone
-
Ensure there's no snapshot
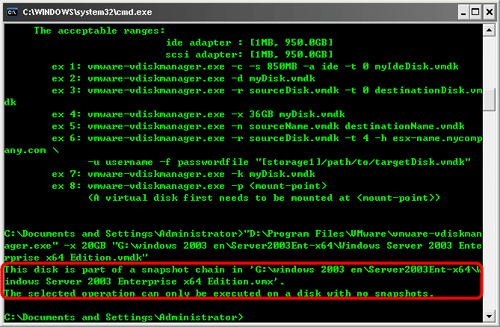
If there's some snapshots when you run the command you may get the error message as below:
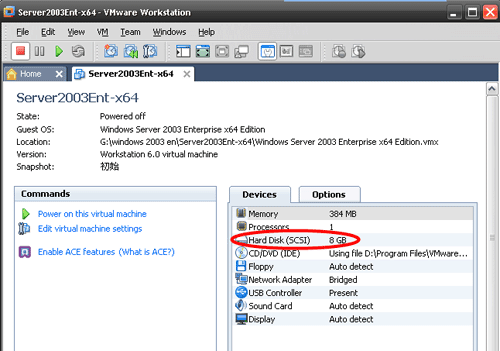
When you get this, you need to remove the snapshot in "Snapshot Manager". After prepare for it, let's start. In this example our original virtual disk size is 8 GB, our aim it to increase it to 20GB.
Step1. Turn off the virtual machine; click "Start"=> "Run"=> type "cmd"
Step2. In the Dos Window, type the follow commands then click "Enter"
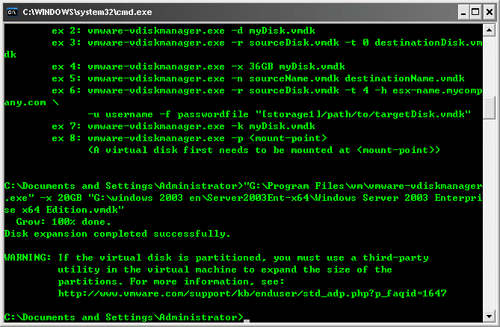
"G:/Program Files/vm/vmware-vdsikmanager.exe" –x 20GB "G:/windows 2003 en/Server2003Ent-x64/Windows Server 2003 Enterprise x64 Edition.vmdk"
Tips: in this command "G:/Program Files/vm/vmware-vdsikmanager.exe" is the path of the "VMware Disk Manager.exe". The "-x 20GB" is means the virtual disk will be extended to 20GB. And the "G:/windows 2003../Windows Server 2003 Enterprise x64 Edition.vmdk" is the path of your target virtual disk file.
After step 2 you will find the process of extending VM disk is begin to work. Just waiting for minutes the operation will be complete.
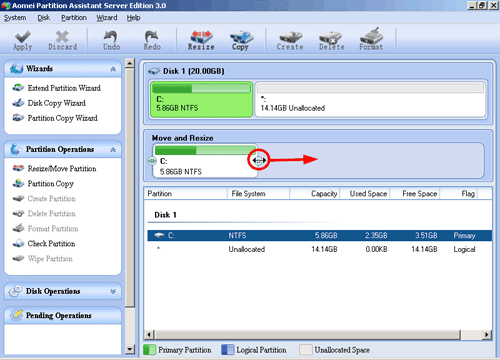
When the process complete, even though we have extended VMware disk, our mission is not complete yet. As the "Warning" mentioned, the newly added space has not been allocated yet and is thus unusable at this point, it is showed as unallocated space at the end of the virtual disk. We must use third-party software to extend partition in VM. The AOMEItech Partition Assistant Sever Edition is the one of the third-party software that be recommended.
Extend System partition in VMware Windows 2003
Step1. Launch AOMEI Partition Assistant in VM. Select the partition you want to extend (here is the system partition) drag the right handle on the panel, rightwards.
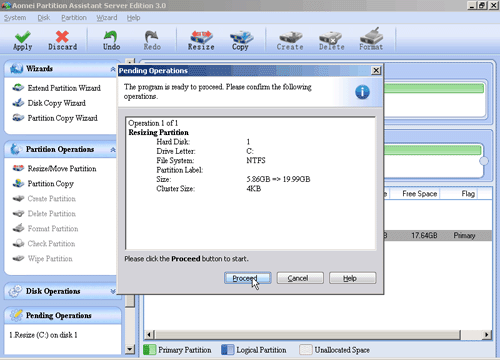
Step2. Click "Apply" on the tool bar, in the pop-up window click "Proceed" to achieve the operation on the virtual disk.
After a few seconds, our mission is completed 100%. Follow the tutorial you may find VM expand disk would never be a hard task. If you want to resize BitLocker partition in VM you could download Partition Assistant. For different OS, this software has different Versions. Select the right one for yourself.
Tips: For enterprise administrator, AOMEI Partition Assistant Unlimited Edition is a better choice to support the unlimited usage within one company.

