Professional Software to Partition Hard drive in Windows 7/8/10/11
This tutorial will introduce you the professional partitioning software to help you Partition/Create/Delete/Format/Resize hard drive before installing Windows.
By Lucas / Updated on May 12, 2023
With the development of technology and changes in people's needs, the computer disk space becomes larger and larger. Nowadays the most popular size is 2048GB, which is a very large one. Accompanying, how to allocate it properly is quite important to the hard drive because it will determine whether the computer performance is good or not.
Besides, one needs to partition the hard drive before installing Windows operating system as well. Now let's read this article together, it will give us some solutions in detail.
Introduction to Disk Partition
What is a partition (also named volume)? It is an independent part classified from the physical disk, which is mainly used to store operating systems and data or files. Usually, different kinds of data will be deposited in different partitions, such as drive C is for OS, volume D is for recreation, etc. Surely this depends on our wish.
According to this kind of classification, we can manage all of them or distinguish them much easier. Moreover, if we get a new disk, we must partition the hard drive to FAT32 or NTFS in Windows OS, otherwise, any data and files will unable to be put in the disk. In addition, partitioning a hard disk drive can improve data protection because every one of them is standalone, not influenced by others.
Way to partition a hard drive
As we can see from the statement above, partitioning a hard drive is very important to administrators, so how to make it come true with ease? Generally, we can achieve this goal by creating, deleting, formatting, and resizing partitions.
But to tell the truth, we should not pin the hope on the built-in Disk Management to finish these operations. Because some systems like Windows XP, 2000, 2003 do not have this tool, even though Windows Vista/7/8 and Server 2008 have added it, limitations and defects are still not resolved.
Therefore, here I recommend an excellent third-party software to help all computer users: AOMEI Partition Assistant Professional Edition. With the aid of it, optimizing the computer performance is no longer difficult. Now follow me to look at how this hard drive partitioning software plays its biggest role in Windows 7/8/10/11.
How to partition a hard drive in Windows 8/7/10/11?
First of all, download partition magic. The following will introduce the detailed steps of each main feature.
A: Resize Partition
Resizing a volume means extending or shrinking it. Usually, the C drive is running out of space much faster than the others because it has an operating system in it which occupies a very large room, while the other volume (for instance D volume) may have large free space which is just empty there. This kind of irrational location may affect the computer's running seriously, so shrinking the larger one and extending the system drive is quite necessary.
This partitioning software will resize the hard drive partition without losing data. If you want to get more free space from the Bitlocker drive, this tool can help resize encrypted partition easily. Then here we will take them as an example to show how to adjust the size of a partition and make the hard drive's distribution more reasonable with this magic tool.
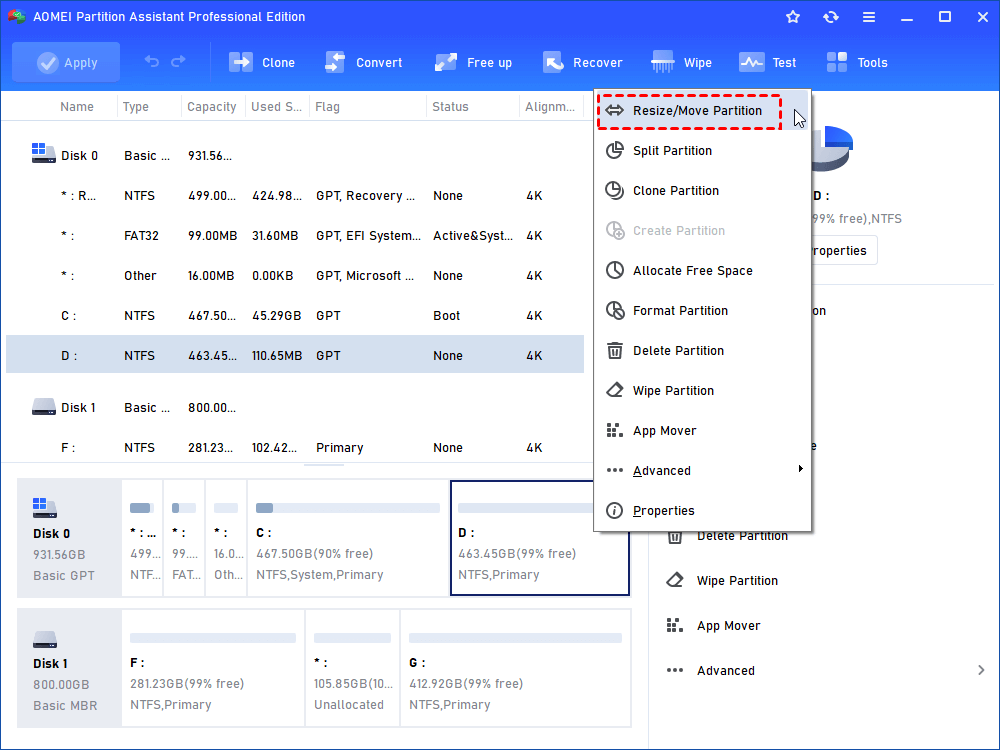
Step 1: Launch AOMEI Partition Assistant, right-click on D drive, and choose the option 'Resize/Move Partition". In the pop-up window, drag the left bar rightwards or set the particular size in the box below, click 'OK".
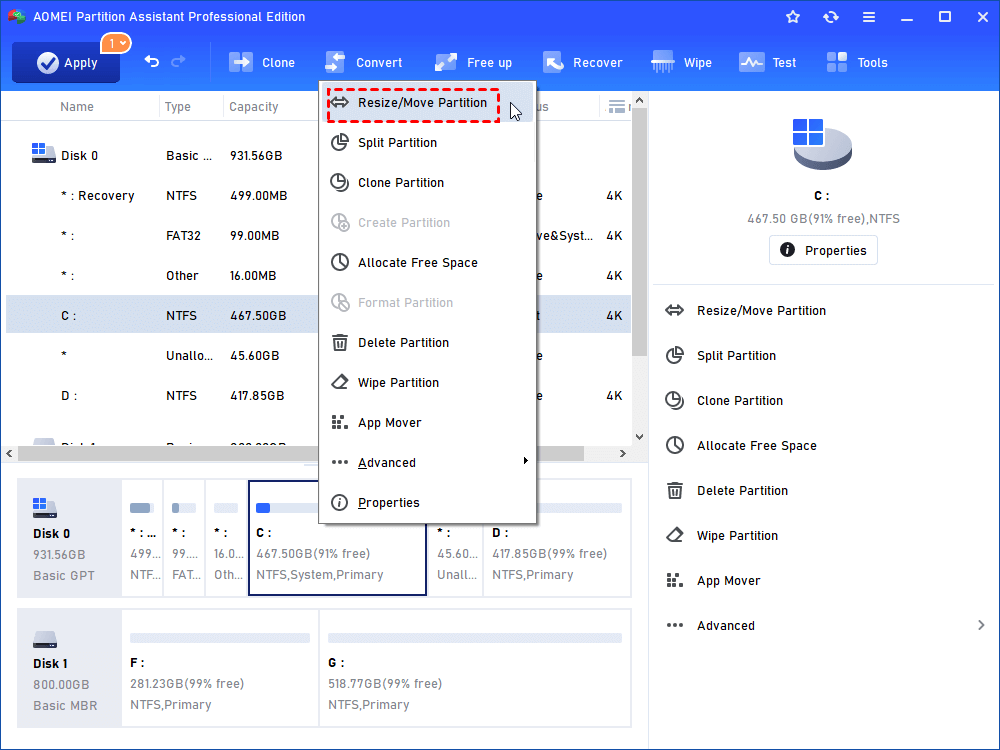
Step 2: Right-click on C drive, select 'Resize" again, drag the right bar rightwards and click 'OK". Then we can see the unallocated space generated from D which can be added to drive C.
Step 3: After previewing the changes on the surface, click 'Apply" on the toolbar to save them.
B: Create Partition
Create with a snap-in tool
As for creating, the snap-in Disk Management also can achieve it. Just do the following steps, a new partition will be created: right-click 'My computer" > select 'Manage" > find 'storage" > choose 'Disk Management" > right-click the unallocated space > choose 'New Simple Volume". Then follow the wizard to finish creating。
Done! But if the disk space has already been allocated, this method can only bemoan its inadequacy in the face of it. In this case, the following way may be the best and the only solution we can find.
Create with AOMEI Partition Assistant
This all-in-one software is a good right-hand to us for it can create a new volume not only from unallocated space but also from an allocated one only if there is unused space. Here we choose the latter situation to operate.
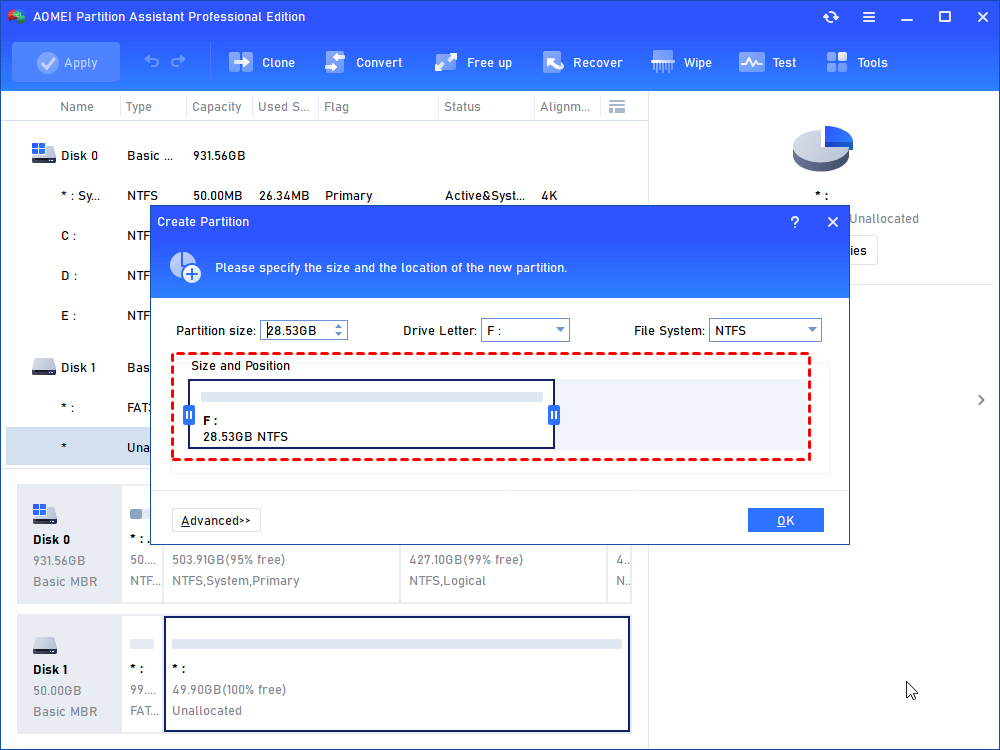
Open the main console, right-click on E: and select the "Create" option; in the popup window, drag the middle slider rightwards or leftwards, or set the particular size and drive letter in the box below; click 'Ok". At last, click 'Apply" on the toolbar to take the operations into effect. We can take a glance at the screenshot below to learn some information about it.
C: Delete Partition
If we want some unnecessary or useless drive to expand the system to one or other applications, Disk Management can help to accomplish the deletion operation. But one shortcoming is the deleted partition and files may be recovered by some malicious intent. So to avoid that tragedy, we need to turn to AOMEI Partition Assistant. It can wipe the data thoroughly and permanently during the process of deleting a partition.
The operating steps are very simple: just right-click on the target drive and select 'Delete", the goal is reached. What remarkable here is that the system boot volume could not be deleted except the function of 'Wipe Hard Drive".
D: Format Partition
Generally, this operation is not advisable for it will clean up all existing data. If we indeed need to wipe them or convert the file systems between NTFS and FAT32, we must think over what information should be backed up first.
Then we can format directly in the computer, or use the AOMEI's partition manager: open its main console, right-click the drive we want to format, and choose 'Format"; next, in the new window, set the related parameters, click 'Ok"; click 'Apply" on the toolbar and commit it.
Summary
Through the previous study, we know that AOMEI Partition Assistant Pro Edition can give a lot of help in partitioning a hard drive either on a laptop or desktop with its functions of creating, deleting, formatting, and resizing. It also provides a schedule defrag service to help users keep their hard drives in nice health.

