How to Run Bootable Partition Manager from USB
How to run a bootable partition manager from USB? AOMEI Partition Assistant can help you figure this out. It also allows users to resize partition with bootable CD and many other wonderful features.
By AOMEI / Updated on June 19, 2024
Many old PCs, have a higher possibility that the internal hard drive crashes and encounters a booting issue. Once it happens, all data and files can’t be read, not even to cope with something with a computer. Therefore, it is necessary to create a USB bootable partition manager.
"How do I fix my computer/hard drive when the PC can't boot up successfully?" "How can I manage my hard drive if my hard drive is broken?" These questions can be found in the forum every second day. The bootable partition manager can easily solve the related problems. This tutorial will give a full guide on how to create and run bootable partition manager on USB.
What Is Bootable Partition Manager USB
USB Boot Partition Manager refers to burning an ISO file to a USB so that the user can boot the PC from the USB and enter the WinPE environment to manage the partitions and execute other operations.
Usually, so many people will try to create a portable partition manager when the booting issue happens. Thus, checking and repairing the internal hard drive is one of the most important purposes of creating a partition manager on a USB drive.
How to Create a Bootable Partition Manager on USB
This section describes two detailed methods for creating a USB bootable partition manager:
Stage 1. Download the Powerful Partition Manager and Prepare USB
1. To create a bootable partition manager for a USB flash drive you need to use a third-party tool - AOMEI Partition Assistant Professional. This manager supports installing it on a USB drive or CD/DVD. And you will have a portable partition manager. When you can't boot up your PC. Insert this USB drive into your PC, and enter BIOS to boot from it. You can try to fix the issue or manage your hard drive with its functions.
Downlaod this powerful and professional tool and prepare for bootable partition manager USB.
2. For the bootable USB to work properly, make sure the USB is ready:
- Prepare a blank USB drive or CD/DVD and format it to a FAT32 file system.
- Converting the USB to an MBR file system
- Backup the USB media if it contains some data you need, because it will be formatted.
Stage 2. Steps to Create USB Bootable Partition Manager
After you've prepared, let's see how to use AOMEI Partition Assistant to create bootable partition manager on USB.
This USB boot partition tool provides an intuitive interface that makes all the operations simple and easy. You can follow its instructions to finish a process easily. This manager allows you to undo steps if you misclick a button, it helps PC beginners control their PCs and drives. So you don't need to worry if you are unfamiliar with partition management.
Step 1. Open AOMEI Partition Assistant. On the main interface, click "Make Bootable Media" under the "Tools" menu. Click "Next".

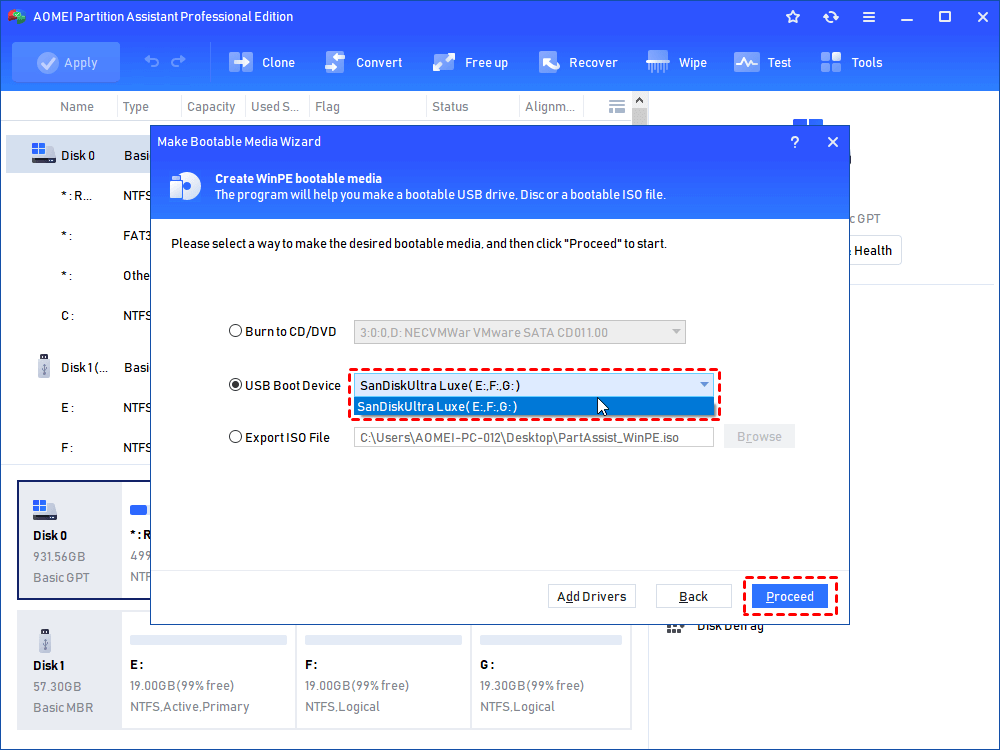
Step 2. Select "Burn to CD/DVD" or "USB Boot Device" according to the media you inserted. Then click "Proceed".
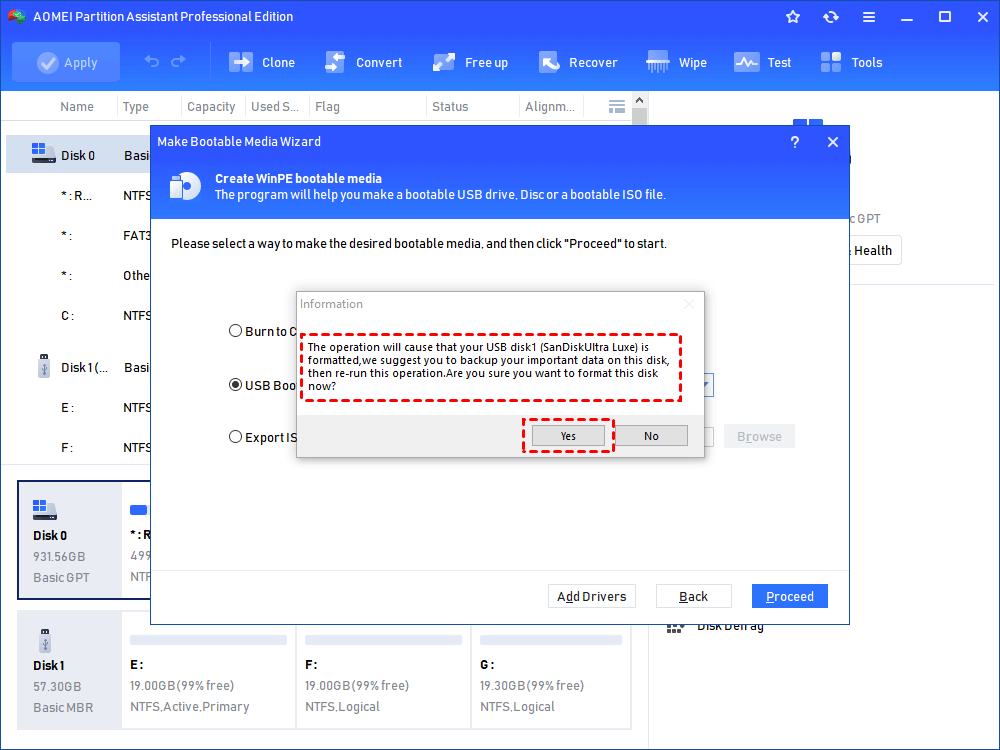
Step 3. There is a message that your USB drive will be formatted. Backed up the information you need, and click "Yes" to continue.
The process of creating a WinPE bootable USB drive will take a few minutes. After that, a full partition manager will be installed on this USB or CD/DVD, you can connect it to another Windows PC to run it. Then go to the next part to see how to enter BIOS to set it as the boot drive.
With this tool, you can securely manage hard disk partitions with AOMEI Bootable Partition Manager, which allows you to perform basic and advanced partitioning operations on hard disks in WinPE.
How to Run a Bootable Partition Manager from USB
After you finish the process, you should know how to run a bootable CD from USB. To boot from the USB flash drive or CD/DVD, you need to enter BIOS and change the boot order under Boot Menu.
Step 1. Power on a PC, and tap the BIOS key. The BIOS key depends on the manufacturer, you can search it on the instruction book, or with Google.
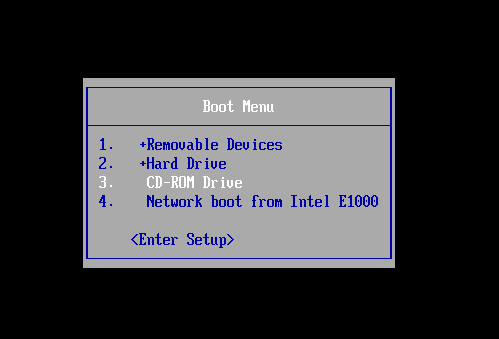
Step 2. Enter BIOS setup, and select the "boot" tab with arrow keys. And choose "change boot order".
Step 3. Set the bootable manager on the first order in the listed devices. Then save the change.
And you will see the AOMEI Partition Assistant, and repair or manage your hard drive with its different features. As a powerful and all-in-one partition manager for Windows, AOMEI Partition Assistant Professional supports various features, including: creating/deleting/formatting/cloning partitions, changing the file system, and a partition table for a drive. Besides, it helps you to check your partition with CHKDSK.exe and to rebuild MBR when your hard drive crashes, a storage device, a corrupted file system, or other issues.
Conclusion
This is how to create a bootable partition manager on a USB drive. After booting from such a tool, you still have control over all connected storage devices with AOMEI Partition Assistant. In addition, it has more advanced features, like managing dynamic disk, extending system partition, allocating free space, cloning OS from a smaller drive to a larger one, and so on.

