How to Solve Cannot Change Drive Letter in Windows 10, 8, 7
Sometimes, "change drive letter and paths" is greyed out in Disk Management. You can turn to AOMEI Partition Assistant when you can't change drive letter in Windows 10, 8, 7.
By Cherry / Updated on May 12, 2023
Scenario
Can't change drive letter
My friend Jerry had a new PC, and he wanted to connect his old external hard drive (previously drive “E” on his old computer) to the USB port. It shows up as drive “I”. He thought that he need to change the drive letter back to drive “E” so that his cloud storage backup will recognize the drive. But he failed. He cannot change the drive letter through Windows Disk Management.
- Question from superuser.com
When We Need Change Drive Letter?
Sometimes, we need to change drive letter to solve some problems. In our daily life, we may meet those scenarios which may lead us to change the drive letter as following:
1. Connect one PC to another one.
2. Upgrade the drive and the new drive letter can’t be changed to the previously used drive.
3. The drive has been hidden so that we can change drive letter to show it.
4. Reform system and the drive letters changed.
The users may think that we can change the drive letter with Windows Disk Management. However, for some reasons, the "change drive letter and paths" option may be greyed out in Disk Management. Don't worry, refer to the following part, we will demonstate how to change drive letter in this situation.
How to solve "Can't change drive letter" in Windows 10, 8, 7
Windows Disk Management cannot change drive letter in some situations as we mentioned above. Thus, we need to find a third-party partition tool to help us, such as AOMEI Partition Assistant, which has very simple operation and multiple functions.
Before using AOMEI Partition Assistant to change drive letter, there are some tips for you:
1. AOMEI Partition Assistant will keep your data safe, so you won’t worry it.
2. Make sure that there is no program processing. If there is, AOMEI Partition Assistant will remind you to close the processing program.
3. Directly changing drive letter may cause some programs and their shortcuts work incorrectly.
4. If the system has been installed on a partition, you will not be allowed to change the drive letter.
Then download this software, and follow the detailed steps below to solve this problem.
Step 1. Install and launch AOMEI Partition Assistant. Right click the partition you want to change the drive letter. Choose the “Change Drive Letter” under the “Advanced” as the following screenshot.
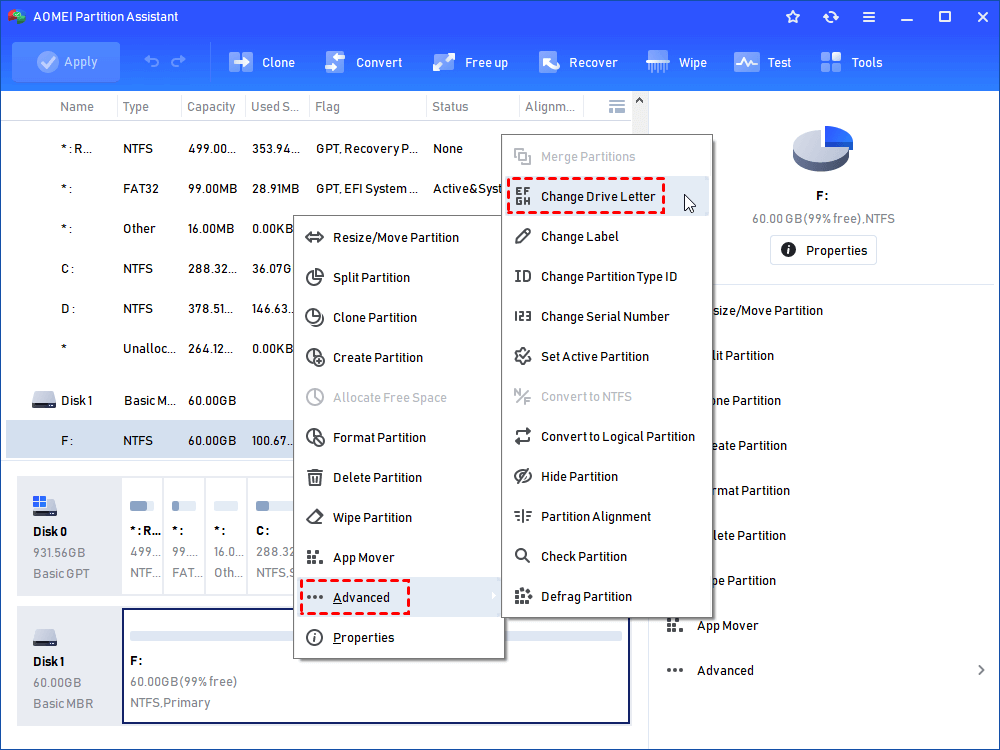
Step 2.After the step1, it will open a pop-up window and you can choose any drive letter you want.

Step 3.After selecting the new drive letter, click “OK” and finally click “Apply” to commit the command.
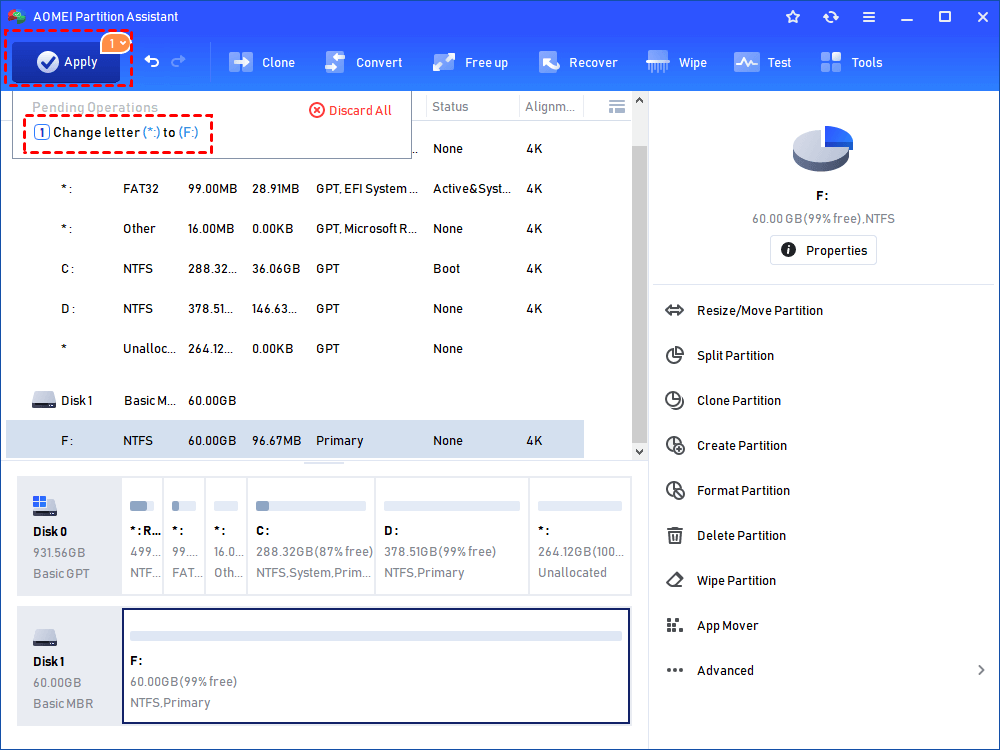
Here, we successfully changed the drive letter from G to H. It’s very simple and the operation is easy too.
Conlusion
This is how to deal with "can't change drive letter" in Windows 10, 8, 7. With AOMEI Partition Assisant, you can easily modify your drive letter. Besides, this is a powerful disk and partition managment tool. It also helps you to create, format, delete, wipe partition, disk. And if you upgrade to Professional edition, you can unlock more advanced features that can be perform easily like recovering deleted/lost partition, read and change SD card serial number.

