[Free Guide]: Use Diskpart Assign Drive Letter in Windows 11, 10, 8, 7
This post will show you how to use Diskpart assign drive letter in Windows 11, 10, 8, 7. In addition, another free GUI software will be introduced to assign or remove the drive letters quickly and safely.
By Hedy / Updated on May 28, 2025
Why to assign a drive letter?
As we all know, Windows assigns drive letters to all available drives on your computer, such as internal hard drives, optical drives, SD cards, and external USB drives. A drive letter is an alphabetical identifier for a volume, and each drive letter can be used once on a computer.
However, sometimes users want to change the original drive letter to another one. Or due to some operation, the drive letter will not be available and the user needs to assign a new drive letter.
How to assign drive letter in 3 ways
Fortunately, there are some methods for assigning a drive letter, and here we provide you the most 3 popular ways.
1. Assign a drive letter with AOMEI Partition Assistant
AOMEI Partition Assistant Standard is an easy-to-use software for all Windows users including beginners. With this tool, you can change or assign a drive letter with only a few mouse clicks, which is very friendly to users who are unfamiliar with command parameters.
2. Assign drive letter with Diskpart
Compared with AOMEI Partition Assistant, using Diskpart to assign drive letters is more difficult. It is based on the command line, so the demands on the operator are higher. In a word, Diskpart is suitable for experts.
3. Assign drive letter with Disk Management
Disk Management is a built-in tool in Windows. It requires users to have certain computer knowledge. If you are not familiar with the Windows operation, this is not the most ideal way for assigning a drive letter.
1. How to assign drive letter with AOMEI Partition Assistant
AOMEI Partition Assistant Standard is a completely free third-party partition and disk manager for Windows computer users. It supports users to assign drive letters through a more friendly interface, which can be done with just a few clicks, much simpler than Diskpart. Also, it can assign drive letter on any file system. More importantly, it has more complete functions and allows you to manage disks flexibly.
Step 1. Launch AOMEI Partition Assistant, it will show you all storage devices in the main interface. you can see the removable drive doesn't have a drive letter. If you want to assign a drive letter for the drive, here you need to right click it, select Advanced-> Change Drive Letter.
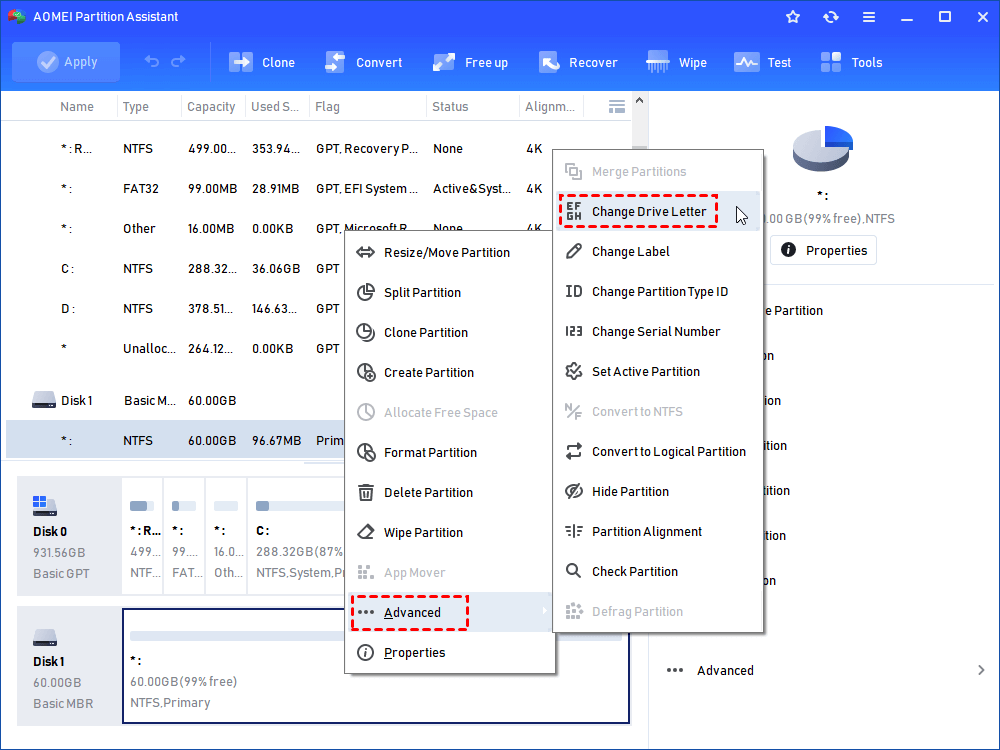
Step 2. Then, select a drive letter for the drive.

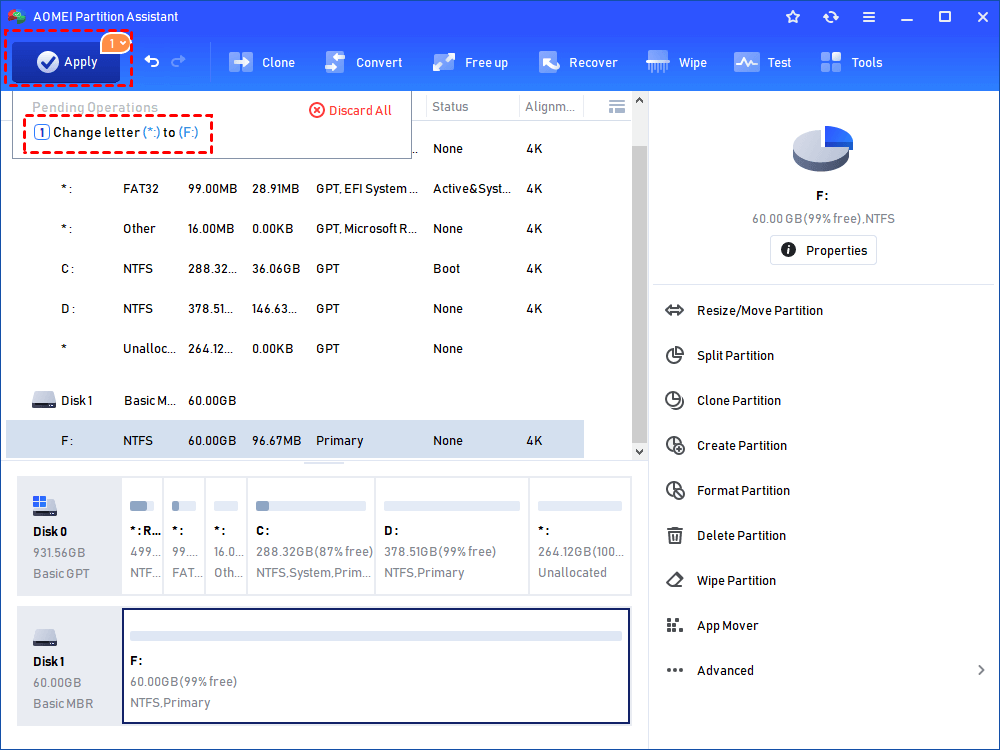
Step 3. Click Apply to submit the task.
In addition, as a comprehensive disk management tool, AOMEI Partition Assistant also provides more advanced features, such as:
- Resize/move partitions to solve the problem of insufficient disk space
- Clone disk to complete HDD to SSD upgrade without data loss
- Create/delete/format partitions, erase data to ensure data safety
- Perform disk surface test and check bad sectors
Now, download this simple partition tool for free, assign drive letters with a single click, and enjoy more advanced features to improve computer performance.
2. How to assign drive letter with Diskpart
Diskpart is a Windows built-in tool that allows you to quickly manage your disks or partitions from the command prompt, like format disk partition, create partition, delete partition, etc. Well, how to use Command Prompt Diskpart assign drive letter? The following parts may help you a lot.
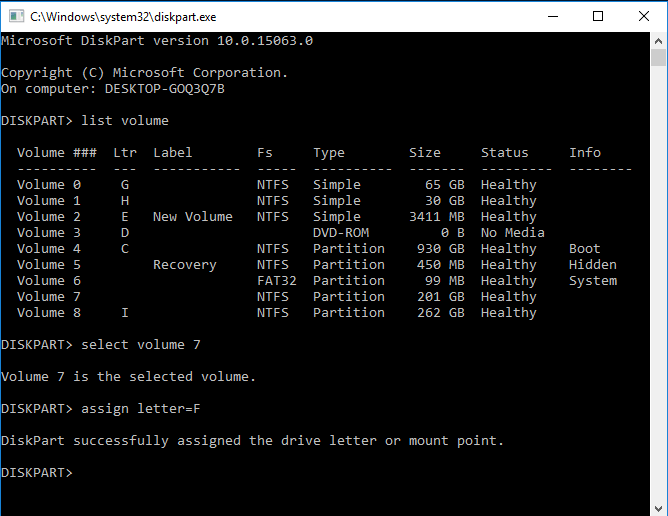
Step 1. Press "Windows + R". Then, type "diskpart" and press Enter.
Step 2. Type in "list volume" and press Enter. Now, you can see all volumes on PC.
Step 3. Type in "select volume 7" and press Enter(here take volume 7 as an example).
Step 4. Finally, type in“assign letter=F” and press Enter.
If you want to remove the drive letter, type “remove letter=X”(X is the drive letter you want to remove).
Actually, you may assign a drive letter when you create a new one. For that, you need to create partition first. After creating a partition, type “assign letter=?” to that partition. Or, if there is some volume hidden, it will not have the drive letter, to unhide it, you need to assign a drive letter for it.
3. How to assign drive letter with Disk Management
The Disk Management tool in Windows provides you with an easy-to-use graphical interface to manage your disks with a single mouse click. In addition to Diskpart, Disk Management may be another good choice to assign drive letter.
Step 1. Press “Win + R” to open the “Run” window and type diskmgmt.msc in the box.
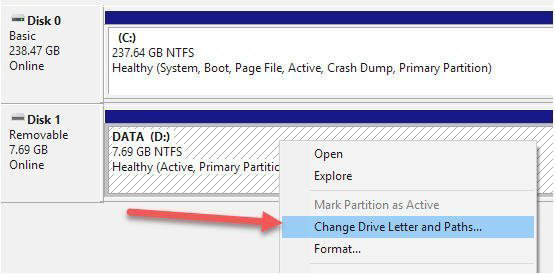
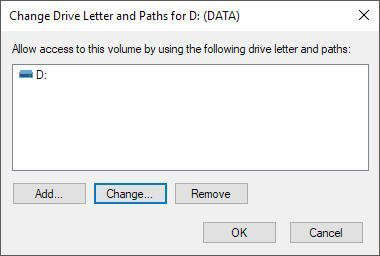
Step 2. Right-click the drive you want to assign, and select change Drive Letter and Paths in the pop-up window.
Step 3. Click Change to summon the next window.
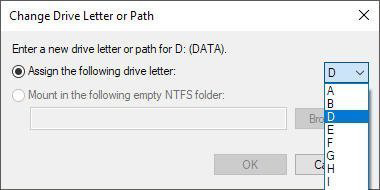
Notice: If you want to remove the drive letter of your partition, you can select "Remove" and follow the instructions step by step.
Step 4. After that, you should choose the new drive letter from the drop list, and then, click OK.
Conclusion
Although the Windows tools Diskpart and Disk Management can help you assign drive letter, we still recommend you the best alternative AOMEI Partition Assistant. Because sometimes you can’t assign drive letter successfully with Diskpart and Disk Management, the both only support assigning drive letter with FAT or NTFS. Fortunately, AOMEI Partition Assistant can break out this limitation which makes up for their shortcomings perfectly.
After you upgrade to AOMEI Partition Assistant Professional, there are more advanced features you can try, such as allocating free space from one drive to C, and moving the installed app from one drive to another.
Last but not least, although the system drive letter can be changed, do not do it because that would make the system unable to boot.
FAQs about how to use Diskpart to assign drive letter
Can I remove a drive letter assignment using Diskpart?
Yes, you can remove a drive letter assignment by using the "remove" command. For example, "remove letter=E" will remove the E drive letter from the selected volume.
Are there any restrictions on the drive letters I can assign using Diskpart?
Drive letters A and B are traditionally reserved for floppy disk drives. You can assign any available drive letter from C to Z to a partition or volume, provided it's not already in use.
Do I need to be careful when using Diskpart to avoid data loss?
Yes, you should be cautious when using Diskpart, especially if you're deleting partitions or making significant changes to disk configurations. Make sure you select the correct volume and drive letter to avoid accidental data loss.
Can I assign drive letter on a hidden drive?
Yes, you can. Be very cautious when assigning a drive letter to a hidden drive or volume, as it might contain system or recovery files.
Press the Windows key, type "cmd" or "Command Prompt," right-click it, and choose "Run as administrator". In the Command Prompt window, type "diskpart" and press Enter. This will open the Diskpart utility. To see a list of all volumes, including hidden ones, type list volume and press Enter. Use the "select volume" command to choose the hidden volume. Replace "X" with the volume number or letter. A ssign a drive letter to the selected hidden volume, use the "assign letter=Y" command. Once you've successfully assigned the drive letter, you can exit Diskpart.

