Can’t Delete Files from NVMeSSD? Try 6 Fixes Now!
If you can’t delete files from NVMe SSD, external hard drive, flash drive, or SD card, this article provides tailored solutions to help you resolve the issue depending on your specific situation.
By Hedy / Updated on June 13, 2025
Why can’t delete files from NVMe SSD?
An SSD (Solid-State Drive) is a modern storage device that relies on integrated circuits to retain data permanently, without the need for mechanical components.
Unlike traditional hard drives (HDDs), SSDs offer much faster performance, lower latency, better shock resistance, quieter operation, and improved energy efficiency due to the absence of moving parts.
In today’s market, SSDs—especially NVMe models—have become the go-to choice for speed and reliability. NVMe SSDs are slimmer and significantly faster than SATA SSDs, making them a preferred option for both operating system installation and data storage.
However, some users encounter issues when trying to delete files from NVMe SSDs. Common causes include:
▸ Lack of full file ownership or permissions
▸ Folder location not properly updated or redirected
▸ Drive set to read-only mode
What to do if you can’t delete files from NVMe SSD?
If you're unable to delete files from an NVMe SSD, try the following solutions to resolve the problem:
Method 1. Get full control of the folder or file
If you're seeing error messages like “Folder Access Denied – you’ll need to provide administrator permission to delete this folder” or “Folder Access Denied – you require permission from [username] to make changes to this folder,” it's likely because you don't have full control over the folder or file.
To gain full ownership and delete the file, follow these steps:
Step 1. Open File Explorer and locate the file or folder you’re unable to delete. Right-click on it, choose Properties, then navigate to the Security tab. Click the Advanced button under the Permissions for Users section.
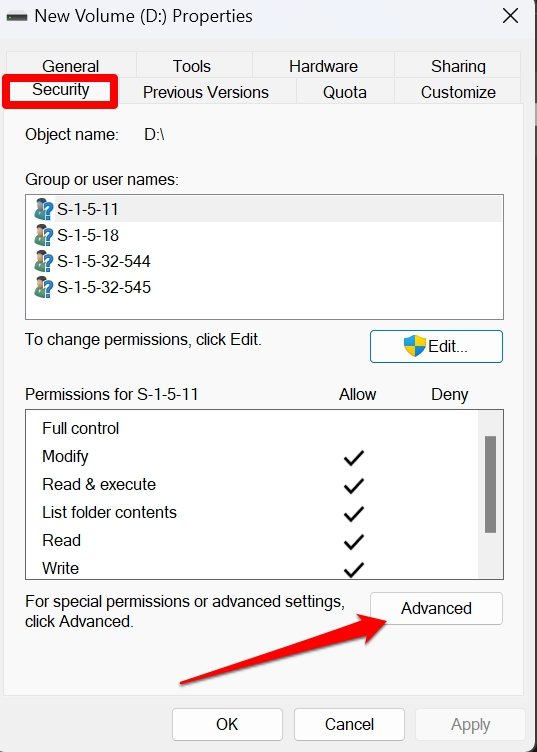
Step 2. In the new window, go to the Owner section and click Change. In the field labeled Enter the object name to select, type your Windows account name and click Check Names. If your account is recognized, click OK to confirm.
Step 3. You’ll now see that the ownership has been updated. Click OK to return to the Properties window. Select the Edit button. In the pop-up, choose your user account from the list, then check the Full control box under Permissions for Users. Click OK twice to apply the changes.
After completing these steps, try deleting the file or folder again from your NVMe SSD to check if the problem has been resolved.
Method 2. Change the default location of the folder
Certain folders, such as the Documents folder, have predefined default locations in Windows. If you try to delete them, they may automatically reappear. To remove these folders permanently, you must first change their default location.
Here’s how to change the default location of the Documents folder:
Step 1. Open File Explorer and create a new Documents folder in your preferred location.
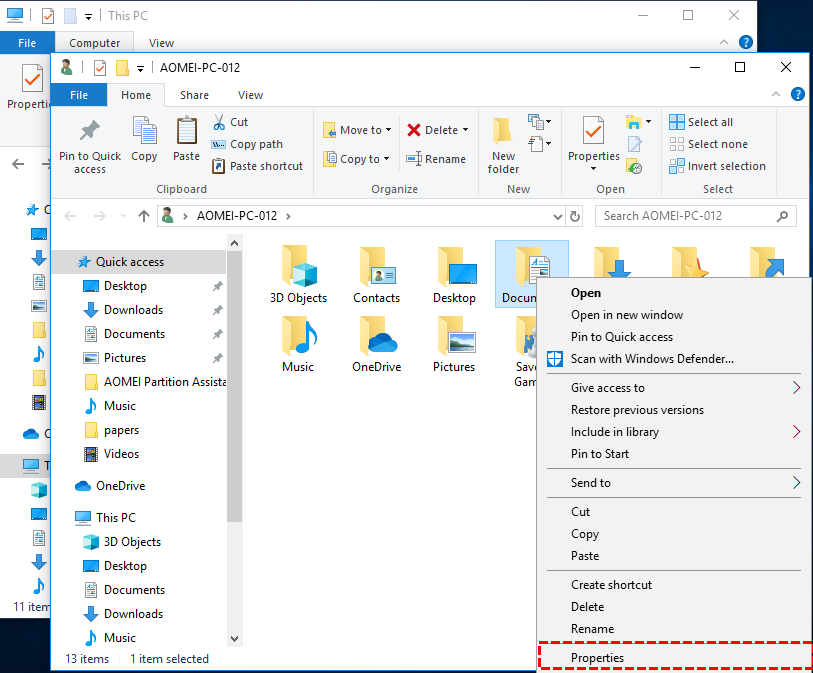
Step 2. In the navigation pane on the left, right-click on the original Documents folder and select Properties.
Step 3. Navigate to the Location tab and click the Move button.
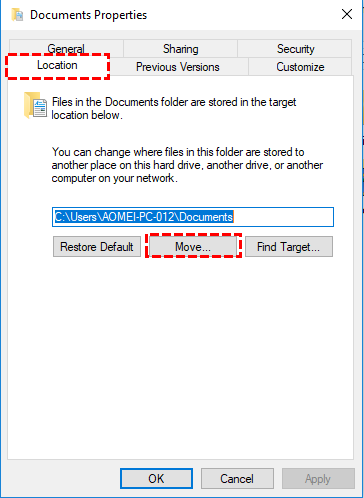
Step 4. In the window that appears, browse to the new folder you created, select it, and confirm the change.
Step 5. After updating the default location, you can safely delete the original Documents folder without it being automatically recreated.
Method 3. Clear readonly attributes using Diskpart utility
If there's no error message and the delete option is missing, the issue might be caused by write protection on the drive. In this case, you'll need to remove the write protection using Diskpart. Follow these steps:
Step 1. Press Windows + R, type diskpart, and press Enter.
Step 2. In the Diskpart window, enter the following commands one by one:
list disk
select disk 1 (replace "1" with the number of your external drive)
attributes disk clear readonly
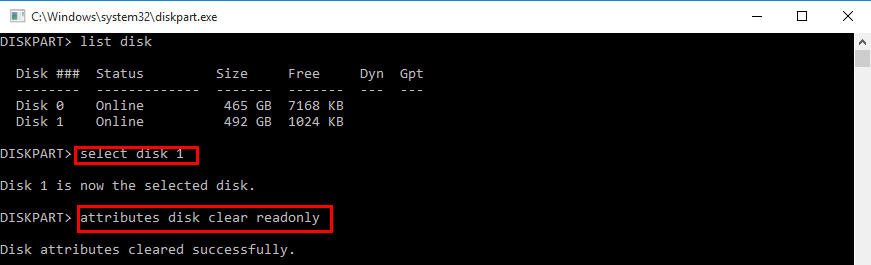
Step 3. After you see the message “Disk attributes cleared successfully”, close the Diskpart window. You should now be able to delete the files from the external hard drive.
Method 4. Delete the files using third-party software
If you're struggling to delete stubborn files from your NVMe SSD — especially those that say “File in use”, “Access denied”, or simply refuse to go away — AOMEI Partition Assistant offers a powerful and user-friendly solution.
This versatile disk management tool includes a "Files Shredder" feature designed to remove files that Windows cannot delete through normal means. Whether the files are locked by the system, corrupted, or otherwise inaccessible, AOMEI Partition Assistant helps you get rid of them with just a few clicks.
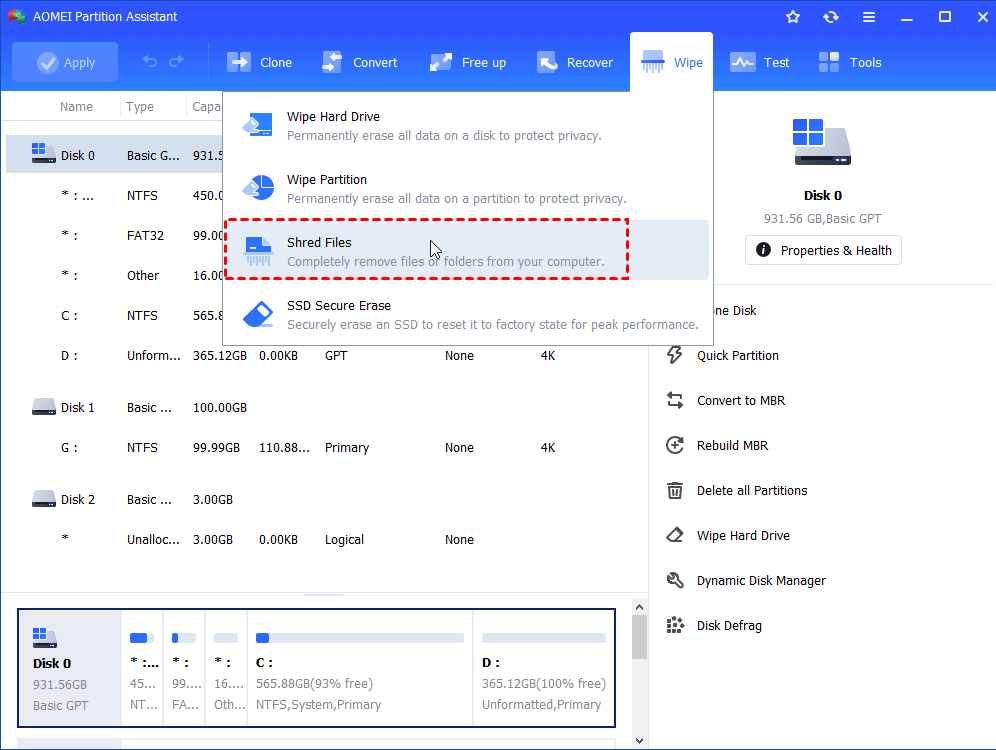
Step 1. Install and run AOMEI Partition Assistant Standard. In the main console, select the target disk, click "Wipe", and select "Shred Files".
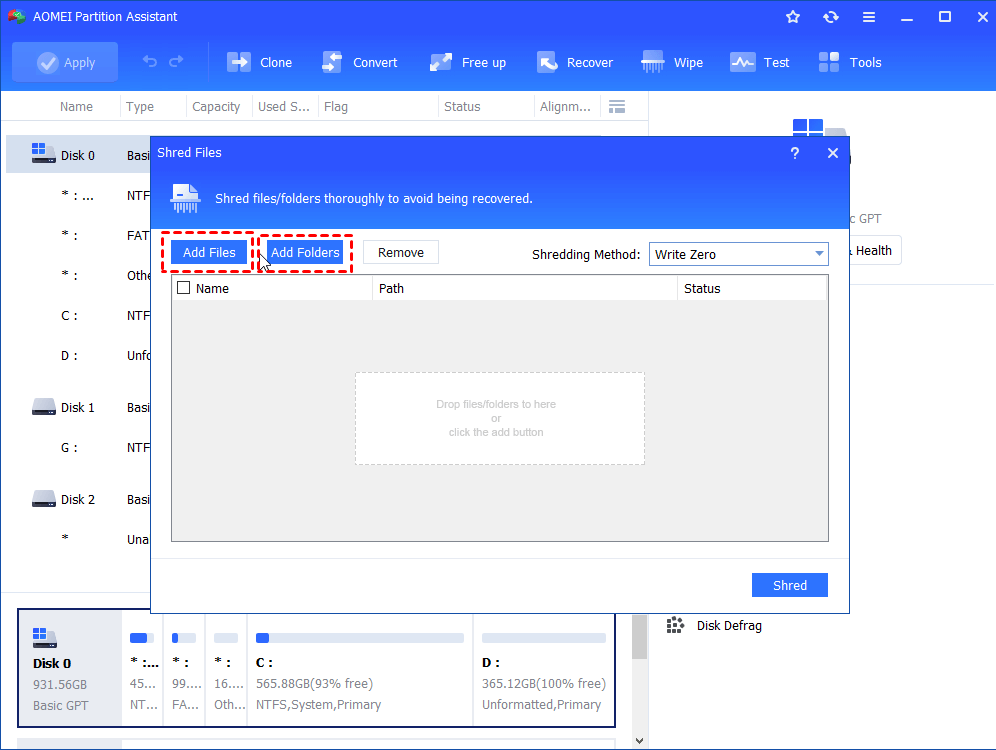
Step 2. In the small window, click "Add Files" or "Add Folder" to choose the file or folder you want to delete forcibly.
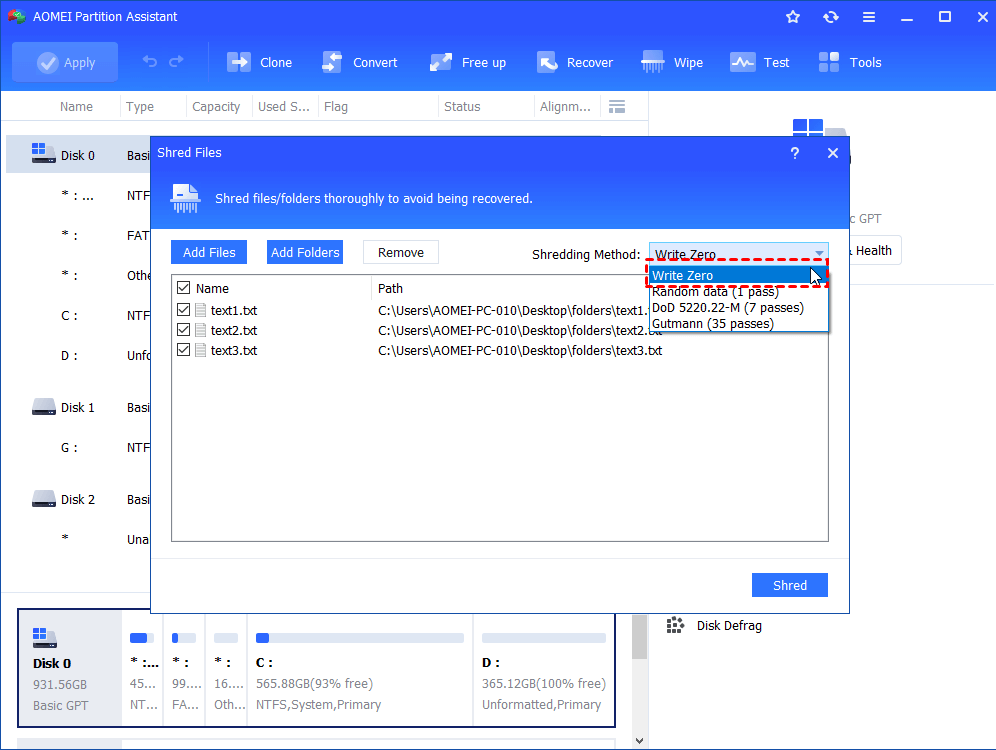
Step 3. Then, choose "Write Zero" as the shredding method.
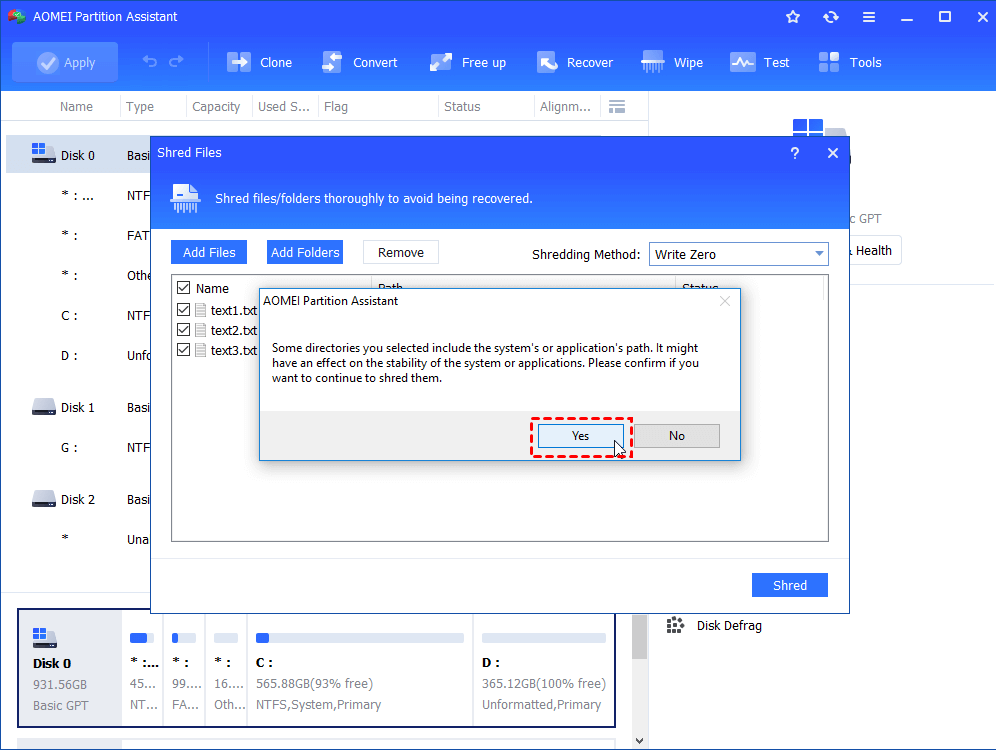
Step 4. Click the "Shred" button and you will be mentioned a confirmation note, click "Yes" to go on.
Method 5. Check the hard drive for errors
If you're unable to delete files and receive the message “The file or directory is corrupted and unreadable,” it’s likely due to a corrupted file system. To fix this issue, you can run Windows' built-in disk checking utility. Here's how:
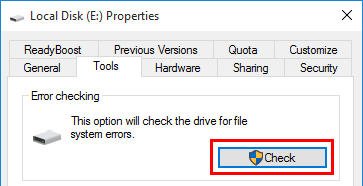
Step 1. Open File Explorer and find the drive where the problem exists.
Step 2. Right-click on the drive and select Properties from the menu.
Step 3. In the Properties window, go to the Tools tab and click the Check button under the Error checking section.
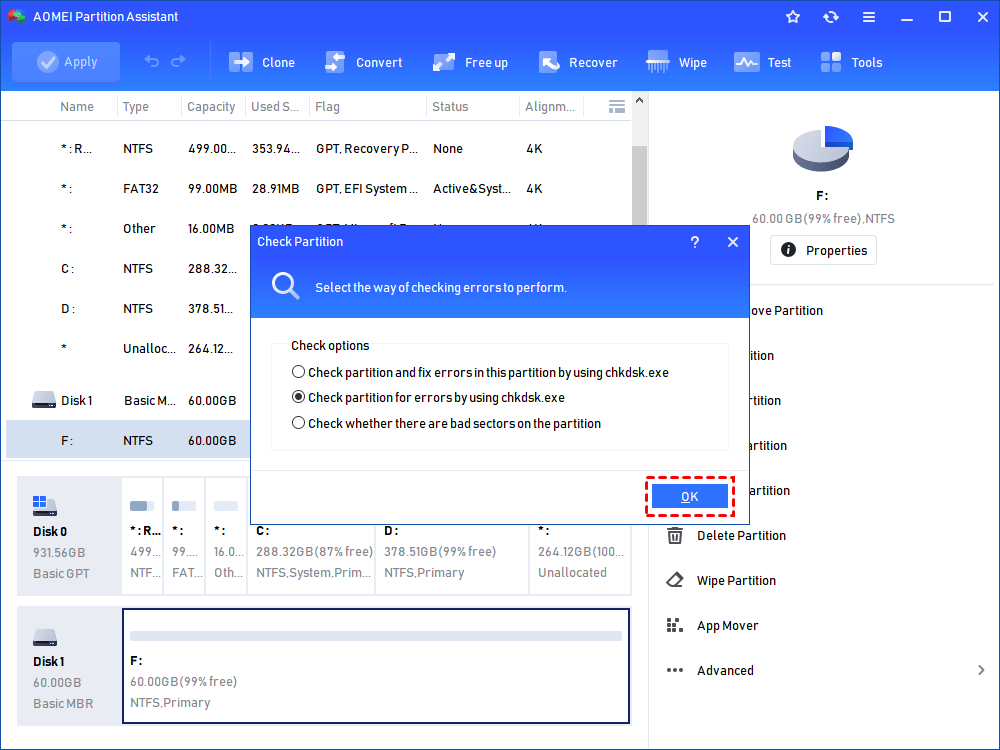
To check disk errors, AOMEI Partition Assistant is also a good choice. With its built-in "Check Partition" feature, you can run CHKDSK to detect and fix file system errors, scan for bad sectors to prevent data corruption, and analyze the health of your hard drive and SSD.
Step 1. Download the software, install it, and launch it. It will display to you the basic situation of your hard drives. Select the partition that you want to check for, right-click it, and select Advanced -> Check Partition.

Step 2. It will pop up a small window that you can select the way of checking errors to perform. Choose one according to your needs and click OK. It will proceed immediately.
Method 6. Reformat the NVMe SSD
This method is straightforward but applies only to data drives—not system drives. First, make sure to back up any important data to another storage device. Once your files are safely backed up, follow these steps to format the NVMe SSD:
Step 1. Press Windows + X and select Disk Management from the menu.
Step 2. In the Disk Management window, right-click on the partition of the NVMe SSD you want to format and choose Format.
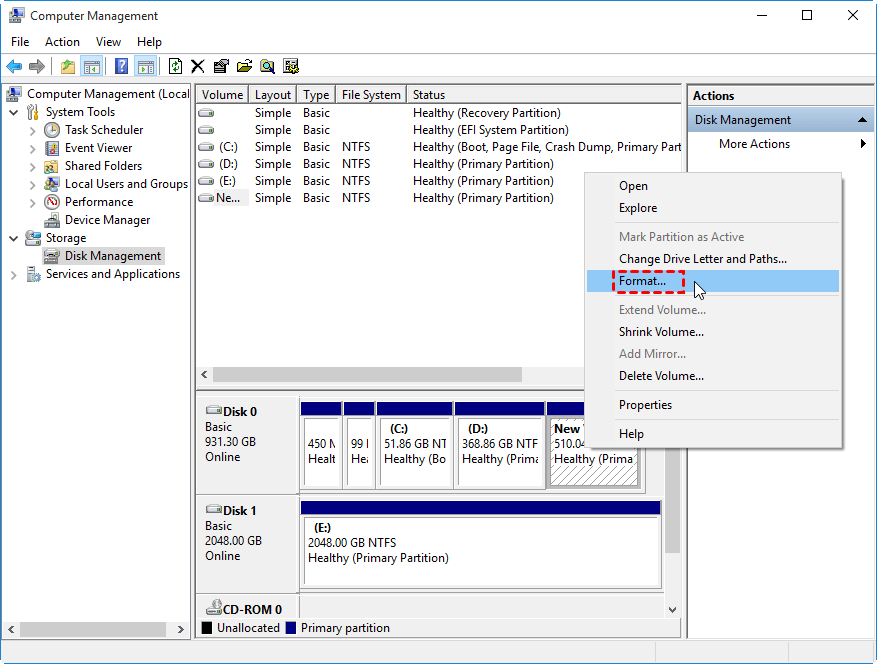
Step 3. Select a suitable file system (such as NTFS or exFAT), leave the other settings at their defaults, and click OK.

Step 4. When a warning message appears, review the information and confirm by clicking OK again.
Step 5. This will erase all data on the selected partition and prepare the SSD for new use.
If you're unsure why you're unable to delete files from your NVMe SSD, reformatting the drive with AOMEI Partition Assistant can be a reliable solution. Whether the problem stems from file system corruption, the need to switch between formats like NTFS, FAT32, or exFAT, or you simply want to start over, this versatile partition manager makes the process easy and efficient.
Just download the software and follow the on-screen instructions to reformat your drive in a few quick steps.
Step 1. Right-click the target partition and select “Format Partition”.
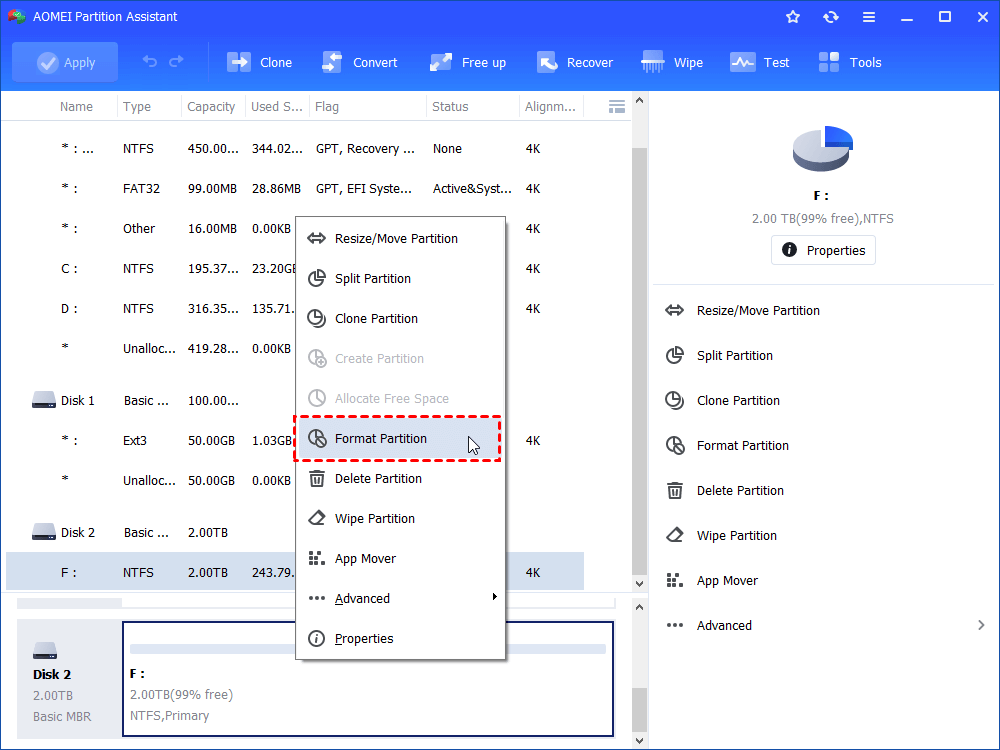
Step 2. In the window, select “FAT32” file system. You can see the “Ext2, Ext3, Ext4, NTFS and exFAT” file systems are also available for your selection.
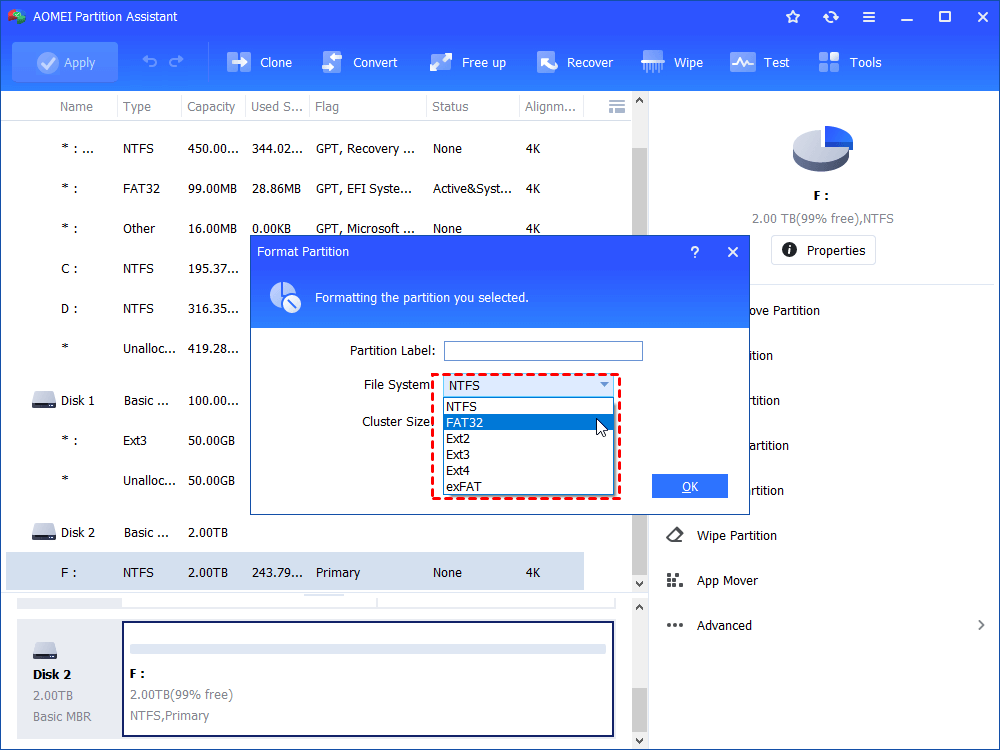
Step 3. Click “Apply” and “Proceed” to commit the pending operation.
Conclusion
Clearly, the inability to delete files from an external hard drive can result from various underlying causes. To resolve the issue quickly, it's best to identify the specific reason and apply the appropriate solution. Alternatively, you can choose to format the drive directly—just keep in mind that this will erase all existing data. If you can’t delete files from NVMe SSD on a Windows Server machine, consider using AOMEI Partition Assistant Server.

