

How to Delete Windows Update Files in Windows 10?
To delete Windows update files in Windows 10, you can run Disk Cleanup, Settings, or SoftwareDistribution Folder. There is also a shortcut can help effectively perform Windows 10 delete update files.
By Irene / Updated on July 8, 2025
About Windows update files in Windows 10
When your C drive is running out of space, you will probably use Disk Cleanup to free up space. There's a "Windows Update Cleanup" category that seems tied to the system-related data. Is it safe to delete these files? Where are they stored? Let's continue to learn more.
🔄What are Windows update files?
Windows update files are like packages of improvements for your computer, with .exe for big changes and .cab for small fixes. Microsoft's Windows Update service automatically puts them in C:\Windows, taking up several GBs of space. They keep your system updated. After updates, old files stay as backups. But these old files can continuously use up storage space over time. Simply put, here’s a table:
Windows update files are packages from Microsoft that improve your system:
| File Type | Purpose | Extension | Location |
|---|---|---|---|
| Executable | Major updates | .exe | C:\Windows |
| Cabinet | Minor fixes | .cab | C:\Windows |
| Backup Files | Old system versions post-update | (varied) | C:\Windows, WinSxS, etc. |
🧹Is it safe to delete Windows Update Cleanup in Disk Cleanup?
Usually, it's safe to delete old and unnecessary update files as long as your system is stable with the updates. Windows Update Cleanup aims for files no longer needed, like old system versions and cached updates. But, be cautious about removing Windows ESD Installation Files in Disk Cleanup. These files are tied to the "Reset this PC" feature, which lets you restore your computer to factory settings. If you delete them, "Reset this PC" might not work properly. If you do not know what to delete in Windows Disk Cleanup, you can click to learn relevant information. In short, you can refer to this table:
| Item | Can Delete? | Notes |
|---|---|---|
| Windows Update Cleanup | ✅ Safe | Removes old update files no longer needed. Frees up space. |
| Windows ESD Installation Files | ⚠️ Caution | Needed for "Reset this PC". Deleting may break the reset function. |
✅ If your system is working fine after updates, it's usually safe to remove update cleanup files.
⚠️ When unsure what to delete in Disk Cleanup, click each item for details before confirming.
3 ways to delete Windows update files in Windows 10
Here, we will share 3 built-in Windows tools to help you remove them and free up space on your computer. However, these methods require you to manually find and delete the Windows 10 update files. If you prefer a more modern and effective solution, you can skip directly to the section.
The Best Windows Disk Partition Manager and PC Optimizer
Method 1. Use Disk Cleanup to delete Windows update files Windows 10
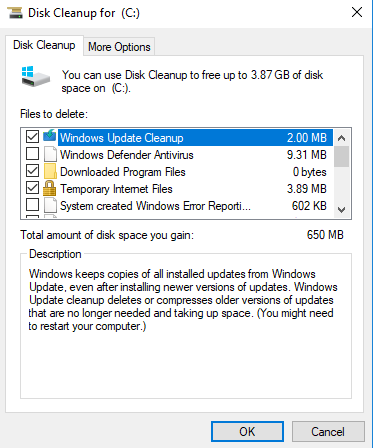
How to delete Windows update? It is a direct way to delete Windows update files on Disk Cleanup. In this utility, you can also clear data like Temporary Internet Files, Downloaded Program Files, Recycle Bin, Thumbnails, and so on. Just with 2 steps, you can delete Windows update files to free up storage space.
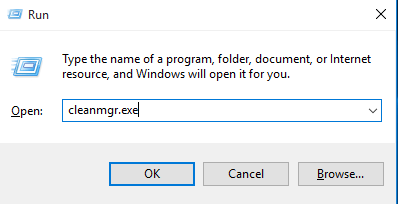
Step 1. Hit “Win+R” to input “cleanmgr.exe”. Click “OK”
Step 2. Find “ Windows Update Cleanup” and check it.
Method 2. Delete Windows 10 update files via Settings
Windows 11 and 10 have the tool named “Windows Update Cleanup” tool in Settings. The updated files and other temporary files on your PC can be found here.
Step 1. Press “Win+I” to open Settings, and choose “System” >”Storage”
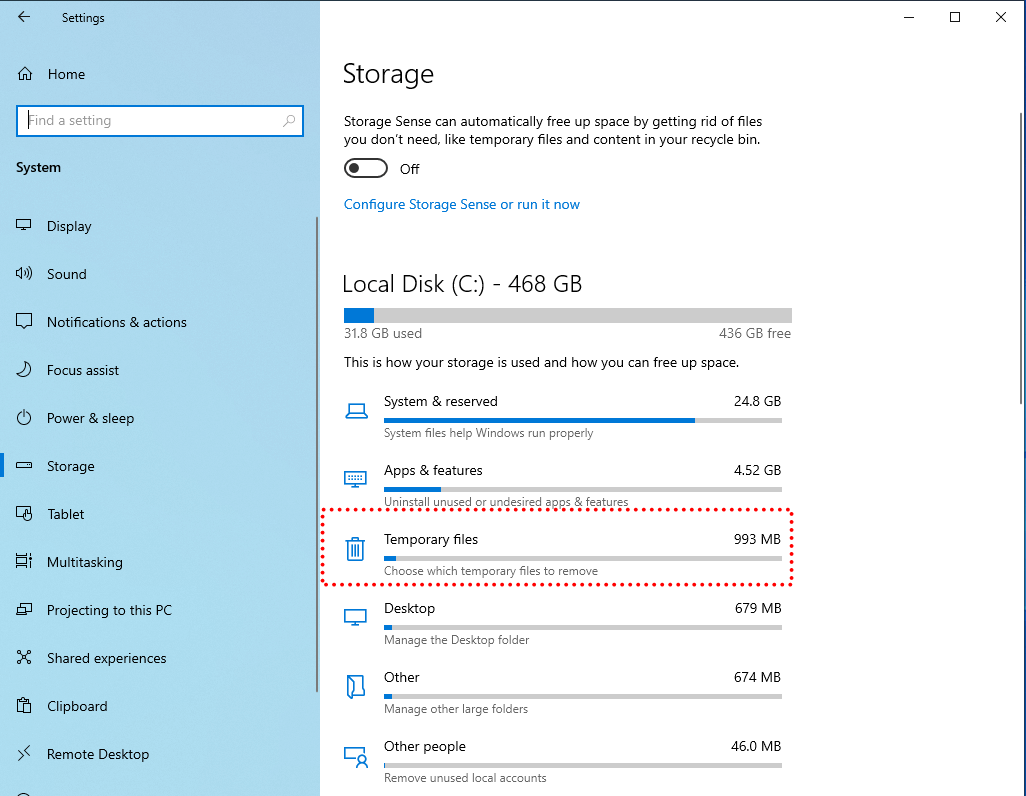
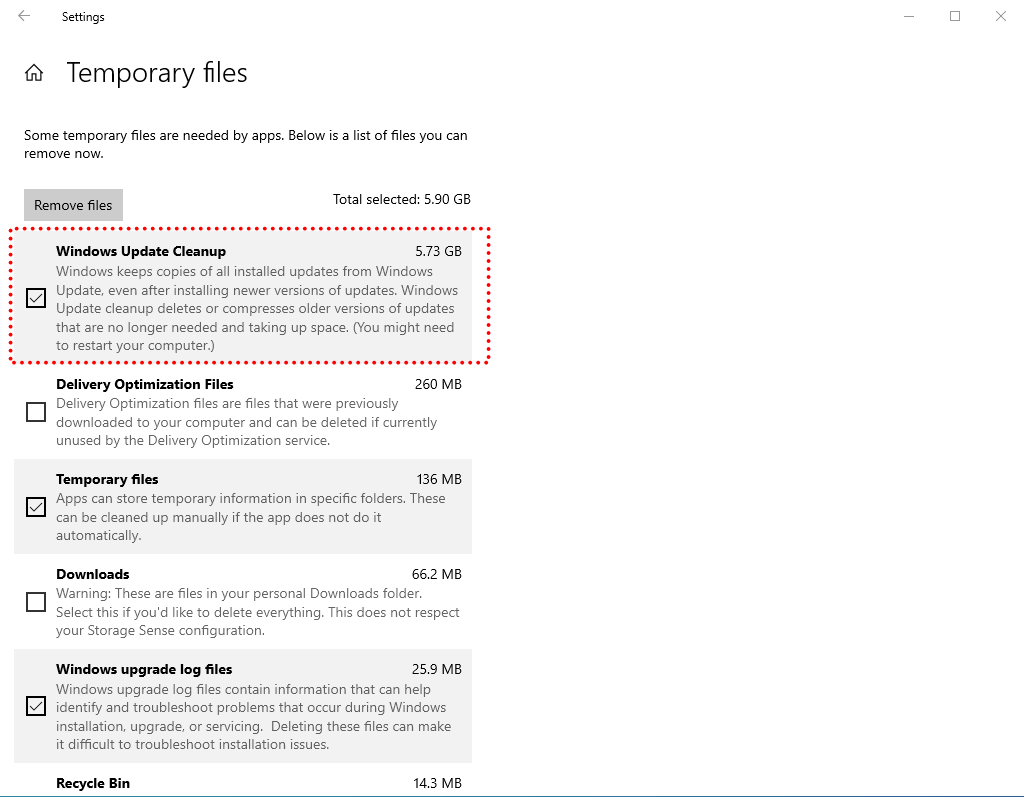
Step 2. Select “Temporary Files”, check “Windows Update Cleanup” and “Delivery Optimization Files” in the pop-up window. After checking, click “ Remove Files” button
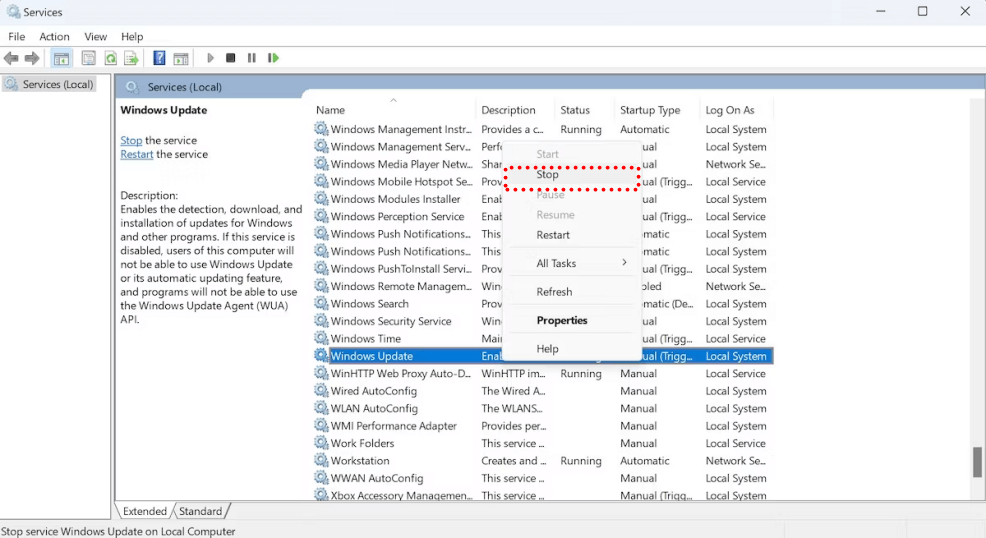
Method 3. Delete Windows update files Windows 10 with SoftwareDistribution Folder
The last method to delete update files in Windows 10 via the Windows built-in tool is easy. Sometimes, when the Windows updates stagnate or not be downloaded entirely, the update files will be stored in the folder temporarily, deleting them or stopping the automatic storage won't trigger any major problem. Therefore, it is advisable to stop the service first to avoid storing.
Step 1. Type “Services” in the search box, and click the icon.
Step 2. Find “Windows Update” service, and right-click it. Choose “Stop”
🔥How to quickly and effectively delete Windows updates?
If you want to remove Windows update files effectively without manually searching and deleting them, AOMEI Partition Assistant is an ideal choice. This disk management tool offers various options to clean up your PC—including, but not limited to, Windows update files, junk files, and other unnecessary data that take up your PC space.
Fix 1. Run PC Cleaner
When using Disk Cleanup, the multitude of files can be puzzling, and it's hard to determine what's safe to delete. Mistakes could lead to data loss or system crashes. To safely and easily clean up your computer to free up space, it is recommended to use user-friendly software, such as PartitionAssistant Cleanup. It is a trusted and free tool designed to help clean your PC and free up space across all your hard drives. It helps keep your computer running smoothly by removing unnecessary files and managing disk space more efficiently.
The Best Windows Disk Partition Manager and PC Optimizer
Step 1. Install and launch PartitionAssistant Cleanup. Click the "Clean Junk Files" tab.

Step 2. Click the "Scan Now" button to start the process of scanning junk files.

Step 3. After the scan process is finished. All system junk files (including recycle bin files, temporary files, log files, invalid shortcuts, and so on) and registry junk files (including DLL registry, system registry, and program registry) will be displayed.

Step 4. You can also click the button behind to view the junk files details.

Step 5. And, you can click the button behind to locate the file.

Step 6. By default, the program will select some junk files to clean up, for example, temporary files, log files, and so on. You can also manually check to select more or uncheck to deselect fewer listed junk files. Or, click "Select All" to select all junk files to clean up if you need to clean up all.
After selecting junk files that are not needed anymore, you can click the "Clean Now"button to start the cleanup.

Step 7. The process of the cleanup might take time, and the selected files will be cleaned up. After the process is finished, you will get a cleanup completed window displaying how many files you have cleaned and not yet cleaned.

Fix 2. Automatically detect and delete large files
PartitionAssistant Cleanup has a variety of solutions available. The another notable feature is "Delete Large Files," which can automatically scan files larger than 16MB, display them for you, and permit the removal of around 1,000 files at a time. To ensure safety, certain files are marked in red, indicating they're not recommended for deletion. Should an inadvertent deletion occur, it will prompt you to manually select files, confirm the action again, and then proceed.
The Best Windows Disk Partition Manager and PC Optimizer
- PartitionAssistant Cleanup allows you to delete large files even you can't delete in Disk Cleanup.
- If you accidentally delete anything important, you can run its Recover Data function to recover it. A powerful software supports recovering permanently deleted files from PC.
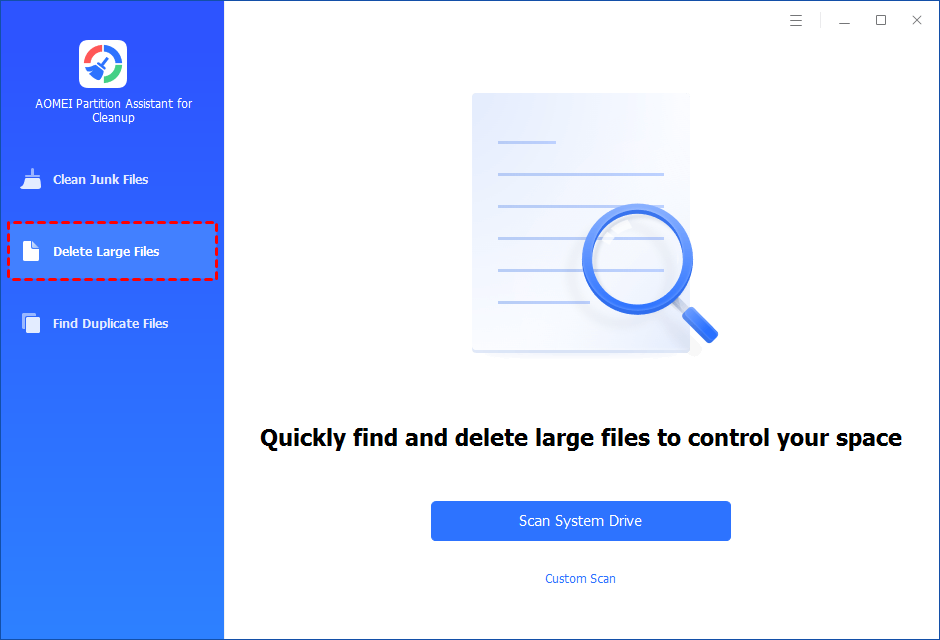
Step 1. Install and launch PartitionAssistant Cleanup. Click the "Delete Large Files" tab.
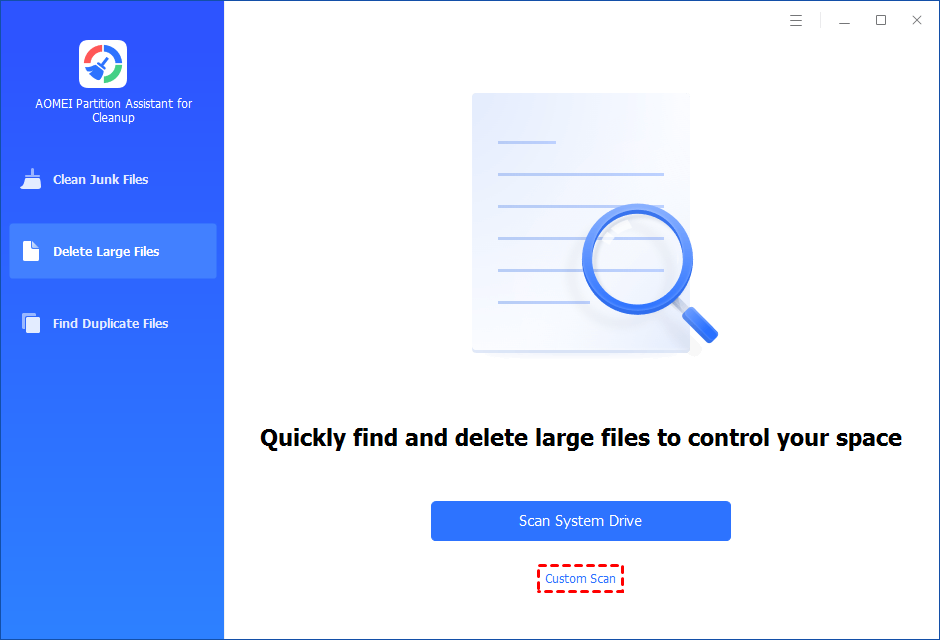
Step 2. You can either click "Scan System Drive" to start the scan of your system C: drive. Or, click "Custom Scan" to manually select paths to be scanned. (Here, we take the "Custom Scan" as an example.)
Step 3. After clicking "Custom Scan", all local and external drives on your PC and the common Desktop, Documents, and Downloads paths will be displayed. You can manually select paths to be scanned. Once necessary paths are added, you can click the "Scan Now" button to start the scan process.

Step 4. The scan process might take time. After the scan is complete, all large files found will be listed.
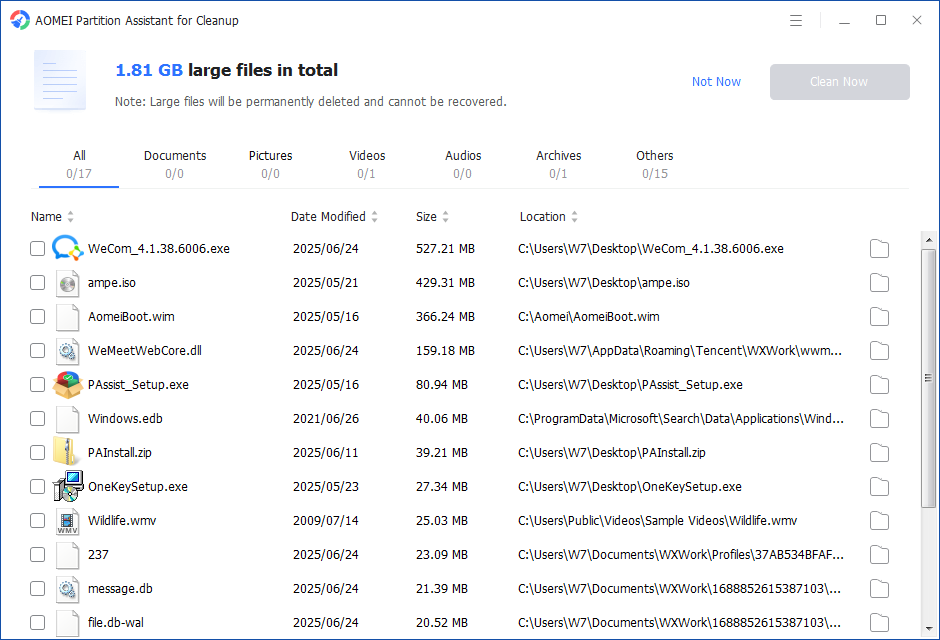
Step 5. You can also check the large files and click the button behind to locate them.
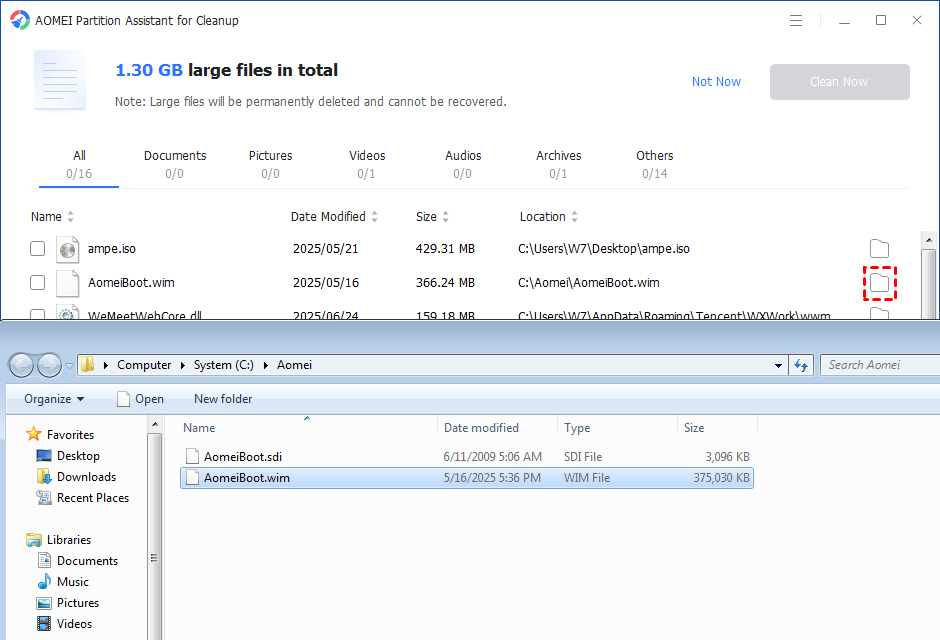
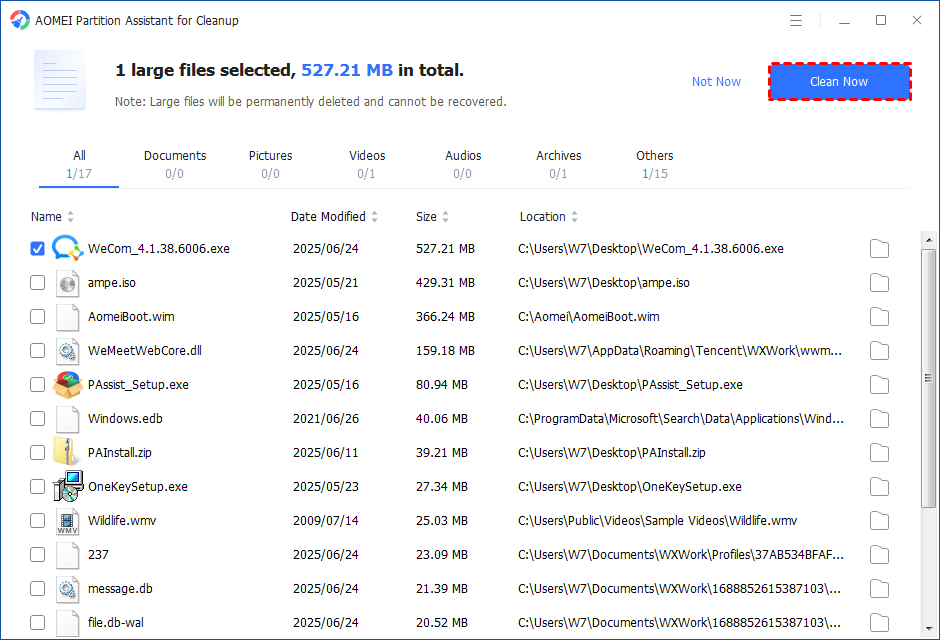
Step 6. Tick the files you want to delete, and then click the "Clean Now" button to start the deletion.
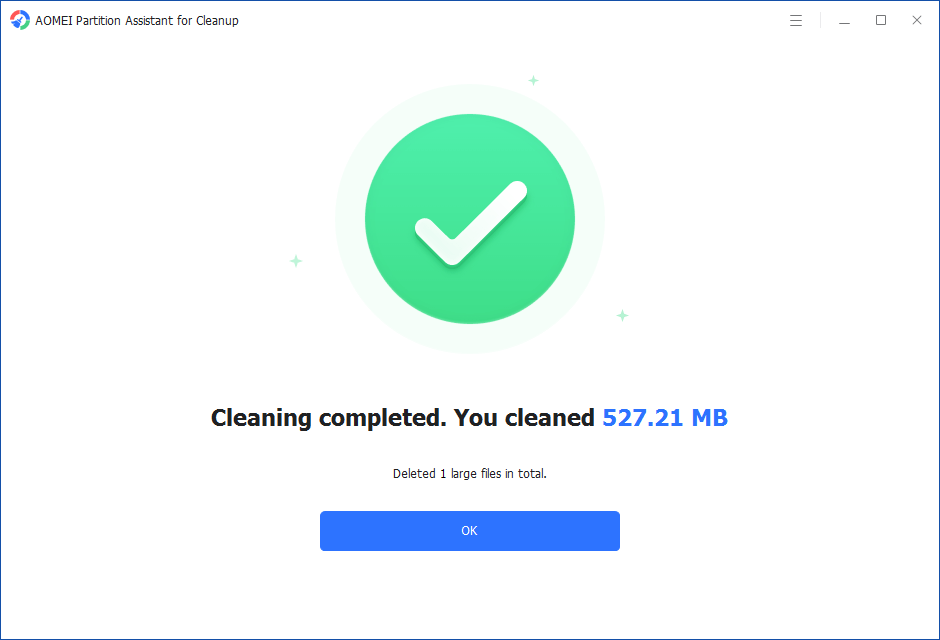
Step 7. The deletion might take time. After the process is finished, the selected files will be deleted, and you will get a cleaning completed window displaying how much data you deleted in total.
Conclusion
In this passage, we share the methods like using Disk Cleanup, Settings, and SoftwareDistribution Folder to delete Windows 10 update files. But when you ask how to delete Windows 10 update files, you aim to free up more space to enhance your computer performance.
The powerful tool PartitionAssistant Cleanup can help you to do that. Furthermore, you can also enjoy the powerful disk management tool, AOMEI Partition Assistant, it offers more advanced features, such as moving applications to another drive, migrating OS to SSD, or merging partitions, etc. to make full use of your storage space. For Windows server users, you can choose Server Edition to manage your computer effectively.

