How to Use DiskPart Resize Partition Without Losing Data?
You can read this article to know how to use Diskpart resize partition without losing data. More importantly, you will learn an easier way to shrink or extend partition effortlessly in Windows 11, 10, 8, and 7.
By Hedy / Updated on May 6, 2026
How can I resize a partition without losing data?
"I have the issue that my C: drive is pretty much out of space, I keep getting low space warnings and I've tried moving everything I can to my D: drive. Basically it's a 1.5TB disk with C: and D: partitions. I'd like to take some of the space from D: maybe 100GB and move it to C:. It seems very hard to find a tutorial to do just that.
I feel like I can do it simply by shrinking D: by 100GB (or whatever) and then extending C: by that same amount but I want to be sure that I can use DiskPart resize partition without losing data. I need this computer for work (and for play). Is there a straight forward tutorial on doing this somewhere? Thanks."
Can DiskPart resize partitions?
When using a computer, it's common to find the partition size is unreasonable like C drive full and D drive empty. This is why a number of users are seeking various methods to resize partitions. It's known to all that Disk Management is the Windows built-in disk manager which can be used to increase or reduce the size of partitions. However, due to the frequent occurrence of the "Shrink/Extend volume is greyed out" issue, many users might switch to DiskPart which is admitted to be difficult to get started for computer novices.
Can DiskPart resize partitions? The answer is absolutely yes! Diskpart is an embedded product that needs to be used under Command Prompt which uses command line to format partition, delete partition, as well as shrink or extend partition. Now, we will show you how to resize partition with DiskPart step by step.
How to use DiskPart resize partition without losing data?
To make partition size adjustment successful via DiskPart, there several things you need to pay more attention to before resizing:
- Notes:✎...
- DiskPart will not allow you to shrink or extend the system partition.
- It's able to resize NTFS partitions or RAW drives, but it doesn't work on FAT-based partitions.
- If there is no adjacent unallocated space right behind the partition you want to extend, the command line will be invalid, which is the same as in Disk Management.
- Please note every command you will type because it's easy to cause operation failure or other system errors.
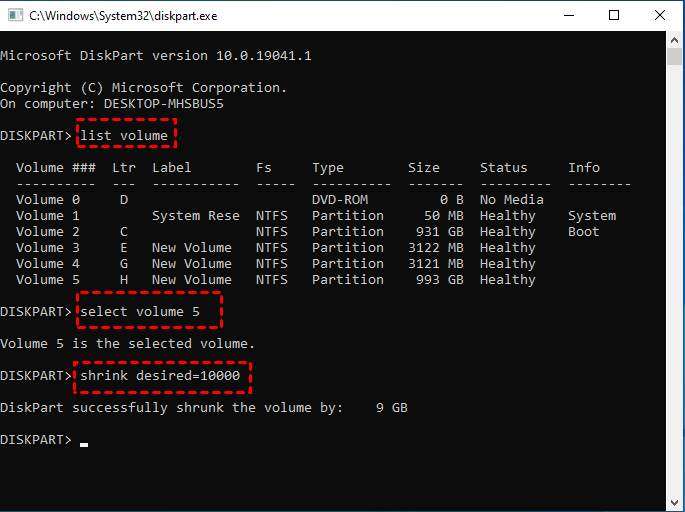
▶ Shrink partition
1. Type "diskpart" in the search box on the taskbar and hit "Enter".
2. Type "list volume" and press "Enter". (All partitions on your PC will be listed.)
3. Type "select volume x" and hit "Enter". ("x" represents the partition you want to shrink.)
4. Type "shrink desired=z" and press "Enter". ("z" refers to the size to be shrunk.)
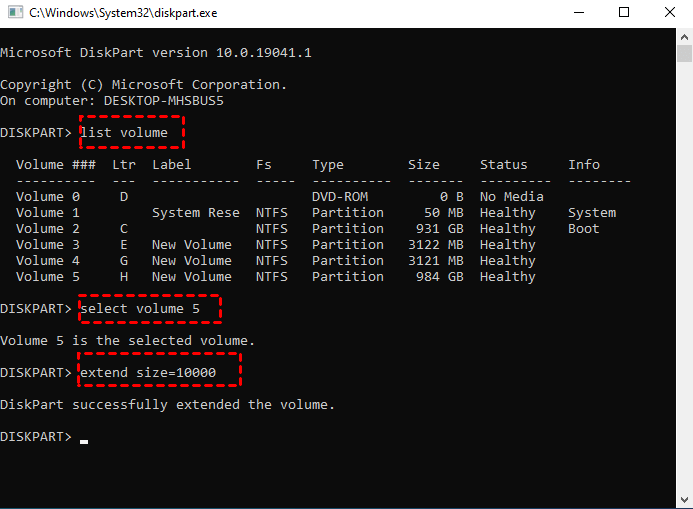
▶ Extend partition
1. Type "diskpart" in the search box on the taskbar and hit "Enter".
2. Type "list volume" to list all partitions on your PC.
3. Type "select volume x" and press "Enter". ("x" means the target volume number.)
4. Type "extend size=z" and hit "Enter". ("z" refers to the size of space.)
An easier way to replace DiskPart resize partition without losing data
Although using DiskPart resize partition without losing data Windows 10 is available, there are still some limitations restricting you from adjusting the size of partitions. For example, you can only resize NTFS or RAW partition and only extend when there is contiguous unallocated space on the right side of the target partition. Besides, if you are not an advanced user, you may feel confused about the command line because you can't see the specific information of your partitions on the operation window.
To get around all those limitations, you can resort to a professional disk partition manager named AOMEI Partition Assistant Standard (Windows 11/10/8/7/XP/Vista supported). It not only enables you to shrink or extend a partition (including resizing encrypted partition) without any data loss, but also allows you to:
- create partitions with unallocated space or within existing partitions;
- convert file system between FAT32 and NTFS without formatting;
- move folders from C drive to D drive to release more free space;
- wipe hard drive so as to take it as brand new storage device;
- resize/move partition without losing valuable data;
- ......
Free download this powerful disk manager software to take the place of DiskPart resize partition.
▶ Shrink partition
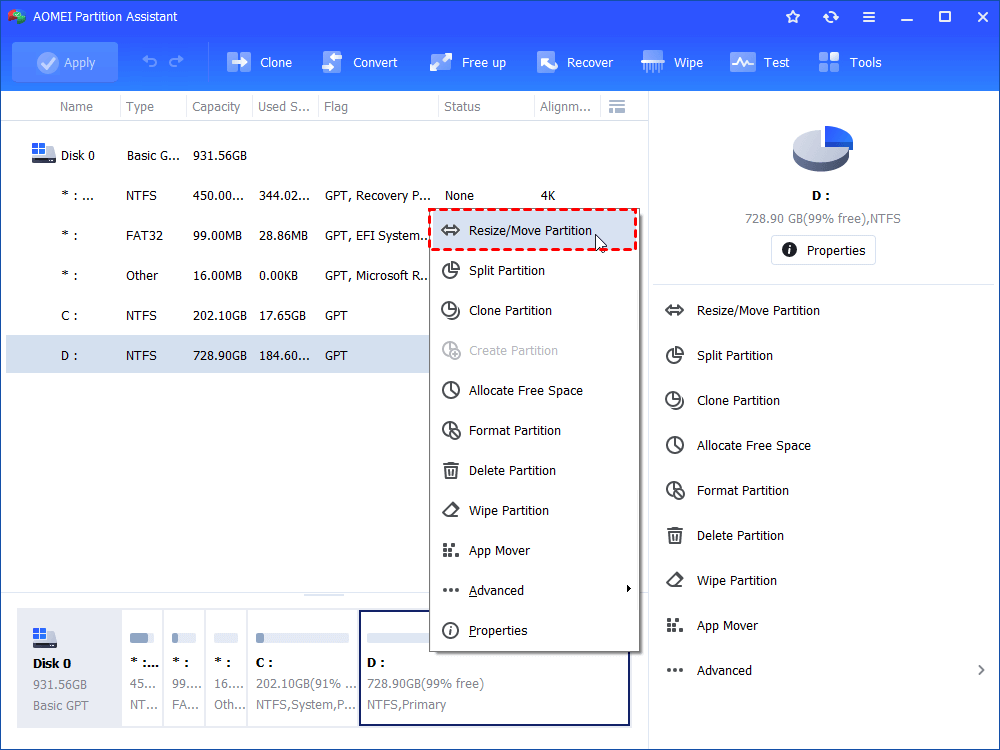
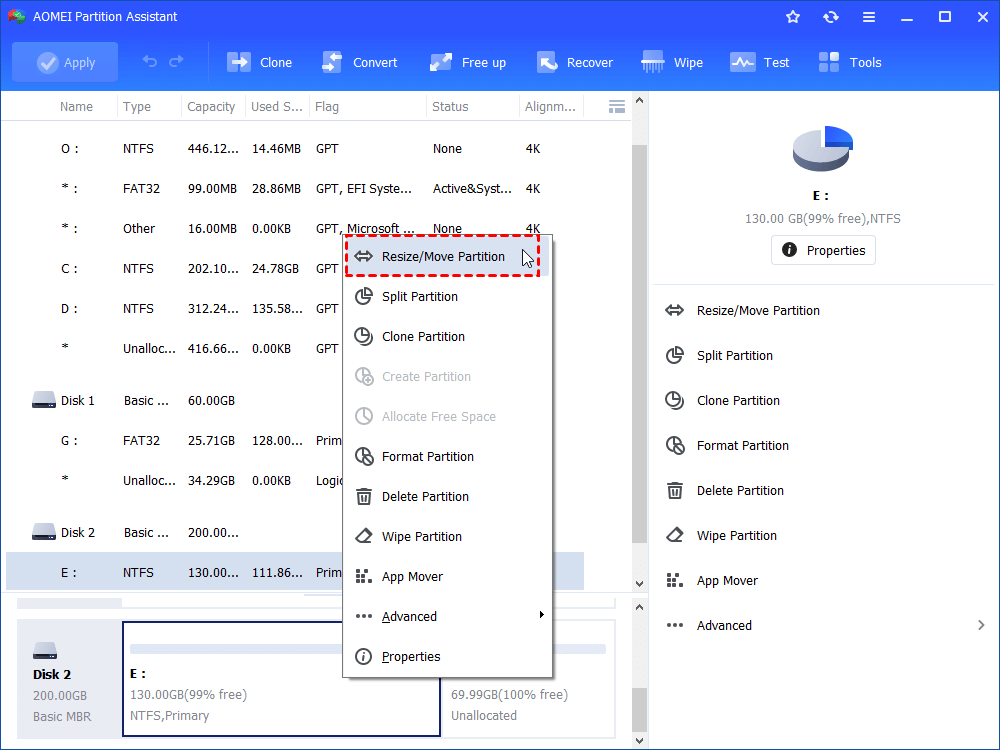
Step 1. Launch and install AOMEI Partition Assistant Standard. You will see all disks and partitions on the interface. Right-click on the partition you wish to shrink and select "Resize/Move Partition".
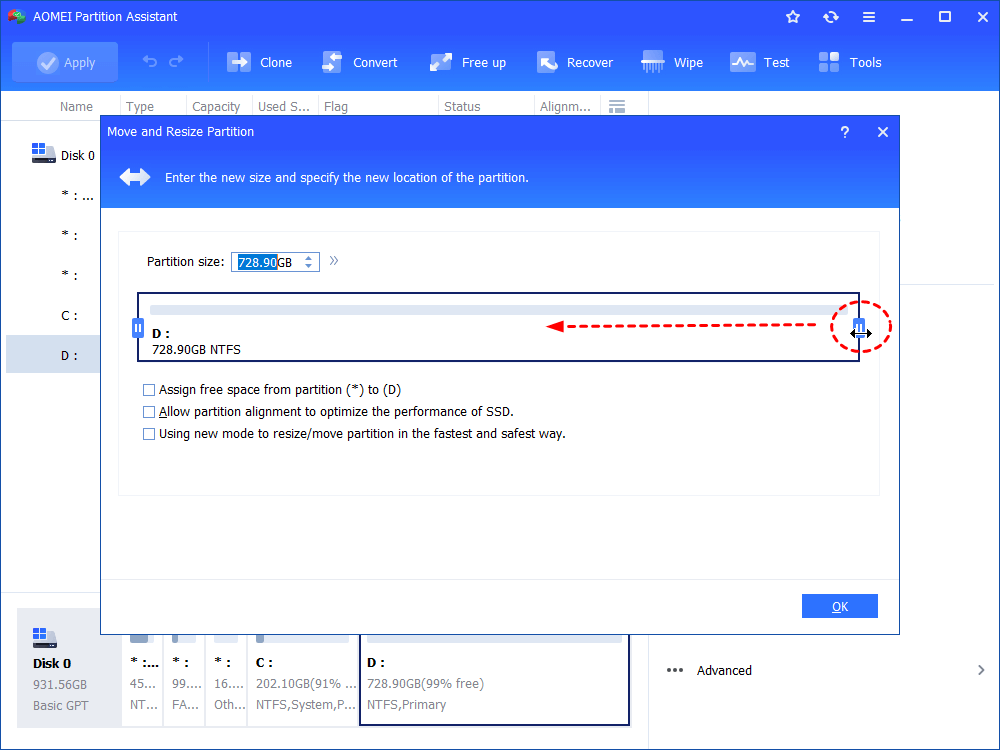
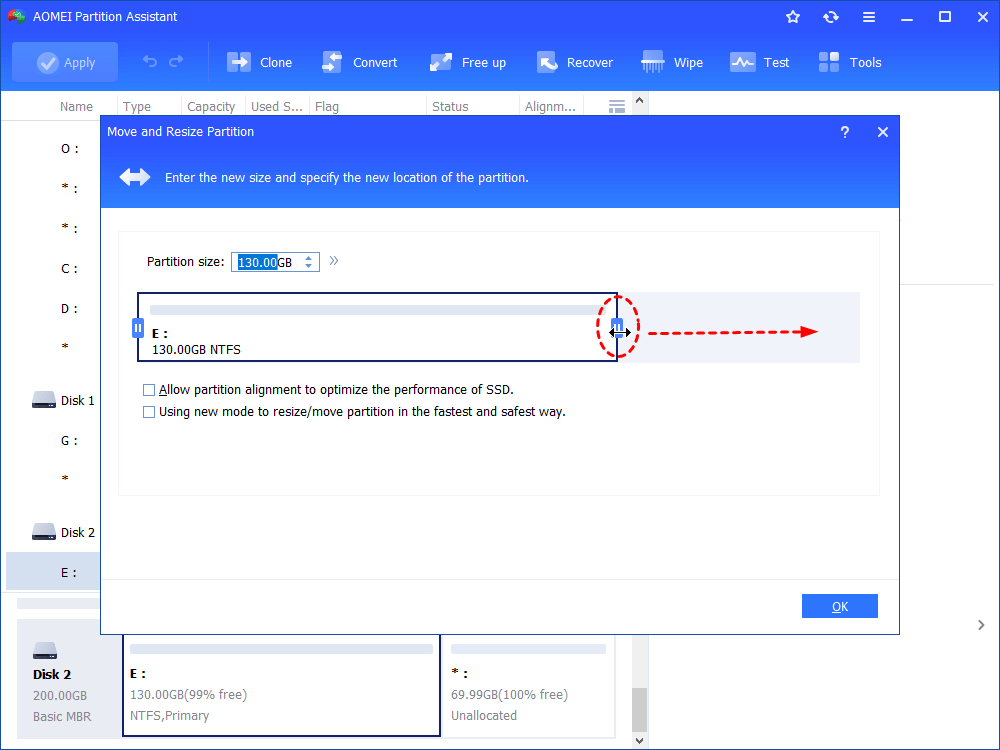
Step 2. In the pop-up window, adjust the length of the green bar by dragging the circle on both sides to determine the size of the space to shrink. When it's done, click on "OK".
Step 3. After returning to the main interface, click on "Apply" > "Proceed" to start the shrinking operation.
▶ Extend partition
AOMEI software has provided different ways to enlarge a partition, you could choose one as your needs, let's see the two most commonly used methods in detail.
Way 1. Extend by resizing
The same as Windows built-in tools, to employ this method, there must be unallocated space on either side of the partition you wish to extend.
Step 1. Locate the partition you want to extend, right-click on it, and select "Resize/Move Partition".
Step 2. Now, you can find there is a segment of the white bar that is contiguous to the green bar. The white bar is the unallocated space mentioned above. Drag the circle to eliminate the white bar to extend the partition. When it’s done, still, click on "OK" to return to the main interface.
Step 3. Click on "Apply" to start the extension.
Way 2. Extend by merging
When the unallocated space on your disk is not adjacent to the target partition, it's available to make the unallocated space contiguous to the to-be-extended partition and then enlarge the drive. But AOMEI Partition Assistant Standard offers you an easier way to make it. The steps are as follows.
Step 1. Right-click on the unallocated space, right-click it, and select "Merge Partitions" from the "Advanced" option, which can not only merge unallocated space to the target partition but also merge two partitions into one.
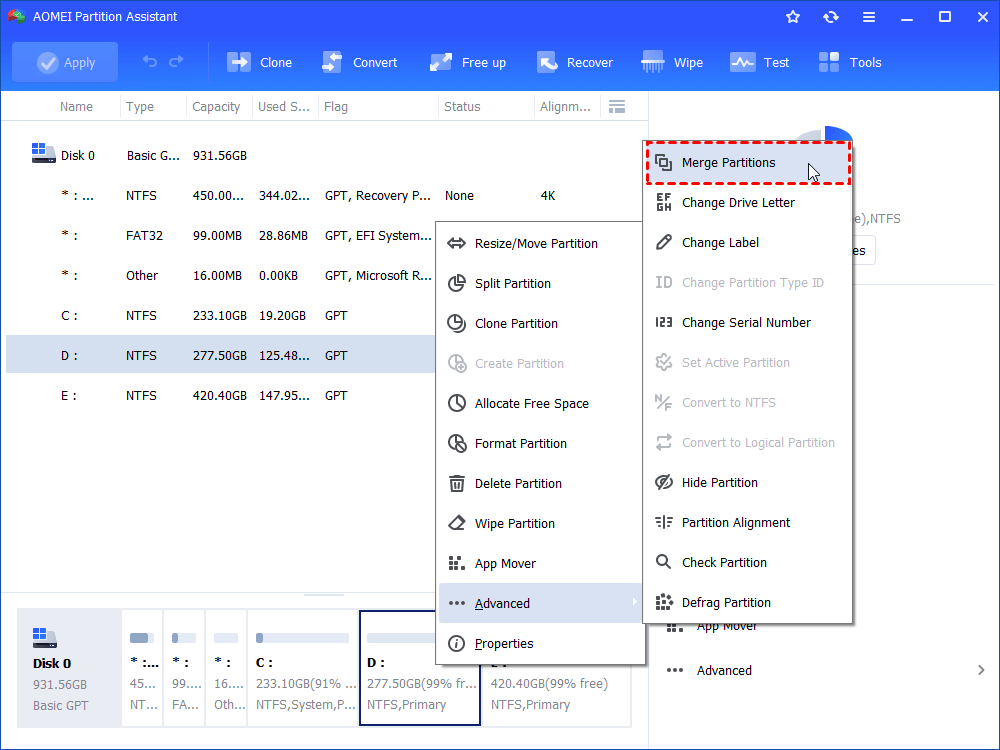
Step 2. In the popup window, all partitions on your disk will be shown. Tick off the partition you want to merge the unallocated space into and click on "OK".

Step 3. Hit "Apply" and then "Proceed" to start the merging process.
Note: What if when you intend to extend one partition but there is no unallocated space on your disk? Don't worry, you even don't have to shrink a partition in advance, AOMEI software is featured with "Allocate free space" which allows you to move free space from one partition to another directly.

Conclusion
In this article, you've learned how to use DiskPart resize partition without losing data. However, there are many limits and risks when using the command line. As an alternative, AOMEI Partition Assistant Standard is your best helper. It offers you several simpler and more convenient ways than DiskPart or Disk Management can do. If you want to try more practical features, you could upgrade to the Pro version; if you are using Windows Server, you are able to try Server Edition.

