What is EFI System Partition and How to Create/Delete it?
An EFI system partition is typically created during the OS installation. What is it exactly, and is it OK to delete the ESP when you no longer need it? Here is a detailed explanation with guidance.
By Irene / Updated on March 29, 2024
What is an EFI System Partition?
The EFI system partition (ESP), is a small partition formatted with FAT32 and typically ranging from 100MB to 200MB in size. If your hard drive is in the GUID Partition table (GPT) partition style, it will automatically generate an EFI system partition after you have installed your operating systems. Both Windows and Mac operating systems are supported. The ESP partition generally contains folders such as Boot and System Volume Information (which includes the bootmgr and Bootsect.back files).

A healthy EFI System Partition ensures proper functionality. It means the partition contains all necessary files for the UEFI firmware to boot the OS and utilities. During the boot process, the UEFI firmware accesses ESP files, which simplifies the process by focusing on specific drives rather than scanning the entire system. And the scripts in the ESP will make it easy to refresh the computer during the installation or reset process.
- Note:
- MBR partition style doesn't support EFI. Please check the storage space on the reserved system partition to detect this. If it is less than 100MB, the computer does not have an EFI partition
Is it OK to delete EFI System Partition?
Do Windows 10 and 11 need an EFI system partition? Can I delete it? The answers are: "Yes, they do." and "You'd better keep it on your drive". The EFI system partition serves as a safeguard. It is not only necessary for booting the operating system, but it also contains several other tools that are necessary when something goes wrong with your computer. That is why you cannot erase an EFI partition using the built-in Disk Management tool in Windows. It is dangerous to delete the EFI partition since the system will become unbootable as a result.
Normally, you even can't view the EFI partition through File Explorer (or Finder for Mac OSX) as it doesn't have a drive letter and if you accidentally manage to find and delete the partition, then your system will be unbootable. In order to protect the EFI partition, Windows will attempt to prevent you from deleting it. However, some users prefer to delete the EFI partition since it takes up space.
Also, some users hope to erase the EFI system partition and reformat the second hard disk. So, in the circumstances where you still wish to delete the EFI partition, what can you do for preparation?
How to delete the EFI system partition in Windows 10?
In this part, we will share comprehensive guidance on how to delete EFI system partition. And here, we would like to take Windows 10 as an example. The method is also available to Windows 11,8, and 7.
Preparation before deleting EFI System Partition
If you plan to erase the EFI system partition, it is better keep the following precautions and practices in mind to avoid any unexpected loss. For situations where you have more than one drive, please make sure you choose the correct disk number from which to erase the partition.
You can right-click the Start button and select Disk Management from the elevated menu to view the disk numbers. Then recall the disk number where you want to erase the EFI partition.
2. If you want to maintain the Windows OS operating properly, don't modify anything in the EFI system partition. It is strongly advised that you back up the vital files from the EFI partition to an external storage device in advance to avoid any unwanted data loss.
3. If you have two Windows systems on your computer and just wish to eliminate the EFI partition, you can clear up disk space by keeping one OS and then use the procedures below. You can reinstall OS directly, which will erase ESP automatically, if you wish to delete the deleted EFI system disk and install a new Windows operating system.
Securely delete the EFI system partition in Windows 10
To delete the original EFI partition, you have to turn to a third-party partition manager because the Windows built-in tools won't allow you to remove the ESP. Here we highly recommend AOMEI Partition Assistant Professional, which allows you to securely delete any partition without losing data on other partitions in Windows 11/10/8/7. But before you delete the partition, there's something important to know.
As we mentioned above, the EFI partition is necessary for booting the operating system that you have installed on your internal hard drive. If you decide to delete the system partition, it is advisable to create a bootable media with AOMEI Partition Assistant so that you can boot your PC from the media and delete the partition without boot problems. Besides, if you created an EFI partition on a Mac and now want to install Windows, you may need to delete the original EFI partition and create a new one.
✍ Now, download the demo version of AOMEI Partition Assistant to give it a try!
To delete the EFI partition using AOMEI Partition Assistant without boot problems, please follow the below steps:
1. Install and run AOMEI Partition Assistant Pro.
2. Connect either a USB drive or CD to your computer and click "Tools" in the toolbar to choose Make Bootable Media. Follow the wizard to create a bootable disk. Then boot the computer from the bootable device.

3. In the main window, right-click on the EFI partition that needs to get rid of and select Delete Partition.
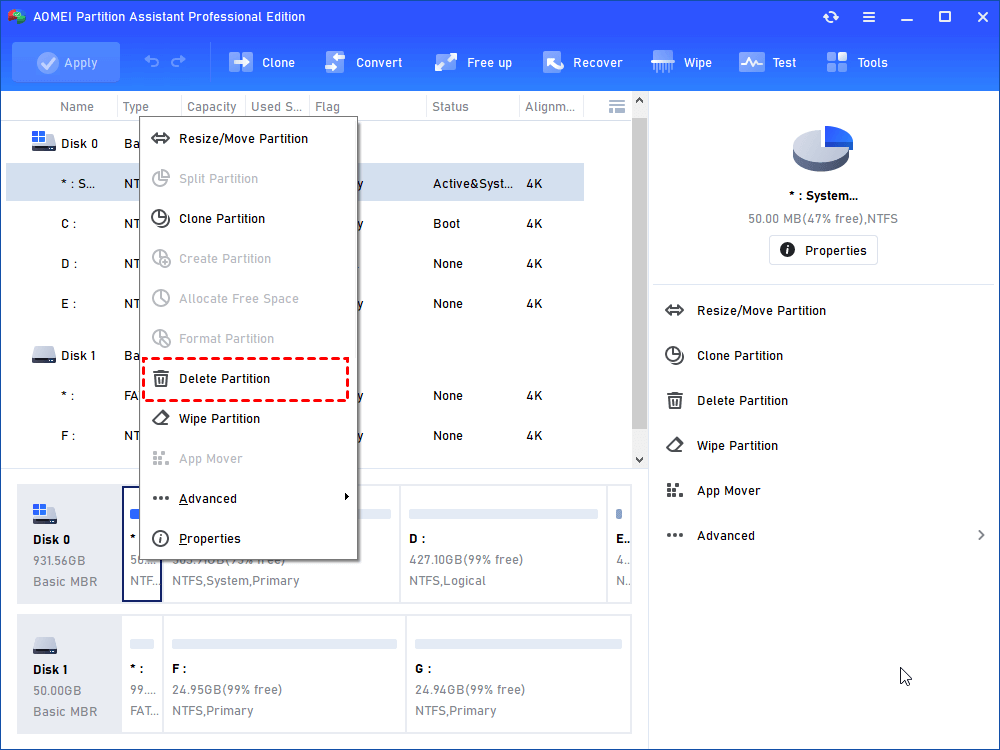
4. In the pop out window, click “OK” to confirm.

5. The program has not yet made any permanent changes to your hard drive, if you’re happy to proceed you need to click Apply to save the changes.
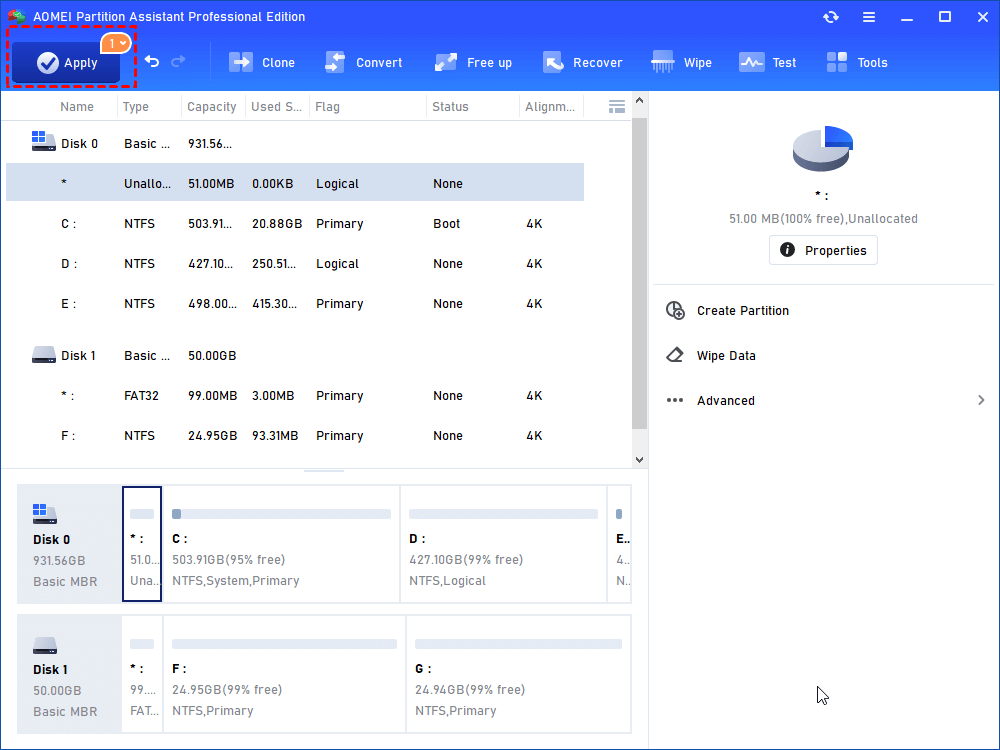
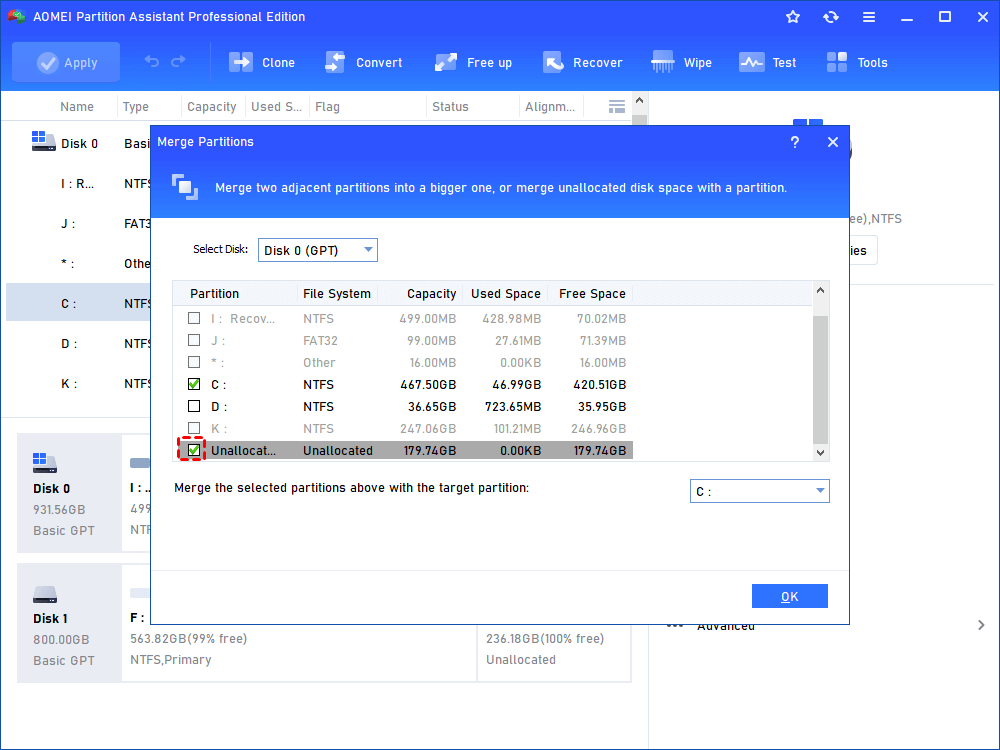
After that, the EFI partition has now become unallocated space, and you can add this unallocated space to any of the existing partitions by using the Merge Partitions function.
Apart from deleting the EFI partition, AOMEI Partition Assistant has many useful features that the in-built Windows Disk Management doesn’t. AOMEI Partition Assistant has the ability to convert disks between GPT and MBR without losing any of your data, clone partition, move folders from C drive to D drive, migrate operating systems, recover deleted partitions, and more!
How to create EFI partition?
In order to boot Windows on a GPT disk, we know that the drive must contain an EFI system partition and a Microsoft Reserved Partition (MSR). If you delete the EFI partition on the system disk by mistake, then Windows will fail to boot. On occasion, when you migrate your OS or install it on a hard drive, it may fail to generate an EFI partition and cause Windows boot issues. In this case, you can create a new EFI partition and then install an EFI boot loader in order to make the hard drive bootable. Here is the tutorial:
1. Boot your computer from a Windows installation disc or recovery disk. Press Shift+F10 during the setup to enter the command prompt.
2. Run the commands below to shrink the partition to free up some unallocated space.
▪ list disk
▪select disk X (X represents the disk number of the disk that requires an EFI partition)
▪list partition
▪select partition N (N represents the partition number of the partition that needs shrinking)
▪shrink desired=500 (shrink the partition by 500MB)
3. Then you can create EFI partition out of the 500MB unallocated space using the command below:
▪format quick fs=fat32 label="System"
▪create partition msr size = 128
4. After those two partitions have been successfully created, use the commands below to install boot loader and other applications needed.
▪bcdboot c:\Windows /s b: /f ALL
On an EFI-only system, the last two options don’t need to be included, and the command should read "bcdboot C:\Windows".
6. Reboot your computer to see if it is now bootable.
Summary
Now, you should have a thorough understanding of what is EFI system partition in Windows 10, 8, 7 or Windows 11, what it is used for, how to delete or recreate an ESP. If your computer fails to boot because no EFI partition was found, you can use the above method to recreate it or use AOMEI Partition Assistant Professional to recover the missing EFI system partition, and then your Windows system should boot as normal. Even though this will not cause data loss, it is also recommended to create a disk backup before you make any changes.
FAQs about deleting EFI System Partition
1. Can I delete EFI partition in Windows?
The EFI partition cannot be deleted directly. This is because the boot files are stored on a protected system partition. If you delete the EFI partition, your machine will become unbootable. If you wish to erase an EFI partition, you may use Diskpart to convert it to a normal data partition and then delete it. You can also utilize a professional utility.
2. What is the size of an EFI system partition?
This question is dependent on the particular operating systems. Typically, the minimum partition size for an EFI partition is 100MB. It is advised that the EFI partition be configured between 100MB and 500MB to minimize potential difficulties.
3. What happens if I format EFI Partition?
As the EFI partition protects Window's necessary data, it will never allow you to format. However, if mistakenly or accidentally you delete the EFI Partition, you may face several consequences like OS boot failure, unfunctional OS, etc.
4. Should EFI partition be primary?
No, the EFI partition should be created as an EFI System Partition (ESP), which is a type of primary partition.
5. What is the difference between boot and EFI partition?
The boot partition contains the files required for the operating system to boot, while the EFI partition holds important files required for the UEFI firmware to boot into the boot process, such as the boot loader and configuration files.

