How to Hide System Reserved Partition with 3 Simple Ways?
System reserved partition contains boot configuration data and other essential data. It is a good idea to hide them to protect information. Refer to this post, it will demonstrate 3 methods helping you perform this operation.
By AOMEI / Updated on May 12, 2023
Why need to hide system reserved partition?
System Reserved partition is essential which contains the Boot Manager, Boot Configuration Data and Startup files used for Bitlocker Drive Encryption. It is a good idea to hide System Reserved partition if you want others to stay away from it. Also, hide System Reserved partition can ensure its integrity and ensure successful system factory restoration after accidents.
How to hide System Reserved partition?
There are 3 methods of hiding reserved partition in Windows 10, 8, 7.
Using DISKPART
Diskpart is a command-line disk partitioning utility which can help you hide System Reserved partition.
Step 1. Start an Administrator Command Prompt.
Step 2. Type diskpart at the prompt and press Enter.
Step 3. Type list disk and press Enter.
Step 4. Type select disk 0 and press Enter (make sure to use the correct disk number for your system).
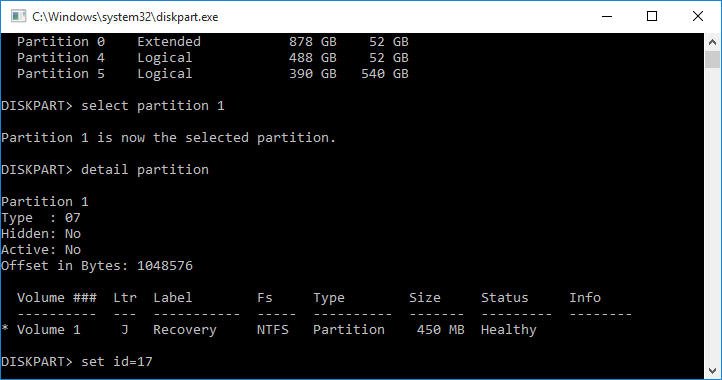
Step 5. Type list partition and press Enter. The System Reserved partition should show up in the list (e.g. Primary, 100 MB). Partition 1 will be used in this example.
Step 6. Type select partition 1 and press Enter.
Step 7. Type detail partition and press Enter. Assuming the correct partition has been selected, it should show Type:07, Hidden: No Active: No.
Important: Make sure you have selected the correct partition before proceeding.
Step 8. Type set id=17 and press Enter. This will change the partition type from 0x07 (Hidden NTFS) to 0x17 (NTFS) and unhide it.
Step 9. Type detail partition and press Enter. Verify that the partition is now 17 and hidden. Volume details and the partition's label should be displayed.
Using Disk Management
You can also remove the drive letter from System Reserved partition. Once the drive letter is removed, the partition will not be shown in File Explorer.
Step 1. Press W + R to bring out the Run dialogue. In the dialogue, type diskmgmt.msc and press Enter. It will open Disk Management.
Step 2. Right click on the drive you want to hide and select the option “Change drive letter and paths.”
Step 3. Click on the button “Remove” in order to remove the assigned drive letter. Then click Yes as the warning windows displays.
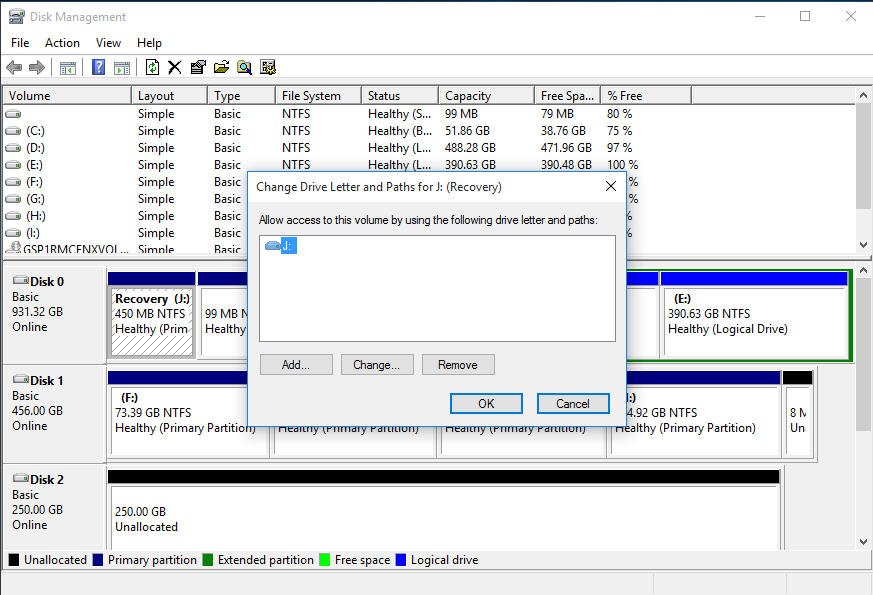
Step 4. With the above action, you have successfully hidden the drive or partition on your Windows system. Then, the System Reserved partition will be invisible in the File Explorer.
Using AOMEI Partition Assistant
Disk Management and Diskpart.exe are not familiar with most people, you can turn to thid-party partition manager-AOMEI Partition Assistant. It is able to hide and unhide a partition on a hard drive on a user-friendly interface. It makes the operation easily and quickly. Here are the detailed steps:
Step 1. Install and open AOMEI Partition Assistant and open it. Right click on the partition which you want to hide, choose Advanced ->Hide Partition.

Step 2. You will get a warning as shown in the following screenshot - “Hiding this partition may cause its drive letters to be changed. Would you like to hide the partition? ”. Click OK to continue.

Step 3. Click Apply to execute the operation. After that, the System Reserved partition will be invisible to others.

Tips:
1. The hidden partition is unavailable for use until you unhide it.
2. After you unhide a partition, Windows will randomly reallocate a new drive letter to that partition. This means you may get a drive letter which is different from its original one.
3. Unhide a partition will cause its related shortcuts invalid.
4. If one day you want to use it again, simply unhide the partition.
Conclusion
With the 3 methods, you can easily and securely hide the System Reserved partition. Some users reported that system reserved drive suddenly appeared after their upgrade their system somtimes. So if you have the same problem, you can try these methods again.
In addition, AOMEI Partition Assistant has many powerful features that diskpart and Disk Management don’t have. For example, you can create bootable media with Make Bootable Media feature in case the computer cannot boot. Migrate OS to SSD feature allows you to clone system to SSD without reinstalling Windows.

