How to Lower the Disk Usage in Windows 10 [8 Ways]
High disk usage Windows 10 is a common but serious computer issue. Luckily, this problem can be resolved possibly. This article aims to teach you how to lower the disk usage in Windows 10 with 8 effective ways.
By Hedy / Updated on June 12, 2024
Why is my disk usage 100%?
A 100% disk usage issue on your computer can be frustrating and can lead to slow performance and unresponsiveness. Several factors can contribute to this problem, and it's essential to diagnose the specific cause to address it effectively. Here are some common reasons for high disk usage Windows 10:
◤Background processes: Sometimes, background processes or services can use a significant portion of your disk's capacity.
◤ Windows update: Windows updates can sometimes trigger high disk usage, especially during the update installation process.
◤ Malware and viruses: Malware or viruses can also cause high disk usage. Ensure that your antivirus software is up to date and run a full system scan to remove any potential threats.
◤ Driver issues: Outdated or incompatible device drivers can lead to disk usage problems. Make sure your drivers are up to date, especially for your hard drive or SSD.
◤ Disk fragmentation: Over time, your disk may become fragmented, which can lead to slow performance and high disk usage.
◤ Insufficient RAM: If your computer has limited RAM, it may resort to using the disk as virtual memory, which can lead to high disk usage. Consider upgrading your RAM if you frequently encounter this issue.
◤ Faulty hardware: In some cases, a failing hard drive or SSD can lead to high disk usage. You can check for disk errors and health using the built-in Windows tool called "Check Disk" or third-party disk health monitoring software.
How to lower the disk usage in Windows 10?
Lowering disk usage in Windows 10 can help improve system performance and responsiveness. Here are several ways you can take to reduce disk usage:
Way 1. Restart Your System
Rebooting your computer is a proven troubleshooting method that can effectively address various issues. When it comes to the 100% disk usage problem on your Windows 10 system, restarting your machine is a valuable tactic. Although it might not uncover the root cause of the issue, the fact that it can eliminate the problem is noteworthy.
Step 1. Press the Windows key.
Step 2. Click on the Power icon.
Step 3. Click Restart, which will close all apps, turn off the PC, and then turn it on again.
Way 2. Turn off antivirus software temporarily
Another important step to consider when troubleshooting 100% disk usage issues on Windows 10 is to temporarily disable your antivirus software. This action allows you to evaluate whether your antivirus software is causing the problem.
Step 1. Press the "Windows + R" keys to open the Run dialog box. Subsequently, enter "msconfig" in the field and click "OK" or press the "Enter" key to open the System Configuration utility.
Step 2. In the System Configuration window, navigate to the Startup tab and select the Open Task Manager option.
Step 3. Go ahead and find the antivirus program from the list and select it. Then, disable the program by clicking the "Disable" button in the lower right corner or right-click and select the "Disable" option.

Way 3. Disable Windows Search
Windows Search Indexer is a known culprit causing 100% disk usage issues on Windows 10 and Windows 11. To determine if Windows Search is indeed the root cause of disk usage issues, you can choose to temporarily disable it. It's worth noting that disabling Windows Search in this way means it will automatically resume when you restart your computer.
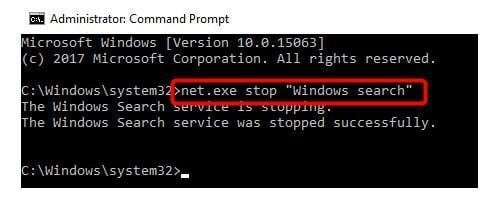
Step 1. Press the Windows key and X simultaneously, and select Command Prompt (Admin).
Step 2. When you get into the command prompt, type net.exe stop "Windows search" and hit the Enter key.
Go to Task Manager to check if your disk usage has decreased and your computer's performance has improved. If this happens, you should follow the steps below to permanently disable Windows Search.
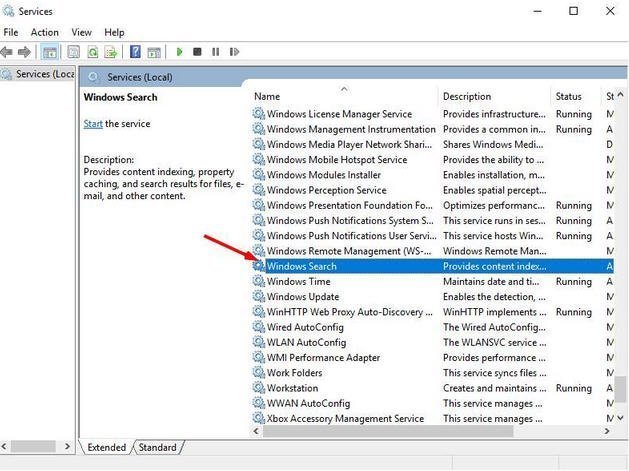
Step 1. Press Windows key +R, type "services.msc".
Step 2. Locate Windows Search option, double click it to enter its Properties window.
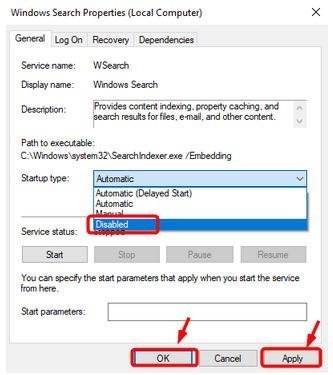
Step 3. In the Properties window, select Disabled under Startup type. Then, click Apply and OK.
Way 4. Upgrade Device Driver
Upgrading your device drivers can prove to be a beneficial step in resolving the 100% disk usage problem. Let's see how to fix 100 disk usage Windows 10 by upgrading device drivers:
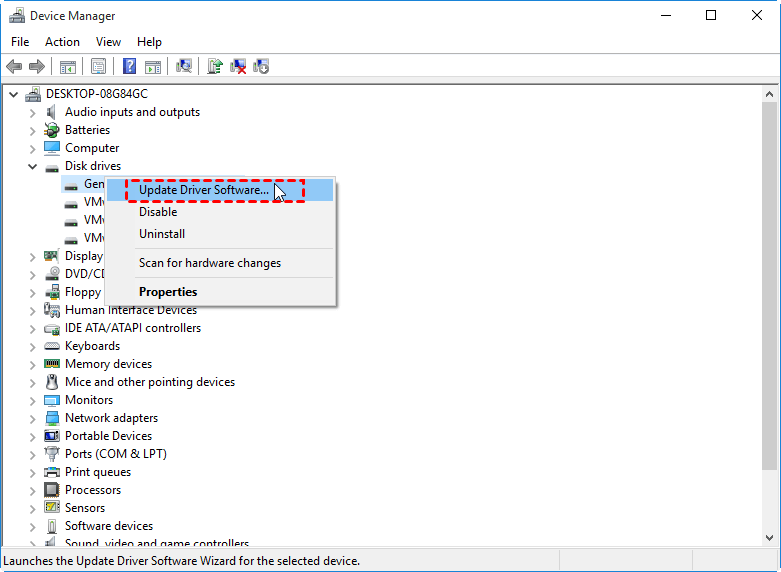
Step 1. Right-click on the Start icon and select Device Manager.
Step 2. Find your slow hard drive, right-click on it, and select "Update Driver Software".
Step 3. Select "Search automatically for updated driver software" in the pop-up window. This will update the device drivers automatically.
Way 5. Disable Superfetch Service
While SuperFetch helps reduce startup times and improves the efficiency of commonly used programs, it can also cause disk performance issues. So, if you are facing a 100% disk usage issue in Windows 10 or Windows 11, you can choose to stop the SuperFetch service:
Step 1. Press Windows + X simultaneously, and choose Command Prompt (Admin) to open it. Type the following command in the command prompt and hit Enter Key to run it:
net.exe stop superfetch
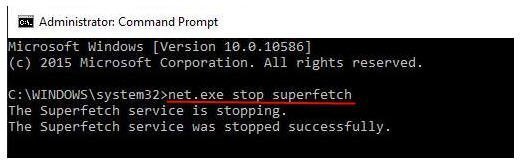
Step 2. Wait for a few minutes to see if your computer starts performing better.
Way 6. Reset Virtual Memory in Windows 10
Virtual memory acts as an extension of the computer's physical memory and resides on a portion of the hard drive. It is important to note that virtual memory can also cause 100% disk usage issues in Windows. If you want to reset virtual memory settings, follow these steps:
Step 1. Open Control Panel > System and Security > System. Select Advanced system settings.

Step 2. In the pop-out window, select Advanced > Settings. Then, go to the Advanced tab in the second pop-up window, and select Change... in the Virtual memory section.
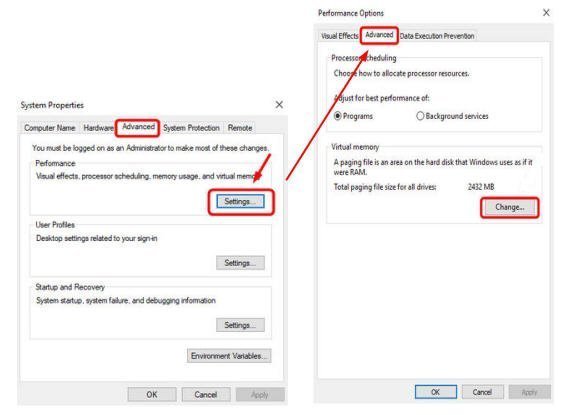
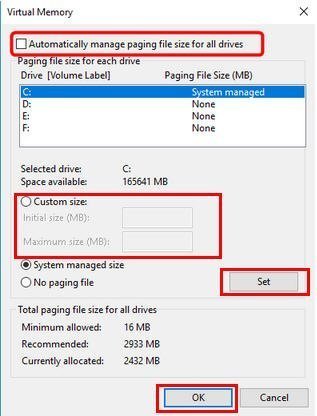
Step 3. Here you need to make sure that the option of Automatically managing paging file size for all drives is not ticked. Then, select the drive installed Windows 10, and enter the Initial size and Maximum size for the virtual memory. Then, click Set and OK.
Way 7. Run Disk Check
Checking the disk can show if there are any physical issues with your hard drive. Typically, high disk usage indicates an application or logic issue driving disk usage, but it's worth your time to rule out any physical damage. Here is how to check your disk:
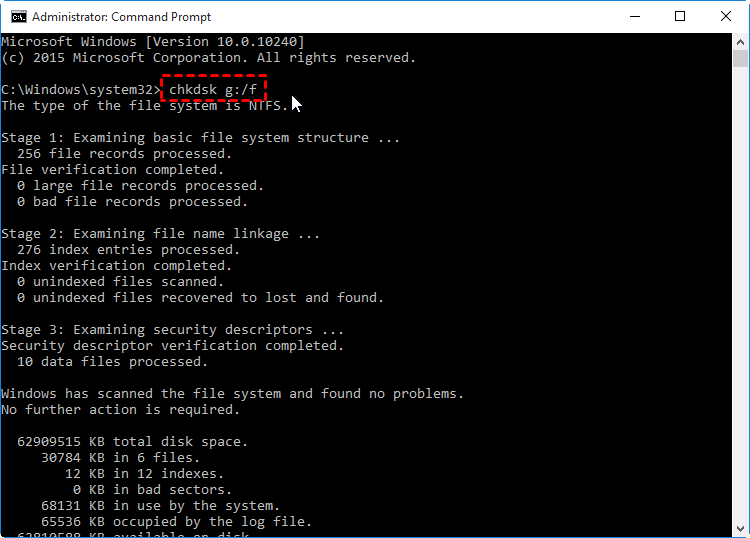
Step 1. Click the "Start" button, type "cmd" in the search bar, right-click Command Prompt and select "Run as administrator".
Step 2. You can type the command in the prompt: "chkdsk g:" to test the G: drive, or type "chkdsk g: /f" to repair any errors that might be found in G: drive.
Way 8. Upgrade to a larger hard disk (SSD)
If you find that none of the above solutions solve the high disk usage Windows 10, then upgrading your current small hard drive to a larger one, especially an SSD (Solid State Drive) can provide a comprehensive solution.
SSDs can significantly improve load times and efficiently handle multiple concurrent tasks and processes without sacrificing performance. A key strategy is to run the operating system on an SSD while retaining the old HDD as a secondary storage drive, which helps reduce stress on the HDD. However, you may be wondering how to perform this upgrade process smoothly.
For this purpose, we recommend using AOMEI Partition Assistant Professional. This powerful tool allows you to upgrade your hard drive without completely reinstalling everything. It does this by cloning everything from one disk to another and ensuring that the operating system and other programs can boot successfully from the cloned disk. You can start by downloading the demo version to explore its features and evaluate whether it suits your specific needs.
Step 1. Install and launch AOMEI Partition Assistant, click "Clone" in the main interface and select "Clone Disk".

Step 2. Choose the hard disk that you need to clone as the source disk and click "Next".

Step 3. Select the destination disk to store the data on the source disk, and then click "Next".

Step 4. Then, you can check the source and destination disk in the next window or change to “Sector to Sector clone”, and click the "Confirm" button to continue if there is no problem.

Here, you can also click the "Settings" button to adjust the partition size on the destination disk or tick "4k alignment" to improve the reading and writing speed of SSD if the target disk is an SSD drive.

Step 5. At last, click "Apply" and "Proceed" in the main interface to start cloning the hard drive.

Conclusion
How to lower the disk usage in Windows 10? For addressing this issue, the eight methods outlined are all viable solutions worth exploring. However, the last method, which involves upgrading to a larger SSD and utilizing AOMEI Partition Assistant Professional, is particularly recommended for achieving optimal results. This approach not only resolves the disk usage problem but also enhances overall system performance.
Additionally, if you intend to transfer only the OS to an SSD or HDD while retaining other partitions, AOMEI Partition Assistant Professional is a valuable tool to assist in this specific task.

