Why is My HDD at 100 and How to Fix it?
Why is my HDD at 100 and how to fix it? In this article, we’ll expalin the most possible causes behind it and teach you how to fix high disk usage Windows 10 in seven different ways.
By Hedy / Updated on September 6, 2023
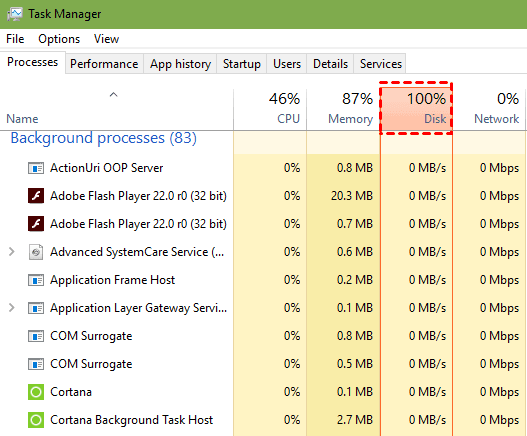
User case:100% Disk Usage on Windows 10
"I'm running Windows 10 and have been seeing 100% disk utilization in task manager even though nothing is running on the machine, how do I isolate and fix this ? This is causing my PC to run slow."
Why is my HDD always at 100?
100 percent disk usage on Windows 10 systems can cause many inconveniences. If you have the same issue as the example above, you may be eager to get the solutions to it.
Before looking into potential remedies, it is important to understand the underlying reasons why is my HDD at 100. The following paragraphs enumerate the main factors leading to this problem:
◤ A redundant program configured to start at startup.
◤ Windows 11 becomes a victim of virus or malware intrusion.
◤ Employ outdated drivers within the system.
◤ Running too many applications and software at the same time.
◤ Allocate disk storage by specific services.
How to fix 100 HDD in Windows 11/10/8/7?
Here are some remedies that have proven effective in resolving the 100 percent disk usage Windows 11 or 10. It doesn't have to be all implemented; it's OK. Instead, systematically explore the options until you find one that successfully solves your problem.
Way 1. Disable SuperFetch service
The purpose of SuperFetch is to reduce startup time and increase the efficiency of basic programs. Nonetheless, it has emerged as a possible culprit for disk performance complications in Windows 8 and subsequent iterations, including Windows 10. Below, you'll find how to stop this service:
Step 1. Press Windows + X simultaneously, choose Command Prompt (Admin) to open it.
Step 2. Type the following command in the command prompt and hit Enter Key to run it:
net.exe stop superfetch
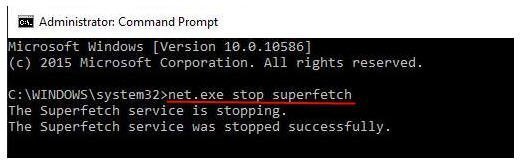
Step 3. Wait for a few minutes to see if your computer starts performing better.
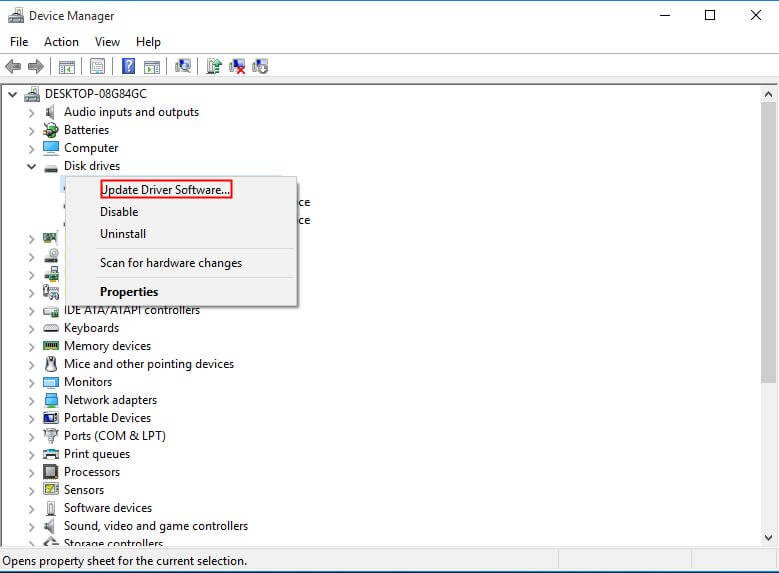
Way 2. Update device drivers
If the above steps did not resolve the 100% disk usage issue in Windows 10, it could be a faulty device driver. One possible solution is to try updating the drivers to see if this resolves the issue.
Step 1. Click on the "Start" button and select "Device Manager" or search it with the Search Box to open Device Manager.
Step 2. Expand Disk Drives and right-click the driver and click "update driver software".
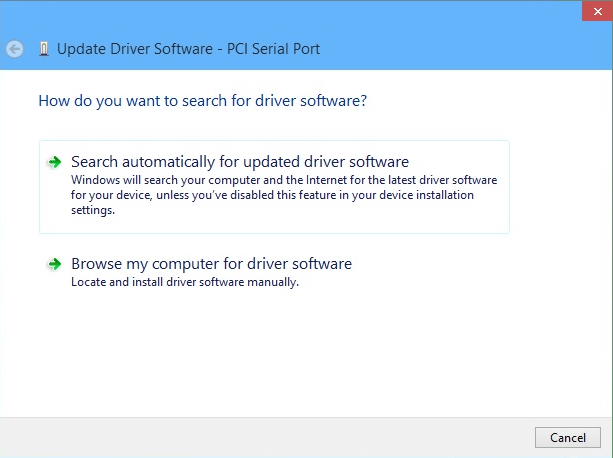
Step 3. You need to choose the way of updating the driver. The first option allows Windows to find the latest driver to update on the internet. If you have downloaded the latest driver, choose the second option.
Way 3. Disable Windows Search
Windows Search Indexer is known for triggering 100% disk usage in Windows 10 and 11. In order to discern whether Windows Search is indeed the root cause behind this disk usage issue, it is recommended to temporarily deactivate Windows Search (note that temporarily disabling Windows Search will cause it to automatically reactivate when the computer restarts).
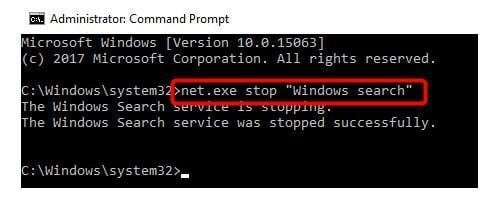
Step 1. Press the Windows key and X at the same time and select Command Prompt (Admin).
Step 2. Once you access the command prompt, enter the following: net.exe stop "Windows search" and press Enter.
Continue to use Task Manager to measure whether disk usage has decreased and your computer's performance has improved. If there are positive changes, it is recommended to use the next steps to permanently disable Windows Search.
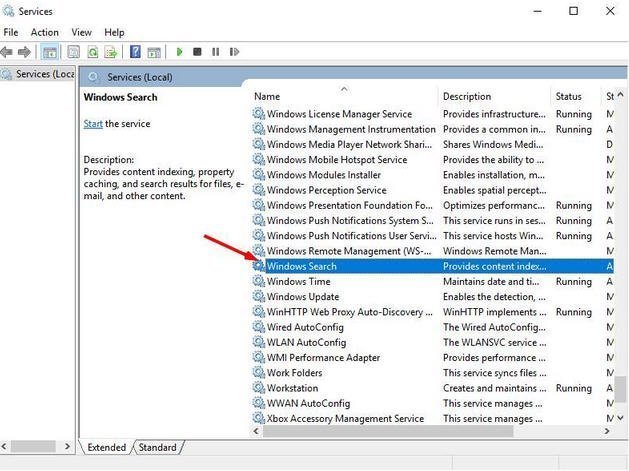
Step 1. Press Windows Key + R and enter "services.msc".
Step 2. Locate the Windows Search entry and initiate a double-click to access its properties window.
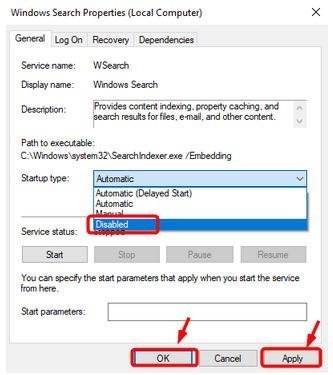
Step 3. In the Properties window, under Startup type, select Disabled. Then click Apply and then OK.
Way 4. Reset Virtual Memory
Virtual memory is a portion of the hard drive that is considered an extension of the computer's physical memory. This is another factor that can cause 100% disk utilization issues. Follow the steps below to reset.
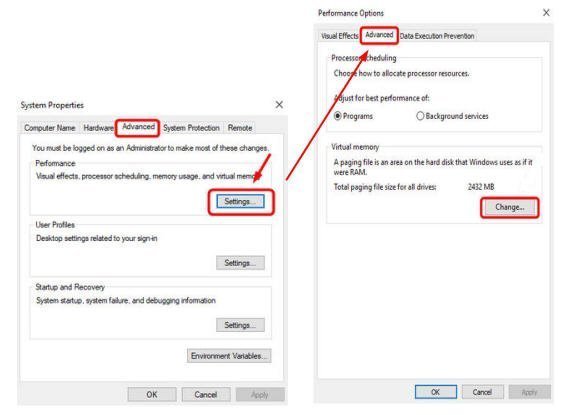
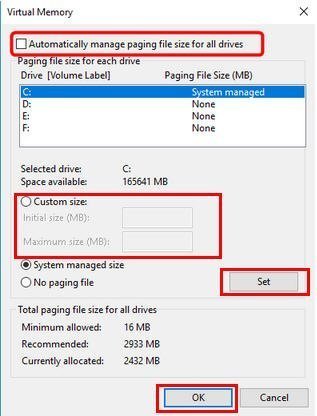
Step 1. Open Control Panel > System and Security > System. Select Advanced system settings.

Step 2. In the pop-up window, select Advanced > Settings. Then, go to the "Advanced" tab in the second popup window and select "Change..." in the "Virtual Memory" section.
Step 3. Here you need to make sure that the "Automatically manage paging file size for all drives" option is not checked. Then, select the drive where Windows 10 is installed and enter the initial and maximum size of the virtual memory. Then, click Settings and OK.
Way 5. Disable Antivirus Software temporarily
Sometimes, antivirus software may block the execution of suspicious programs or files, clarifying situations where Windows is having difficulty accessing specified files. Therefore, a possible solution is to temporarily deactivate your antivirus software to mitigate this issue.
Step 1. Invoke the "Windows + R" key combination to display the Run dialog box. Subsequently, enter "msconfig" in the field and click "OK" or press the "Enter" key to initiate the opening of the System Configuration utility.
Step 2. In the System Configuration window, navigate to the Startup tab and select the Open Task Manager option.
Step 3. Go ahead and find the antivirus program from the list and select it. Then, disable the program by clicking the "Disable" button in the lower right corner or right-click and select the "Disable" option.

Way 6. Fix your StorAHCI.sys driver
The 100% disk utilization issue in Windows 10/11 may also stem from specific models of Advanced Host Controller Interface PCI-Express (AHCI PCIe), which is caused by a firmware glitch, usually related to the built-in StorAHCI.sys driver. It is necessary to confirm whether this factor is causing the disk utilization 100% issue in Windows 10/11.
To perform this verification, follow these steps fix high disk usage Windows 10:
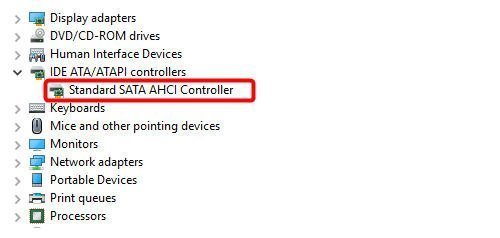
Step 1. Press the Windows key and X at the same time and select Device Manager.
Step 2. Expand the IDE ATA/ATAPI Controllers category and initiate a double-click on the AHCI controller.
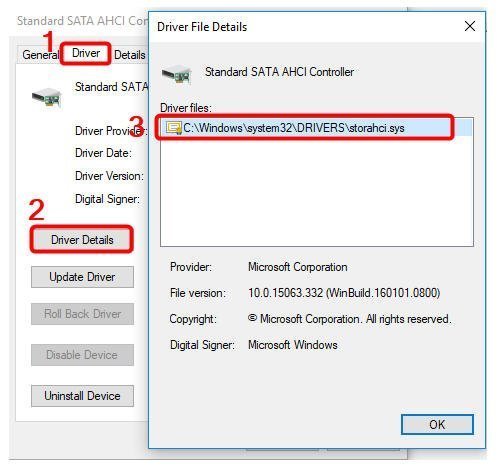
Step 3. Navigate to the Drivers tab and click Driver Details. If you observe storahci.sys stored in a location within the system32 folder, it indicates that the built-in AHCI driver is used. In this case, resolving the issue requires subsequent steps.
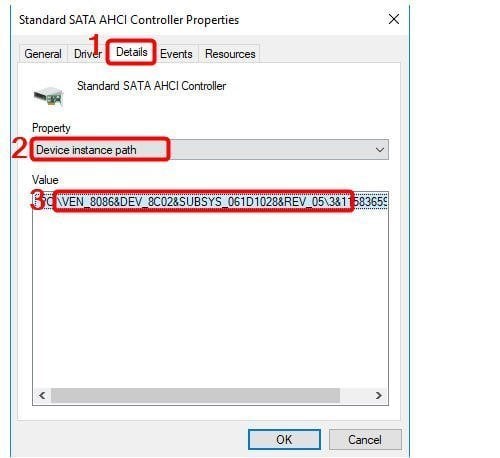
Step 4. Return to the AHCI controller properties, click Details, and then select Device Instance Path under Properties. Note the path starting from VEN_. Then, click OK.
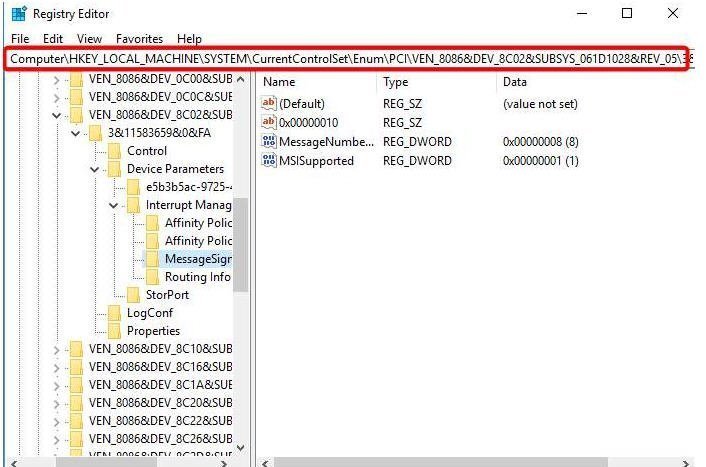
Step 5. After clicking Start, type "regedit" in the search box and press Enter to access the Registry Editor. Navigate to the following path:
HKEY_LOCAL_MACHINE\System\CurrentControlSet\Enum\PCI\\DeviceParameters\Interrupt Management\MessageSignaledInterruptProperties
(Note: "PCI\\" refers to the name of your AHCI controller, which may be different on different machines.)
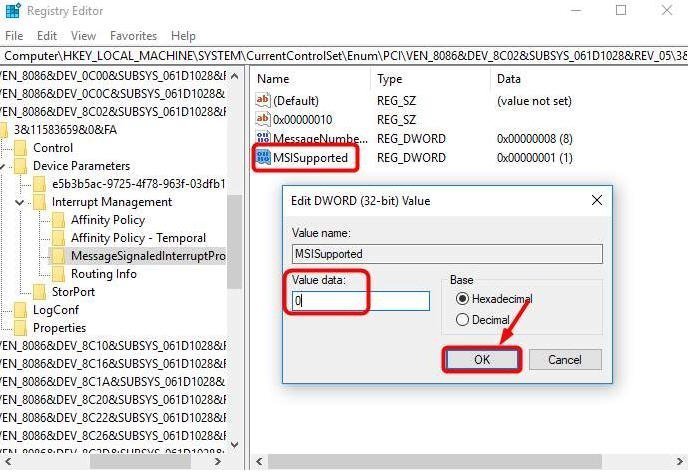
Step 6. Double-click "MSISupported" and modify the numeric data to 0. Click OK.
Step 7. After completing these changes, restart your computer.
Way 7. Perform a disk check
Experiencing 100% disk usage on Windows 10 may be due to hard drive errors. Therefore, performing a thorough disk check becomes imperative. This task can be accomplished through the native Windows CHKDSK utility, or by using third-party software such as AOMEI Partition Assistant Standard.
First of all, let’s see how to launch CHKDSK via Command Prompt:
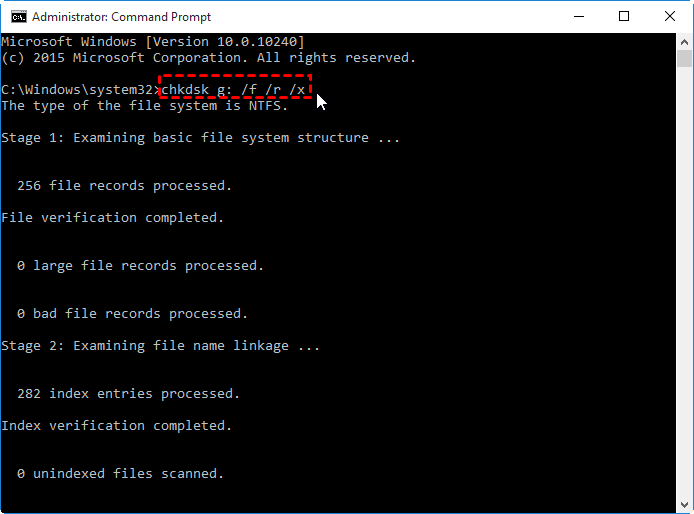
Step 1. Press the "Win + R" keys simultaneously, enter "cmd" and press the Enter key.
Step 2. In the Command Prompt window, enter the command "chkdsk [drive letter]:/f /r /x" and press Enter. This command is designed to check for errors and try to recover readable data to the greatest extent possible.
In some cases, the Command Prompt can get confusing and you may encounter issues that it cannot start, displaying an "Access Denied" message due to insufficient permissions.
In this case, another solution is to resort to AOMEI Partition Assistant Standard Edition. The advantage of this tool is that it is free and feature-rich, which helps improve convenience. Additionally, its compatibility extends to multiple Windows operating systems, including Windows 11, 10, 8, 7, Windows XP, and Windows Vista. Notably, the software's user-friendly interface simplifies the process of correcting CHKDSK related issues, thereby reducing the likelihood of operational complexity.
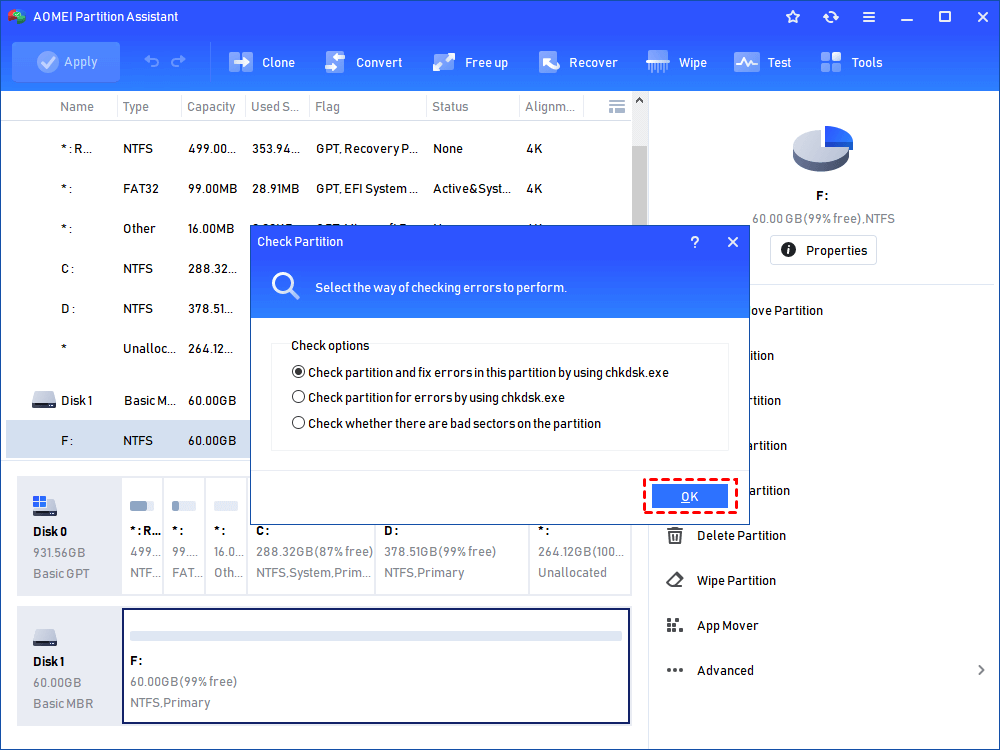
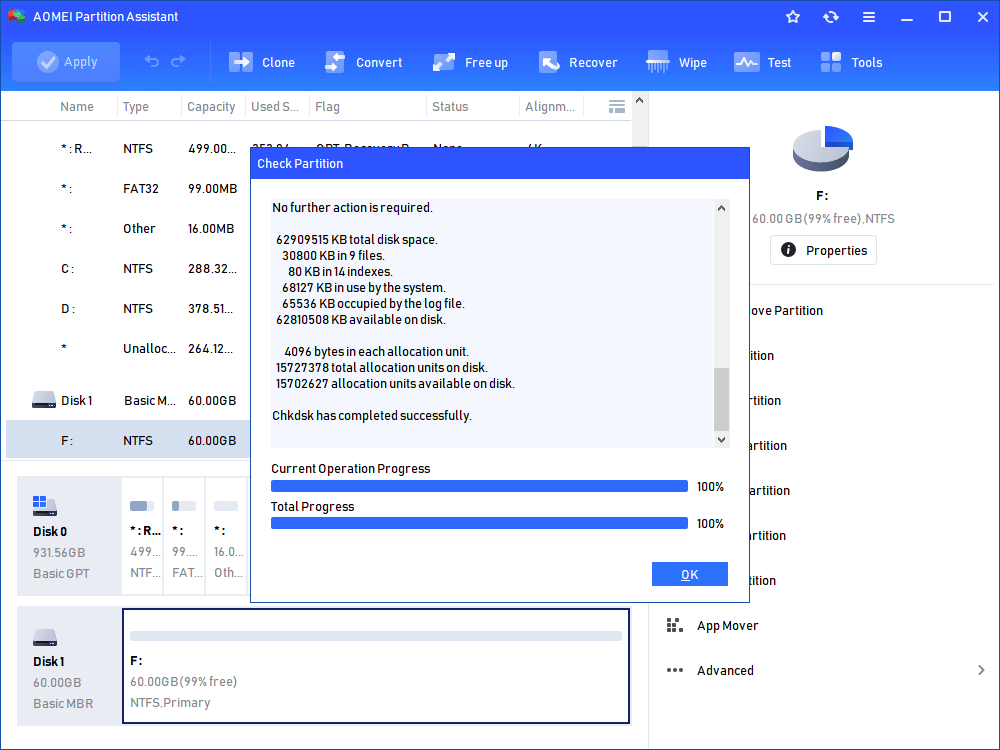
Step 1. Install and open AOMEI Partition Assistant. Right-click the target hard drive on the main interface, and click "Advanced" > "Check Partition".

Step 2. We choose the "Check partition and fix errors in this partition by using chkdsk.exe". You can also choose other options or just run them one by one, and click "OK".
Step 3. Then wait for the check to be completed, and click "OK".
Conclusion
When 100 percent disk usage Windows 11 or 10 occurs, you will have suffered a slow PC. Before proceeding to the fixes, it’s necessary to figure out why is my HDD at 100. And in this post, you can get both the answers and measures to it.
In addition to those ways, there are many other ways that can help you solve the high disk usage Windows 10 problem. For example, you can upgrade firmware for SSD, wipe the hard drive, and reinstall Windows 10. These methods are also worth a try if you like

