A Step-by-Step Guide: How to Remove a Laptop Hard Disk Safely
Learn how to remove a hard disk from a laptop for an upgrade or disposal. This guide details the entire process, from data backup and secure wiping to the final removal steps.
By Lucas / Updated on November 10, 2025
Whether you're upgrading to a faster SSD, replacing a faulty drive, or salvaging data from a dead computer, knowing how to remove a laptop hard disk is a valuable skill. While it might sound like a job for a tech professional, the process is often surprisingly straightforward with the right guidance. However, the physical removal is only the final step in a process that should always begin with managing your data.
This comprehensive guide will walk you through everything you need to know. We'll start with the crucial preparatory steps to protect your data, then provide a detailed walkthrough of the physical removal of hard disk from laptop process, complete with essential safety tips to ensure you do the job right.
Why Remove a Hard Disk from a Laptop?
Before you grab a screwdriver, it's helpful to understand the common reasons why you might need to perform this task. Knowing your goal will help you determine the right preparatory steps to take.
This section covers the primary motivations for learning how to remove hard disk from laptop.
Performance Upgrade: The most common reason is to replace an old, slow Hard Disk Drive (HDD) with a modern, lightning-fast Solid State Drive (SSD). This is the single most effective upgrade for boosting a laptop's speed.
Replacing a Faulty Drive: Hard drives can fail over time, leading to system crashes, errors, and data loss. Replacing a failing drive is essential to keeping your laptop functional.
Data Recovery: If your laptop's screen, keyboard, or motherboard has died, the hard drive itself might still be perfectly fine. Removing it allows you to connect it to another computer to retrieve your important files.
Secure Disposal: Before selling, donating, or recycling an old laptop, you should remove the hard drive to ensure your personal data cannot be accessed by the next owner.
Before Removing Hard Drive from Laptop, What Do You Need to Do?
This is the most critical stage of the entire process. Before you even think about unscrewing the back panel, you must decide what to do with the data on the drive you're about to remove. A powerful disk management tool like AOMEI Partition Assistant Professional is indispensable for this task.
AOMEI Partition Assistant Professional is a comprehensive and user-friendly software suite that gives you complete control over your hard drives. It simplifies complex tasks like data migration and secure erasure, making it the perfect tool to prepare for a hard drive removal.
Option 1: For Upgrades - Clone Your Entire Disk
If you're upgrading to a new drive and want to keep your operating system, programs, and files exactly as they are, cloning is the answer. This process creates an exact, bootable copy of your old drive on the new one.
Step 1. Install and launch AOMEI Partition Assistant on your running Windows. Click "Clone" in the main interface, and select "Clone Disk".

Step 2. Choose the hard disk that you need to clone as the source disk and click "Next".

Step 3. Select another drive as the destination disk, and then click "Next".

Step 4. Then, you can check the source and destination disk in the next window or change to "Sector to Sector clone", and click the "Confirm" button to continue if there is no problem.

Here, you can also click the "Settings" button to adjust the partition size on the destination disk or tick "4k alignment" to improve the reading and writing speed of the SSD.

Step 5. After returning to the main interface, check the pending operation and click "Apply" and "Proceed" to commit the operation.

After the copy process completed, you need to disconnect the old hard drive and install SSD to your computer to let system boot from SSD. Also, you need to change the boot settings in BIOS directly. As for the HDD, you can use it as a copy or as the second storage disk on your computer.
Option 2: For Disposal - Securely Wipe the Hard Drive
If you are getting rid of the drive or the laptop, a simple delete or format is not enough to protect your data. AOMEI Partition Assistant's "Wipe Hard Drive" feature overwrites the entire disk with random data, making your personal files permanently unrecoverable.
Step 1. Install and launch AOMEI Partition Assistant, and right-click on the hard drive you want to wipe, and choose “Wipe hard drive”.
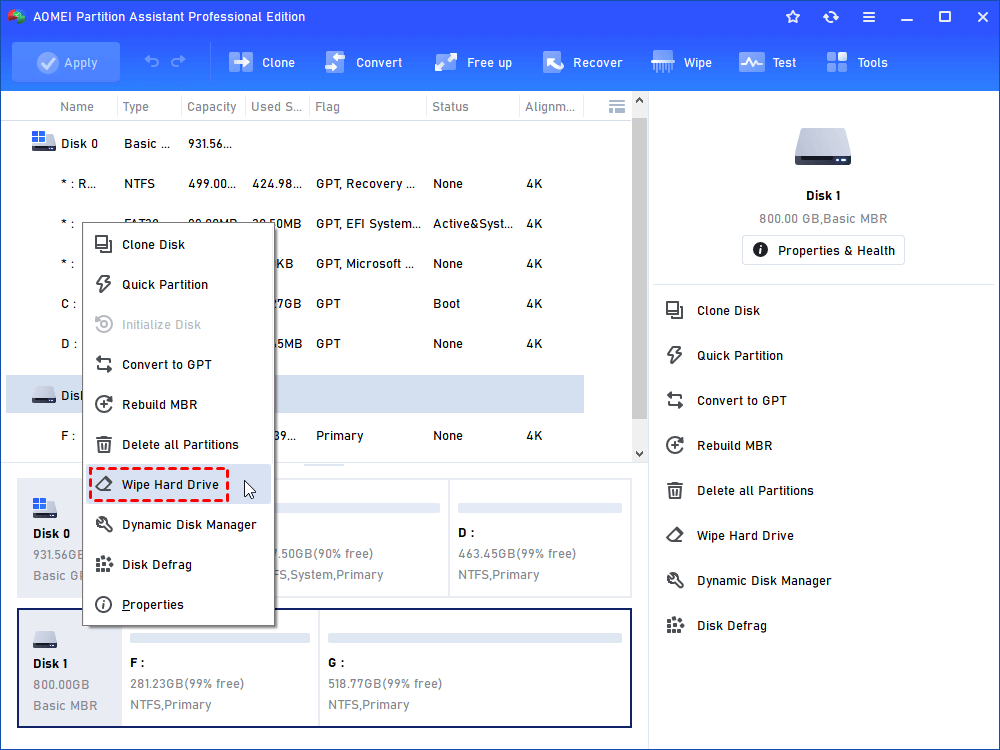
Step 2. Select the disk you want to wipe and click "OK" to continue.

In this stage, you can also select a wiping method to wipe the selected hard drive according to your requirements and click "OK". (By default, the wiping method is Fill in 0.)

Step 3. You can preview the shrink operation by viewing the "Pending Operations". To commit the "Pending Operations", please click "Apply" and "Proceed".

Steps: How to Remove Laptop Hard Disk
With your data either safely cloned or securely wiped, you're ready for the physical removal. The exact steps can vary slightly depending on your laptop's make and model, but the general process is very similar.
This section provides a universal guide on how to remove a hard disk from a laptop.
Tools You'll Need:
- A small Phillips-head screwdriver
- An anti-static wrist strap (recommended to prevent static damage)
- A plastic pry tool or old credit card (optional, for some models)
The Removal Process:
- Power Down Completely: Shut down the laptop, unplug the power adapter, and remove the battery if it's external.
- Ground Yourself: Put on an anti-static wrist strap and clip it to a metal part of the laptop's frame to discharge any static electricity.
- Locate the Hard Drive Bay: On most laptops, the hard drive is accessible via a small panel on the underside. If not, you may need to remove the entire bottom case. If you're unsure, a quick search for your laptop model's service manual online will show you the exact location.
- Unscrew the Access Panel: Carefully unscrew the screws holding the panel in place. Keep the screws organized, as they can be different sizes.
- Disconnect the Drive: The hard drive is usually housed in a metal bracket or caddy. To disconnect it from the motherboard's SATA port, gently slide it away from the connector. Do not pull straight up.
- Lift the Drive Out: Once disconnected, you can lift the drive and its caddy out of the laptop.
- Remove the Caddy: The final step is to unscrew the four screws (usually two on each side) that attach the drive to its caddy.
To Sum Up
Learning how to remove a laptop hard disk is a manageable task that empowers you to upgrade, repair, or secure your own device. The key to a successful operation lies in proper preparation. Before touching any hardware, it is absolutely essential to manage the data on the drive, whether that means cloning it for an upgrade or wiping it for disposal.
Tools like AOMEI Partition Assistant Professional are invaluable for these critical first steps, providing reliable, user-friendly solutions for data migration and secure erasure. Once your data is handled, the physical removal is a careful and methodical process. By following these guidelines, you can confidently complete the job safely and effectively.

