How to Solve the [Please Insert the Last Disk of the Multi-Volume Set] Error
Fix the frustrating "please insert last disk of the multi-volume set" error with our step-by-step guide. Learn how to update drivers, run troubleshooters, and use AOMEI Partition Assistant Standard to format your drive correctly.
By Lucas / Updated on August 13, 2025
Few computer errors are as confusing as the pop-up message that reads, "Please insert the last disk of the multi-volume set." It often appears when you're simply trying to copy a file, access a USB drive, or perform a seemingly routine task. The message is a relic from a time when large files were commonly split across multiple floppy disks or CDs.
While physical multi-volume sets are rare today, the error persists due to how modern Windows systems handle certain files and drive issues.
This guide will demystify this frustrating error. We will explain exactly what it means, why you are seeing it in a modern computing environment, and provide four detailed, step-by-step solutions to get rid of it for good.
Overview of the Error: Please Insert the Last Disk of the Multi-Volume Set
To fix this problem, it's important to understand why the "please insert the last disk of the multi-volume set" message appears. This error indicates that Windows believes it is in the middle of a process that requires multiple sources (or "volumes"), and it's waiting for the final piece of the puzzle.
There are two primary culprits behind this issue:
Spanned or Multi-Part Archive Files: The most common cause is the presence of a split archive file (like a .zip or .rar file) on the drive. These are large files that have been broken into smaller chunks (e.g., archive.z01, archive.z02, archive.zip). If you try to move, copy, or even just select the folder containing these files, Windows' extraction utility might activate in the background and prompt for the "last disk" if it can't find all the parts.
File System Corruption or Driver Issues: Sometimes, the error isn't related to a specific file but to the health of the drive itself. Corruption in the drive's file system or outdated/faulty USB drivers can cause communication errors between your PC and the drive, leading Windows to throw this confusing message. When you see the "please insert the last disk of the multi-volume set" prompt unexpectedly, it could be a sign of a deeper issue.
How to Fix the Error [Please Insert Last Disk of the Multi-Volume Set]
Now that you understand the potential causes, let's move on to the solutions. This section provides four effective methods to resolve this persistent error, starting with the simplest fix and moving to more comprehensive solutions for stubborn cases.
Solution 1. Remove .Zip Folders on Your Drive
Before attempting more technical fixes, perform this simple check, as it resolves the issue for most users. This method involves finding and removing the multi-part archive files that are likely triggering the error.
Step 1. Open File Explorer (Win + E) and navigate to the drive that is causing the error (e.g., your D: drive or a USB drive).
Step 2. In the search bar in the top-right corner, type .zip and press Enter. Look through the results for any archive files that seem out of place or that you don't need.
Step 3. If you find split archives (files ending in .z01, .z02, or similar numbered extensions), they are the most likely cause.
Step 4. Delete these files. If you need the contents, move all parts of the archive to a different location (like your Desktop), extract them there, and then delete the original archive files from the problematic drive.
After removing the files, try your original operation again. The error should be gone.
Solution 2. Format the Drive
If removing archive files doesn't work, the drive's file system may be corrupted. Formatting the drive will erase all its contents and create a fresh, clean file system, which almost always resolves the issue.
Important Note: Formatting will delete all data on the drive. Back up any important files to another location before proceeding.
Option 1. Using Windows File Explorer
Step 1. Open File Explorer. Right-click on the problematic drive and select Format.
Step 2. In the Format window, ensure the correct File system is selected (usually NTFS for internal drives or exFAT/NTFS for USB drives).

Step 3. Check the Quick Format box and click Start.
Windows will warn you that all data will be erased. Click OK to proceed.
Option 2. Using a Professional Free Tool: AOMEI Partition Assistant Standard
While the Windows tool works, it's basic. For more control and reliability, we recommend a dedicated partition manager. AOMEI Partition Assistant Standard is a powerful and completely free disk management utility that makes formatting and other complex tasks simple and safe. It offers more file system options and a more intuitive interface than the default Windows tools, ensuring the job is done right.
The Best Windows Disk Partition Manager and PC Optimizer
Step 1. Right-click the large partition and select “Format Partition”.
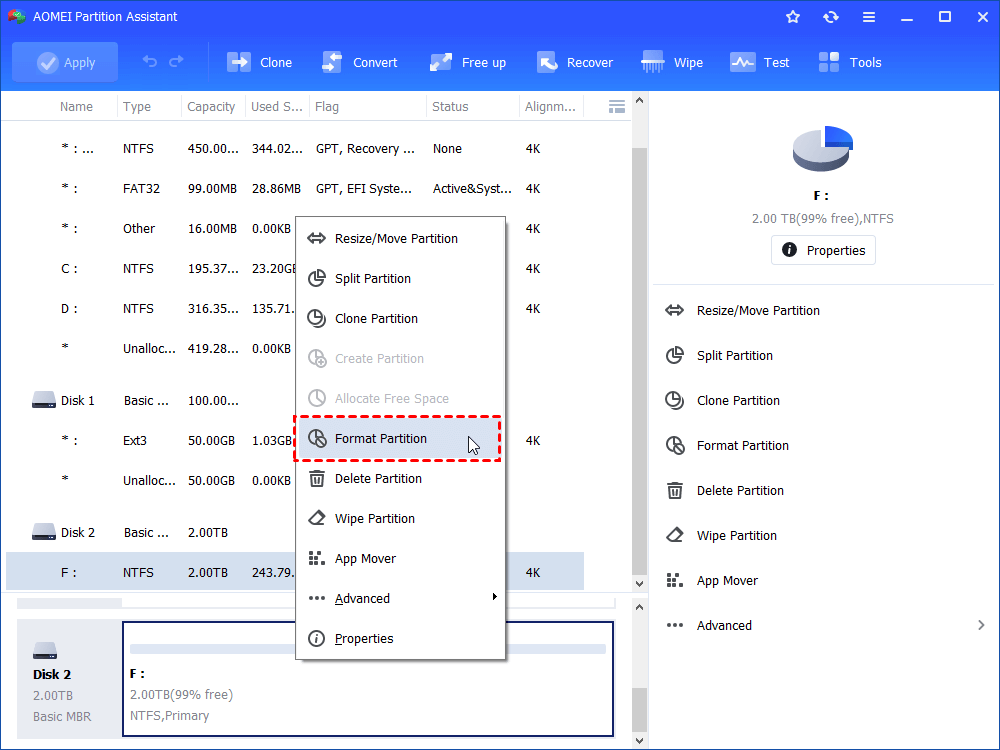
Step 2. In the window, select “FAT32” file system. You can see the “Ext2, Ext3, Ext4, NTFS and exFAT” file systems are also available for your selection.
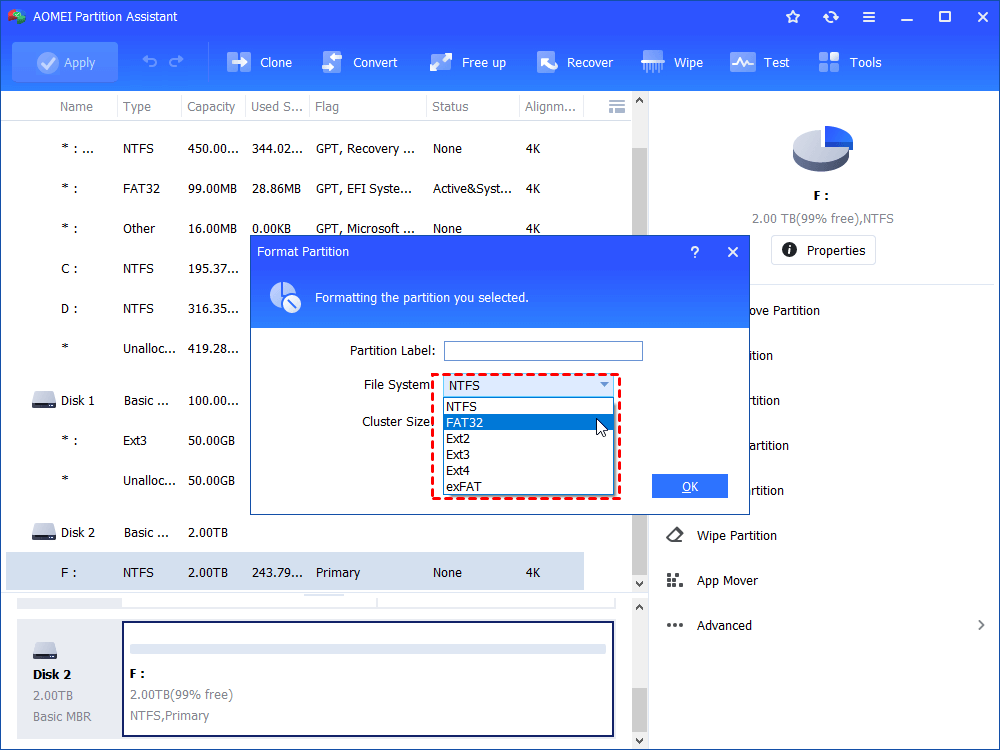
Step 3. Click “Apply” and “Proceed” to commit the pending operation.
AOMEI Partition Assistant Standard is more than just a formatting tool. It also allows you to resize, move, merge, and clone partitions for free, giving you complete control over your disk management needs without any cost.
Solution 3. Update the USB Controller Driver
If the error occurs specifically with external drives, an outdated or corrupt USB controller driver could be the cause. Updating the driver ensures your PC can communicate with your USB devices correctly.
Step 1. Right-click the Start button and select Device Manager.
Step 2. Expand the Universal Serial Bus controllers section.
Step 3. Right-click on each entry (especially those with "Host Controller" in the name) and select Update driver.
Step 4. Choose Search automatically for drivers. Windows will search for and install any available updates.
Step 5. Restart your computer after the updates are complete and check if the error is resolved.
Solution 4. Run Windows Troubleshooter
Windows includes built-in troubleshooters that can automatically find and fix common problems with hardware and devices.
Step 1. Open Settings (Win + I).
Step 2. Go to Update & Security > Troubleshoot.
Step 3. Click on Additional troubleshooters.
Step 4. Find and run the Hardware and Devices troubleshooter. If it's not listed, you can run the one most relevant to your issue, such as Bluetooth or Printer, if the error occurs when using those devices.
Follow the on-screen instructions to let Windows diagnose and fix any detected issues.
Ending
The "please insert the last disk of the multi-volume set" error is an unusual and often confusing problem, but it is highly solvable. In most instances, the culprit is a lingering multi-part archive file that can be quickly located and deleted. For more persistent cases caused by file system corruption or driver conflicts, the solutions are just as straightforward.
By following the steps in this guide, you can confidently tackle the issue, whether it requires a simple file search, a driver update, or a complete drive format. For tasks like formatting, using a robust and reliable tool like AOMEI Partition Assistant Standard not only solves the problem but also equips you with a powerful utility for all future disk management needs, ensuring your drives remain healthy and error-free.

