How to Fix “Repairing Disk Errors” in Windows 11, 10, 8 or 7?
To fix the "Repairing disk errors. This might take over an hour to complete" error, you can remove all external devices, run Startup Repair, check system volume and check file system integrity and so on.
By AOMEI / Updated on May 12, 2023
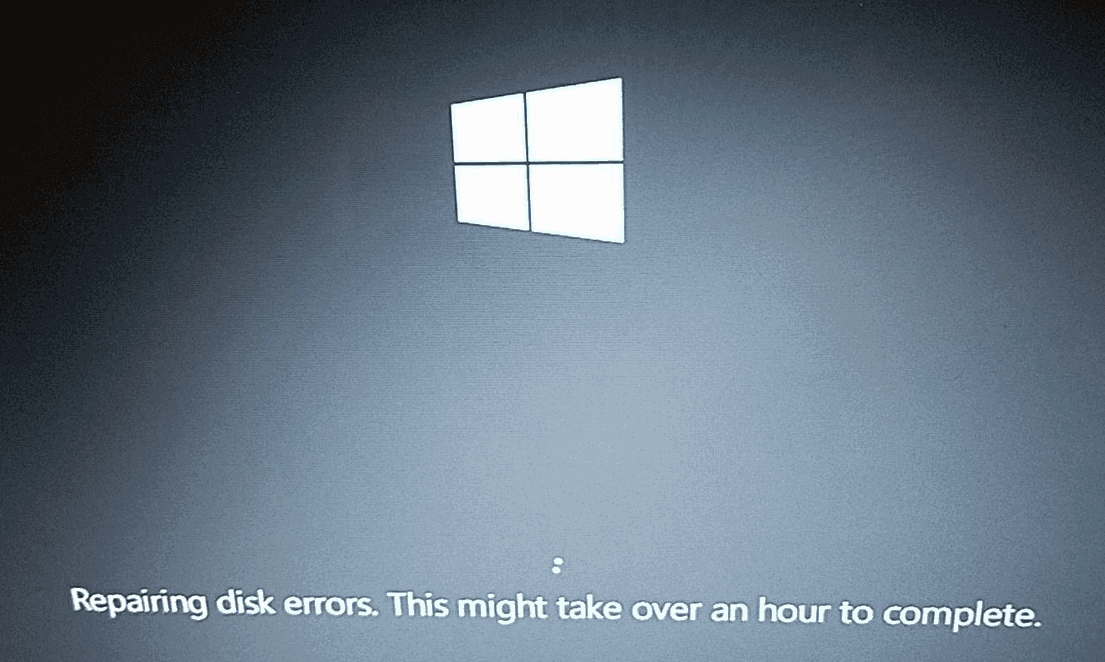
My HP PC says “Repairing disk errors” on a black screen
“When I start up my HP laptop, it always shows “Repairing disk errors. This might take over an hour to complete” message on a black screen. My PC is running Windows 10. Why this message appears? How can fix this error and boot up my PC normally?”
What causes the “Repairing disk errors” issue?
It’s not rare to encounter the “Repairing disk errors” issue in Windows 11/10/8/7. This error can be caused by an improper shutdown, sudden power outage, viruses infection, hard drive issues, like bad sectors, corrupted file system, etc.
Note: To protect your data, you can back up the hard drive without booting Windows before you take measures to eliminate the error.
5 Solutions for the “Repairing disk errors” problem
In the beginning, you can leave your computer running overnight to complete disk errors repairing. If this way is not working, you can employ more ways presented in the following text.
Solution 1. Remove all external devices
Windows might recognize the external drive that connected to your PC as the system boot partition and cause boot issue. Thus, you can disconnect all external drives, including printer, keyboard, etc., reboot your computer to check if you can boot your PC normally.
If the issue is settled, you can connect your external devices back one by one to find out which device causes the issue. Then, replace the external drive with a good one or update its driver. If you still can’t boot your Windows normally, try more solutions.
Solution 2. Run Startup Repair
Startup Repair is one of the recovery tools in the System Recovery Options menu. You can use it to fix damaged system files, which can be helpful in resolving the “Repairing disk errors.” To run it, you can follow the steps given below:
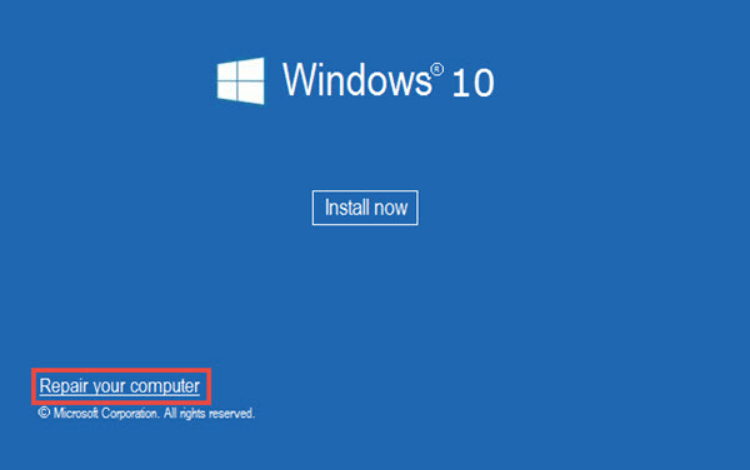
1. Insert the Windows 10 installation CD/DVD into your PC.
2. Start your PC, press a certain key to enter BIOS to boot from the Windows installation media.
3. Press any key to continue when “Press any key to boot from CD or DVD appears.
4. Choose a language, time, and keyboard. Then, click Repair your computer.
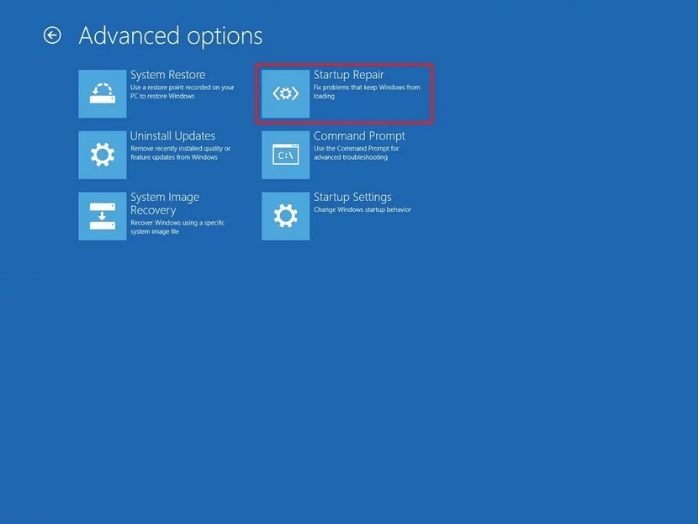
5. Go to Troubleshoot > Advanced options > Startup Repair to automatically fix Windows boot failure.
6. Wait for the whole process to finish.
7. Remove the Windows installation CD/DVD, and reboot your PC from its system hard drive to see whether the error disappears.
Solution 3. Check system volume and fix errors
If the issue is related to hard drive issue, it’s a nice choice to run CHKDSK.exe from Command Prompt. Here are the detailed steps:
1. Boot from Windows 10 installation CD/DVD and go to Repair your computer > Troubleshoot > Command Prompt.
2. In Command Prompt interface, “chkdsk c:/f/r” and hit Enter.
3. If you are prompted by “Chkdsk cannot run because the volume is in use by … Would you like to force a dismount on this volume? (Y/N)”, type “y” and hit Enter key.
4. Wait for the process to complete, remove your Windows installation media, run from the system hard drive to check whether this way works.
Note: If there is any bad sector, CHDK will try to repair it and the data stored in the bad sector can be lost.
Solution 4. Check file system integrity
If the boot failure occurs due to Windows system files corruption, you can run SFC (System File Check) tool to scan system files integrity.
You can access Command Prompt interface firstly (mentioned in Solution 3). Then, run the command: “sfc/scannow” or “sfc /scannow /offboot=d:\ /offwindir=d:\windows”.
Then wait patiently for the whole process to complete.
You can also run the following commands to rebuild BCD.
▪ bootrec/fixmbr
▪ bootrec/fixboot
▪ bootrec/scanos
▪ bootrec/rebuildbcd
Solution 5. Restore system to normal status
If you don’t want to try the methods mentioned above, you can restore your system, if you have created system restore points.
1. Run your PC from the Windows installation media.
2. Go to Repair your computer > Troubleshoot > Advanced option > System Restore.
4. Do as the prompts to finish system recovery.
Solve Repairing disk errors issue via a GUI tool
To repair Windows boot issues, like “Repairing disk errors. This might take over an hour to complete, you can run Startup Repair or check and fix errors from Command Prompt when you have Windows installation media.
If you can’t access Command Prompt, you can turn to a reputable & reliable partition manager – AOMEI Partition Assistant Professional. To fix boot failure, it offers features: Check bad sector and Rebuild MBR. Download the demo version and see how to create a bootable USB to boot the unbootable PC.
The first stage: Create a bootable USB drive for repairing
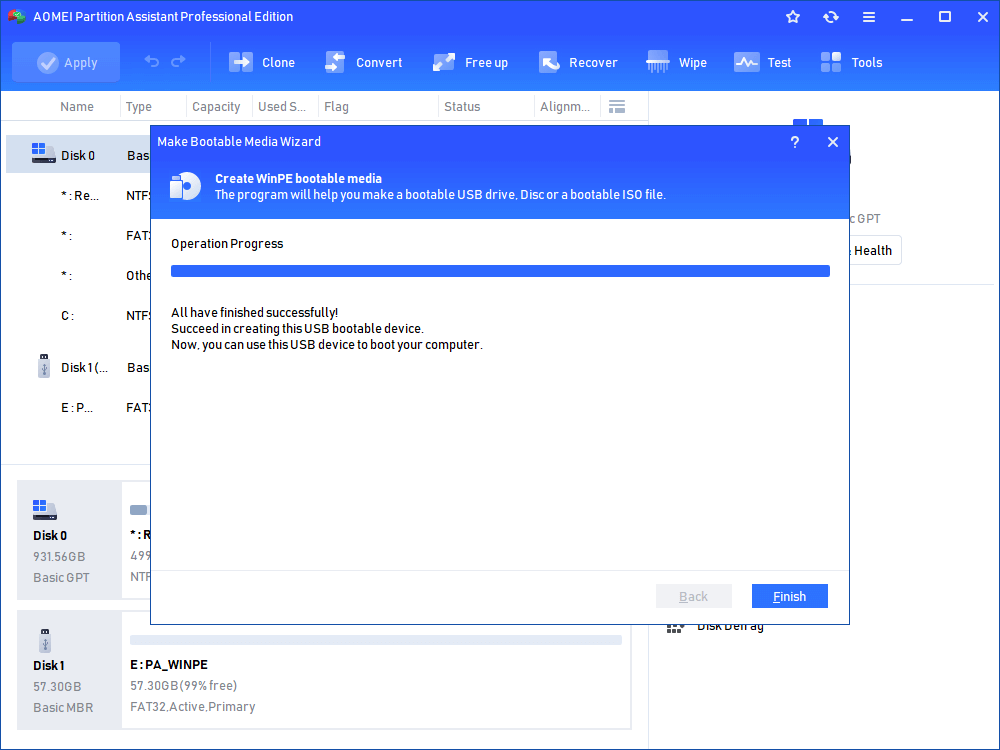
Step 1. Insert a blank USB drive to a working PC, install and run AOMEI Partition Assistant Professional. In the main interface, click on Make Bootable Media under Tools menu.

Step 2. Choose USB Boot Device, choose the inserted USB drive, and click on Proceed and Yes.
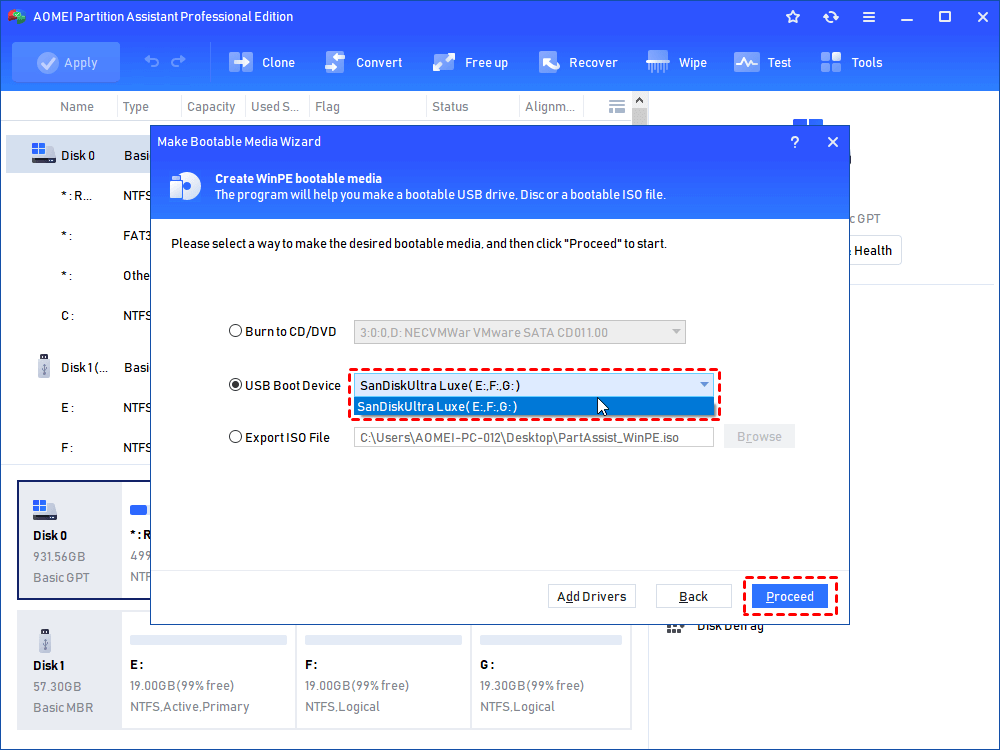
Step 3. Just wait for the process to complete.
The second stage: boot from the created bootable media
After creating the Windows bootable USB drive successfully, insert the bootable media to the PC stuck on the “Repairing disk errors” black screen. Then, start up the PC and constantly press Del or a certain specific key to enter BIOS. Finally, change boot priority and boot from the created bootable USB.
The third stage: repair Windows boot failure in WinPE mode
. Once you log in successfully, you’ll be in the main interface of AOMEI Partition Assistant Professional automatically. And you can try those methods to repair your PC.
▶ Check and fix errors for system drive
Step 1. In the home interface, right-click the system partition (usually C drive) to select “Advanced”> “Check Partition”.
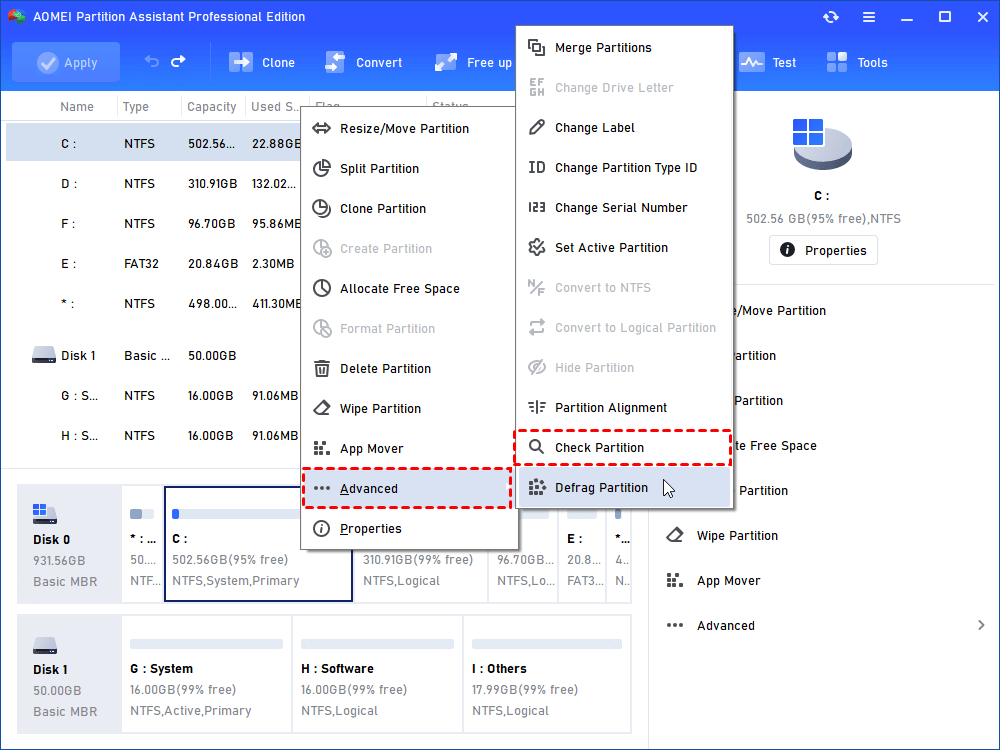
Step 2. choose “Check partition and fix errors in this partition by using chkdsk.exe.” and hit “OK”.
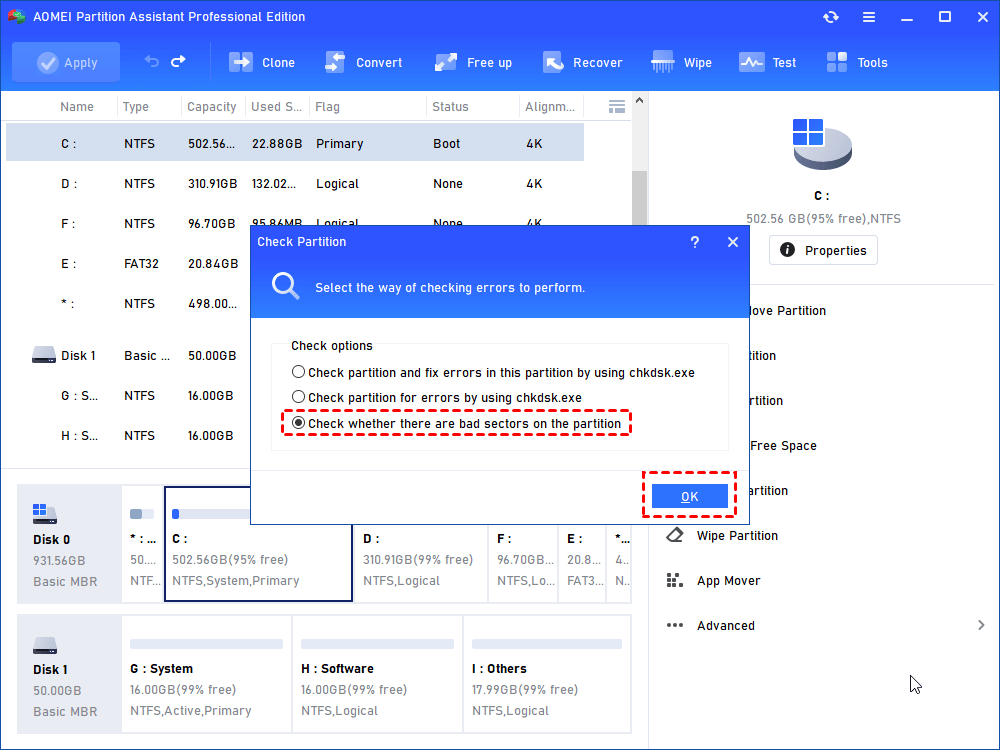
Step 3. Wait patiently for the operation to complete.
Note: To check the whole disk for bad sector, you can right-click the system disk and choose “Surface Test”.
▶Rebuild MBR
Step 1. In the main interface, right-click the system disk and choose Rebuild MBR.

Step 2. In the pop-up window, set the type of MBR for the current OS and click OK.
Step 3. Click Apply and Proceed to commit the operation.
✍ Other Highlights of the third-party partition manager
◆ Clone system hard drive to SSD without reinstalling Windows & apps
◆ Migrate OS from HDD to SSD with secure boot
◆ Extend system partition with non-contiguous unallocated space without data loss
◆ Create multiple partitions on a removable storage device, such as an SD card.
And if you download this versatile software, you can get more advanced functions, like recovering deleted boot partition, converting system disk from MBR to GPT without deleting your partition for Windows 11 upgrade, etc.

