How to: Fix Restart to Repair Drive Errors on Windows 10
Restart to repair drive errors. Click to restart your PC is an annoying problem that can occurs in Windows 10, 8, 7. This post tells how to deal with the issue effectively.
By AOMEI / Updated on May 12, 2023
My PC keeps saying “Restart to repair drive errors”
After the latest Windows 10 update, once restart my laptop, it gives an error message saying:
Restart to repair drive errors
Click to restart your PC
I have run manufactures hard drive diagnostics and anti-virus software to check my hard drive. As a result, the error still appears after I reboot the computer. How can I do to fix the error?
3 solutions for restart to repair drive error on Windows 10, 8, 7
The issue may occur after the Windows update or using the error checking tool in Windows 10. Effective solutions to fix restart your PC to repair the drive error issue will be listed; you don’t need to employ the solutions one by one and use the ones you need.
✔ Solution 1. Restore Windows 10 to a previous status in Safe Mode
✔ Solution 2. Run Startup Repair to automatically repair PC
✔ Solution 3. Enter Command Prompt to fix errors and files
✔ Solution 1. Restore Windows 10 to a previous status in Safe Mode
When the error comes out after the update, it’s not a bad choice to restore to a previous status from a system restore point (a snapshot of your Windows system files, certain program files, registry settings, etc.).
Warning: This operation won’t delete your personal data, but the software, drivers, updated installed after the restore point would be deleted.
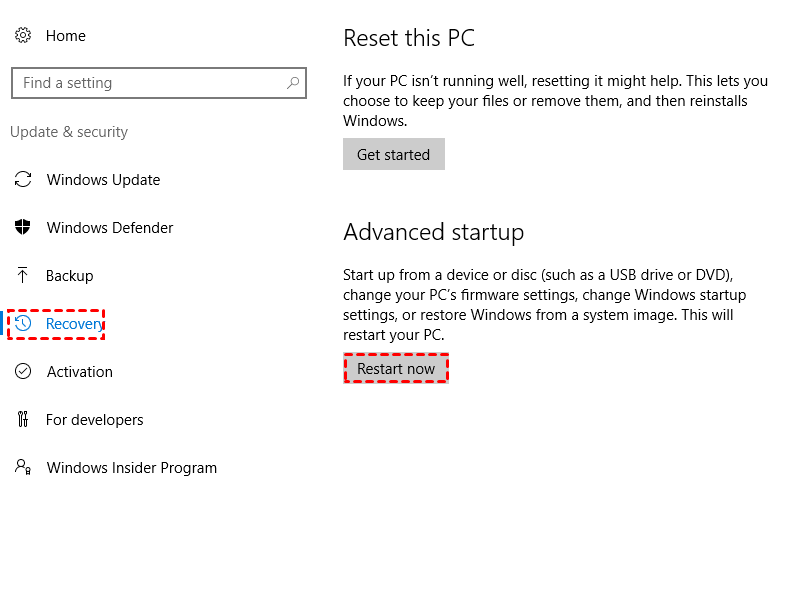
Step 1. Go to “Start” > “Settings” > “Update & Security” > “Recovery”. Then, click "Restart Now" under "Advnaced startup".
Step 2. Then, you’ll be on the “Choose an option” screen, go to “Troubleshoot” > “Advanced Options” > “Startup Settings”. Finally, click “Restart”.

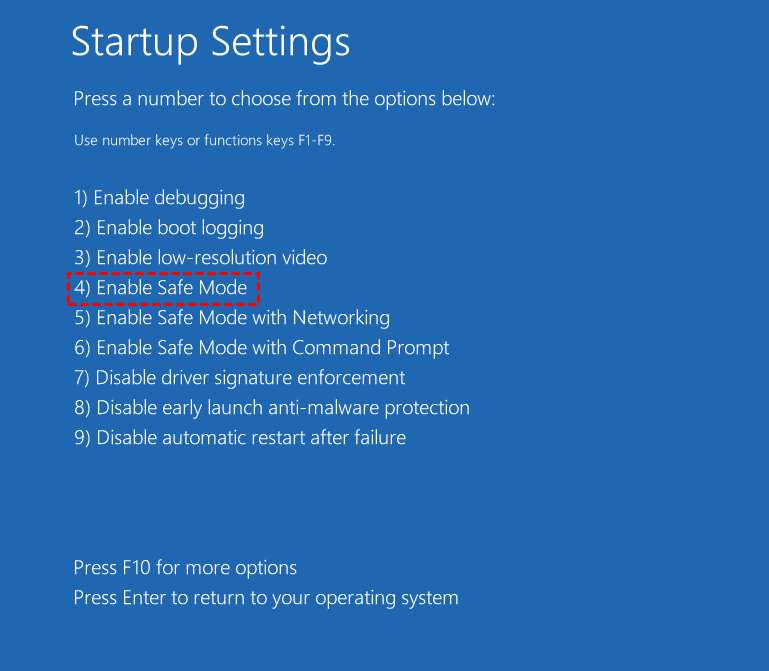
Step 3. In the pop-up window, you can see multiple options, choose “Enable Safe Mode” to start your computer in Safe Mode.
Step 4. After you boot in Safe Mode, input “system restore” and choose it in the results.
Step 5. In the System Restore window, click “Next”.
Step 6. Choose one of the available restore points and follow the guides to restore the system.
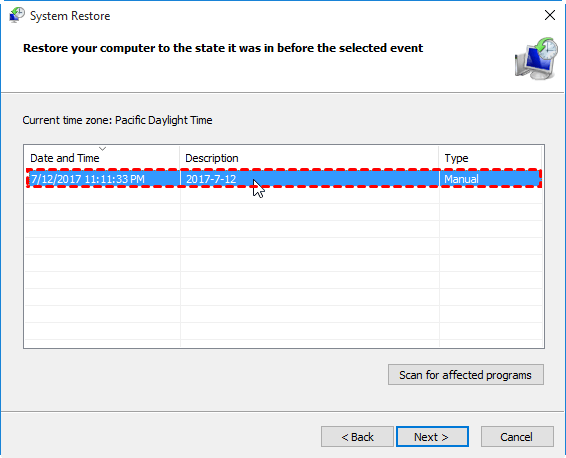
Note: It’s advised to scan for affected programs before starting system restore.
If restart to repair drive errors issue happen isn’t related to Windows update, you can insert Windows installation CD/DVD into your PC, boot from the CD/DVD, and keep reading.
✔ Solution 2. Run Startup Repair to automatically repair PC
Startup Repair is helpful in repairing system files or boot files. Run it and see whether the issue can be removed.
Step 1. After booting from the Windows installation disc, choose “Repair your computer”.
Step 2. Choose a language, a time, a currency, and an input way. Then, click “Next”.
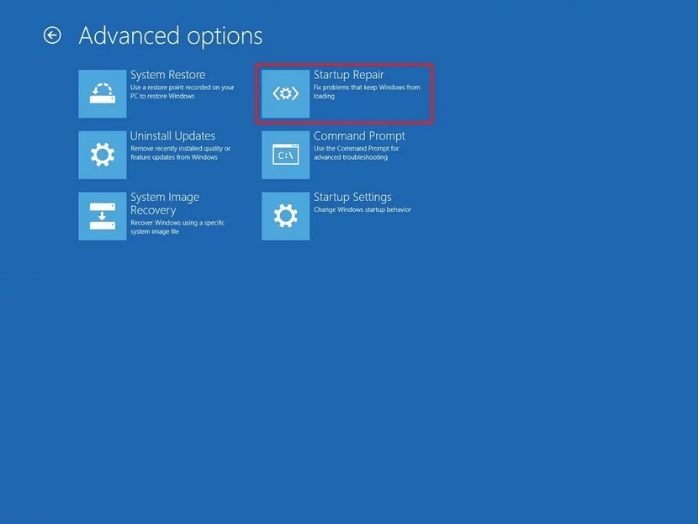
Step 3. In the pop-up window, choose “Troubleshoot”. Then, go to “Advanced Options” and “Startup Repair”.
✔ Solution 3. Enter Command Prompt to fix errors and files
After booting from the Windows installation disc, you can go to “Repair your computer” > “Advanced Options” > “Troubleshoot” > “Command Prompt” to fix hard drive errors or repair system files.
▶ Run CHKDSK commmand to check and fix errors on system hard drive:
▪ chkdsk C: /f
Note: If chkdsk C: /f isn’t working, you can input “chkdsk C: /f/r” and press Enter.
▶ Scan and repair integrity of all protected system files:
▪ “sfc /scannow
▶ Run DISM to restore corrupted files
▪ DISM /Online /Cleanup-Image /ScanHealth
▪ DISM /Online /Cleanup-Image /CheckHealth
▪ DISM /Online /Cleanup-Image /RestoreHealth
If the tool can’t get health file online, you can run:
DISM.exe /Online /Cleanup-Image /RestoreHealth /Source:D:RepairSourceWindows /LimitAccess
Note: "D" is the drive letter of the Windows installation CD/DVD.
If you can’t get access to Windows Recovery Environment, you can turn to AOMEI Partition Assistant Standard, to repair Windows issues like restart to repair drive error. Free download it and see how it works:
Firstly, install it on a normal computer and create a bootable USB drive and then boot from the USB drive. Then, you can check and fix hard drive errors.
Step 1. Right-click C drive and choose "Advanced"> "Check Partition".
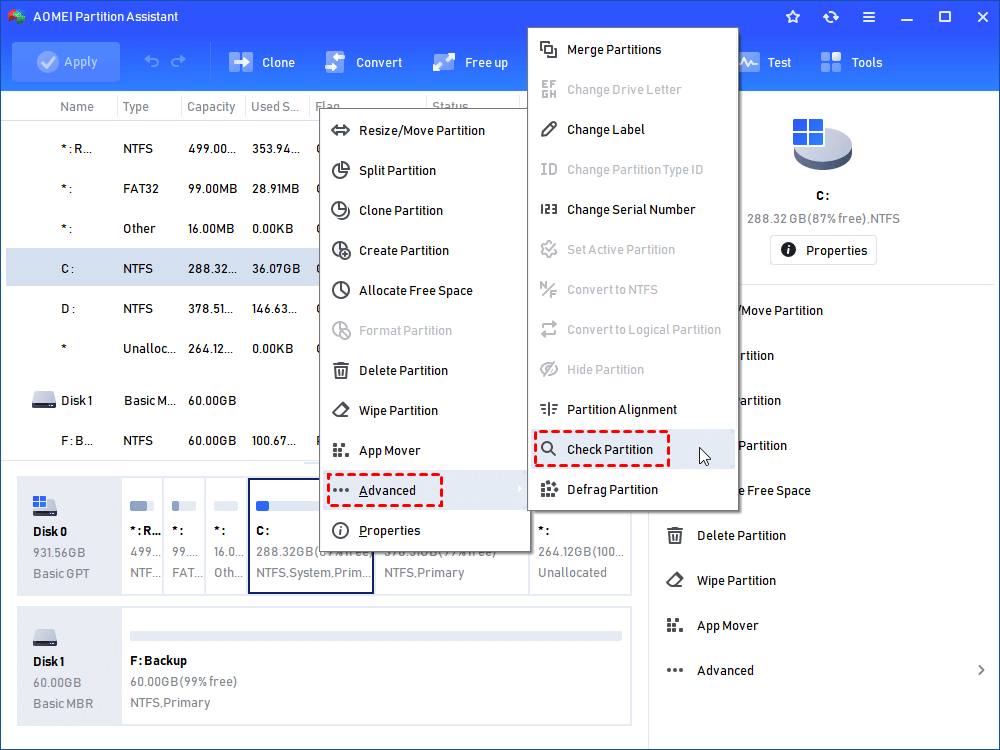
Step 2. choose “Check partition and fix errors in this partition by using chkdsk.exe.” and hit “OK”.

Step 3. Wait patiently for the operation to finish.
Add info: How to boot from the Windows installation disc or bootable USB
If you have no idea about how to boot from the Windows installation CD/DVD or bootable USB after inserting the device into your PC, the following content will be useful for you!
Step 1. Reboot your computer and press a specific key (F11 or F12) to enter the boot menu.
Step 2. Choose the device (the installation CD/DVD or the bootable USB) and press Enter to boot from the device.
This just changes boot odder once; if you want to change boot order permanently, you can Enter BIOS whiling rebooting to change the boot priority. Then, save the changes and restart your computer.

