How to Shrink Volume While Not Enough Space Available on the Disk
Windows Disk Management has some limitations, so you may encounter the problem that shrink volume not enough space. Here you shall find some explanation and workarounds.
By AOMEI / Updated on October 28, 2024
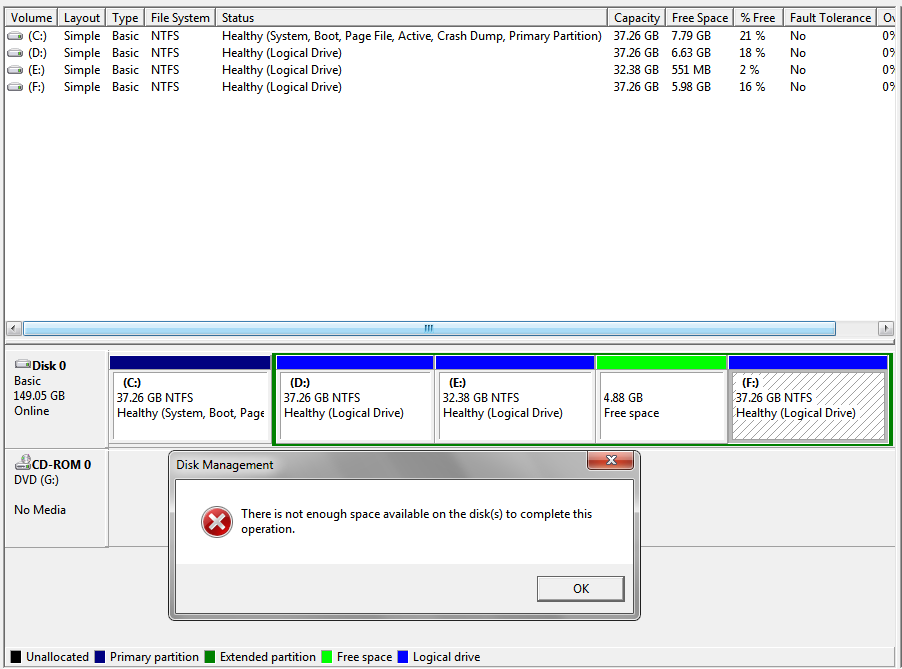
The symptom: Windows shrink volume not enough space
When you try to shrink a volume with Disk Management, you may encounter the problem that shrink volume not enough space. One situation is that it only shows a little space that allows you to shrink when there is actually a lot of free space, the other situation is that it shows enough space to shrink, but it gives an error that there is not enough space available on the disk to complete this operation while shrinking a partition, in most of the case system partition.
Why is there not enough space available for shrinking partition?
When other applications have made some changes to your partitions after you open Disk Management, then the partition status shown in Disk Management is different from what really is. Therefore, you will receive this error when you try to shrink partition in Disk Management. Besides, when doing other operations that will perform other operations like Extend Volume, Delete Volume, you may also get this not enough space available error message.
Additionally, you cannot shrink a volume with unmovable files located in the middle of the partition. If there are page files or other unmovable/locked system files at the end of the volume, it might also cause the problem there is not enough space on the disk to complete shrinking volume.
How to solve it when there is not enough space for shrinking volume?
To help users solve the problem, here we collect three methods that are proven to be effective. Take a look and choose a proper one for your situation.
Method 1: Rescan Disks
In most of the cases, you can simply click the option “Rescan Disks” under “Action” tab to fix this problem. After the partitions and volumes reloaded, you shall be able to shrink volume or do other operations.
Method 2: Disable system files
To fix this Disk Management error not enough space, you need to disable the system files as many as you can at this very moment.
1. Disable System Protection in Control Panel\System and Security\System\System Protection.
2. Run Disk Defragment. Type in "disk defragmenter" in the search box, and the defragment utility should show at the top of the search results.
3. Disable Hibernation mode by run the command “powercfg /hibernate off “in the Command Prompt. In Windows 8/8.1, Windows 10, or Windows 11, the Hibernation mode is disabled as default.
4. Disable the kernel memory dump. In the Advanced Settings, go to Settings under Startup and Recovery, and then switch the drop-down menu under Write debugging information to “None”.
5. Disable page files. In the same System, go to Advanced System Settings\Settings under Performance\Advanced\Change, uncheck the option Automatically manage paging file size for all drives, and check the option No Paging File. Restart your computer, and then delete your c:\pagefile.sys file.
6. Run the Disk Cleanup. Open Disk Cleanup at the Properties of the partition you want to clean up. Then click Clean up system files to remove the hibernation file and all restore points.
After all these steps, you should be able to shrink volume the amount of space you want. Unfortunately, if it still failed to shrink partition to a certain amount of space, you can try a third party software.
Method 3: Use reliable partition manager program
AOMEI Partition Assistant, software works on Windows 11/10/8/8.1/7, is able to shrink a partition up to its total amount of free space regardless of location of any unmovable files. So you can get rid of the "shrink volume not enough space" issue. To shrink partition with AOMEI Partition Assistant:
1. Download this program. Install and launch it.
The Best Windows Disk Partition Manager and PC Optimizer
2. Right-click the partition or volume you want to shrink and select "Resize/Move Partition".
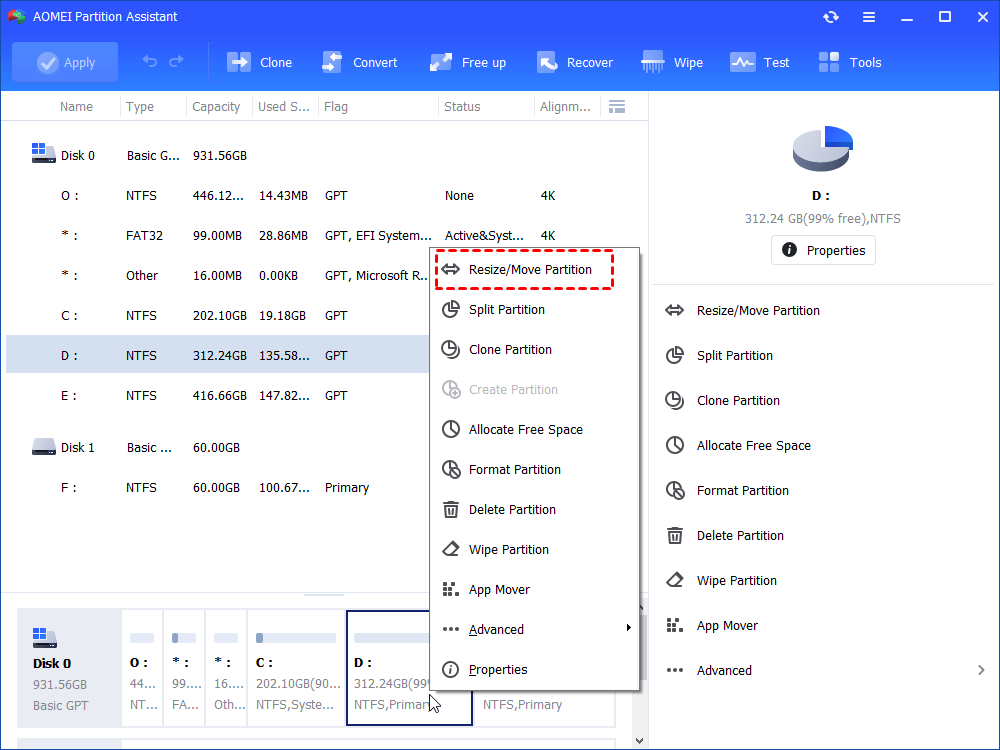
3. In the pop-out window, drag the slider leftwards or enter the new partition size to shrink the partition. If you check the option I need to move this partition, it allows you to shrink a partition from both sides.

4. Click "Apply" to run the operation.

Note: This powerful disk managing tool can also shrink the BitLocker partition.
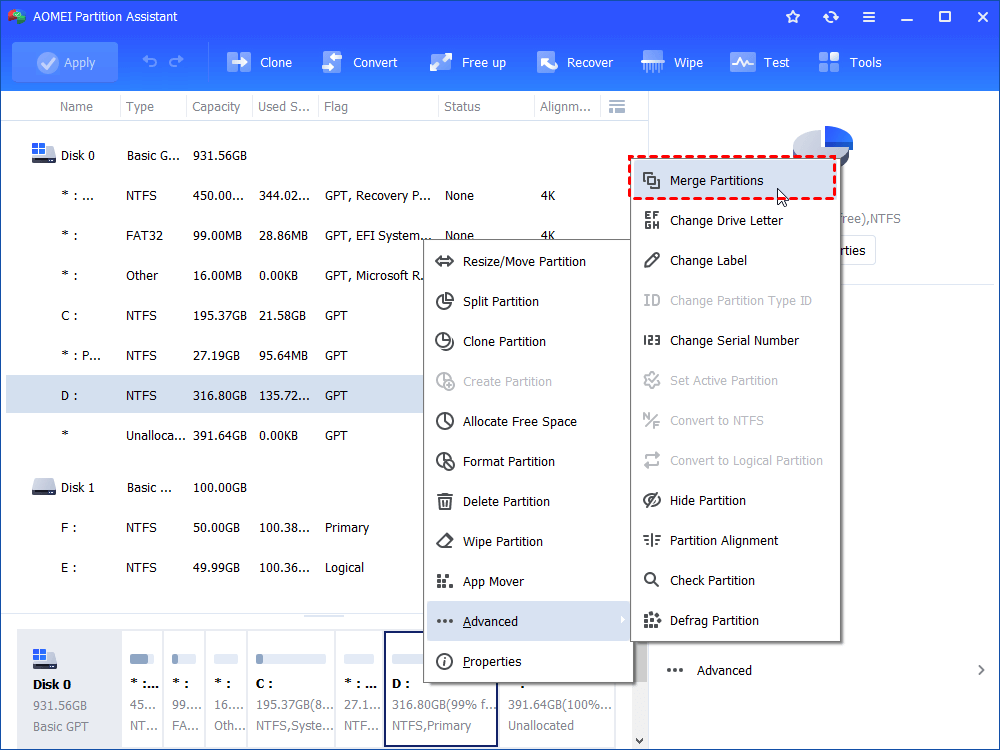
Using this partition software, you can successfully shrink volume Windows 10 without not enough space warning. If want to add the unallocated space to other partition, AOMEI Partition Assistant allows you to add unallocated space to any partition on the same disk by using the feature "Merge Partitions" in "Advanced".
Besides, many useful functions are implemented in AOMEI Partition Assistant, such as Migrate OS to SSD, Convert MBR to GPT disk without data loss, Clone disk, and many more.

