SSD Reports Wrong Size in Windows? Why and How to Fix it Easily!
Sometimes, you might find the SSD reports wrong size. But don't worry and here we willtell why it happens and what to do when SSD shows wrong size on Windows 11, 10, 8, 7.
By Lucas / Updated on February 26, 2025
Why does SSD reports wrong size?
Thanks to the optimal reading&writing performance and low latency, SSD (solid-state drive) has become increasingly popular, and it has been a prior choice for tech users. Some users prefer to transfer OS to SSD for a quick boot time. However, some users find their new SSD showing wrong capacity for no reason.
Why is SSD not showing full capacity? There are possible reasons that can be accounted for the SSD not showing the correct size:
▶ The Virtual Memory paging file is located on the SSD/HDD.
▶ The SSD drive is larger than 2TB but initialized to be MBR.
How to fix “SSD reporting wrong size” in Windows?
After figuring out possible reasons for SSD drive showing wrong size, it’s time to get a deeper understanding of each one and check the corresponding solutions.
▌Solution 1. Make conversion between vendor and OS capacity calculating method
It is well known that computers operate in binary (or base-2), which is a numeric system that only uses two digits: 0 and 1. As a result, in the operating systems, the capacity is calculated on a one-step basis every 1024, so every 1024MB is 1GB, and every 1024GB is 1TB.
But the hard disk manufacturers calculate the capacity on a one-step per 1000, that is to say, every 1000MB equals 1GB and every 1000GB equals 1TB, which leads to the “reduction” of SSD capacity.

For example, we buy an SSD advertised as 120GB, but it will only show about 112GB available for usage in the computer operating system. Therefore, when you find that the SSD shows wrong capacity, you can convert the capacity according to the following calculation method.
NOTE:
Actual capacity= byte/(1024*1024*1024 *1024)
Take 120GB as an example:
In manufacturer capacity calculating: 120GB=120,000MB=120,000,000KB=120,000,000,000 bytes
Actual capacity (in computer operating system)=120,000,000,000/(1024*1024*1024)≈111.8GB
So, the actual capacity of an SSD labeled as 120GB is just about 112GB.
▌Solution 2. Reset the Virtual Memory paging file
Storage/memory is quite important for computers. All programs running on the computer need to be executed in memory. So if the executed programs are too large or multiple programs are running at the same time, the memory will run out quickly.
To fix this problem, Windows adopts “Virtual Memory” (also Virtual Storage) technology, which can take out some disk space to work as memory-supporting programs running by constructing a vast range of contiguous addresses via combining active RAM and inactive memory. In the hard disk, the virtual memory exists as the PAGEFILE.SYS.
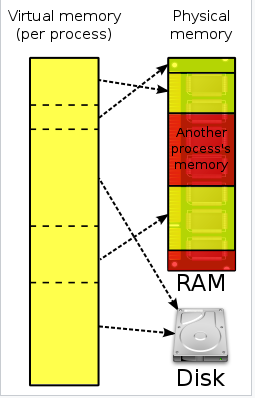
The size of the Virtual Memory in the computer is exactly how much space it takes up in the hard disk. So if you find the actual size of SSD is different from the described one, you can check and reset the size of the virtual storage in the computer taking the steps below.
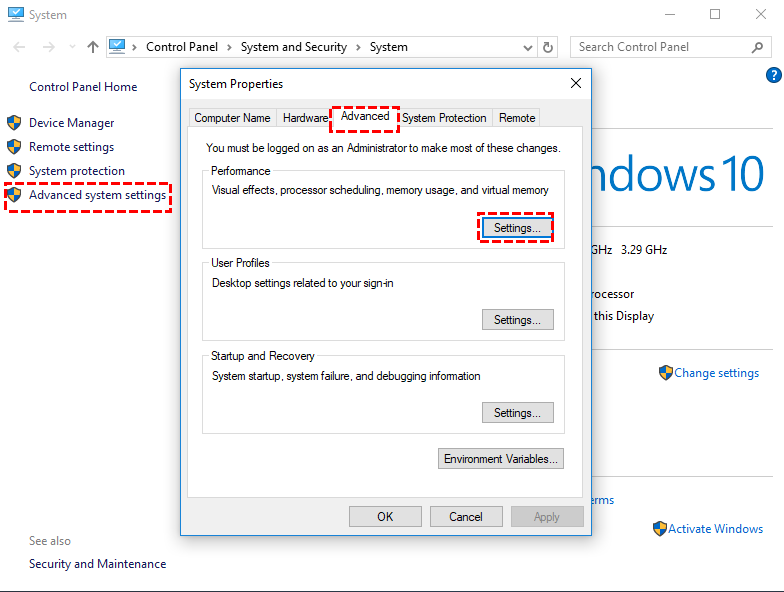
Step 1. Right-click “My Computer/This PC” and choose “Properties”.
Step 2. Click “Advanced system setting” in the left panel--> “Advanced” in the next mini window--> “Settings” under “Performance”.
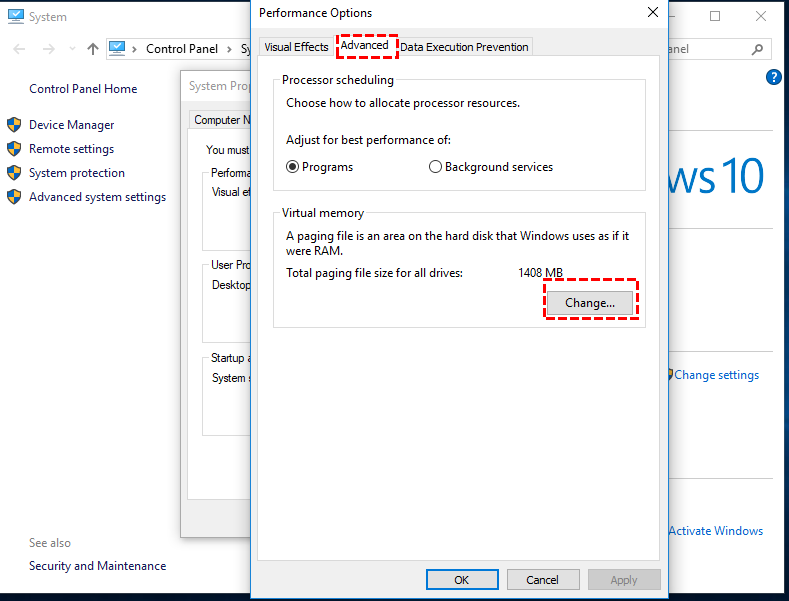
Step 3. In the “Performance Options” windows, locate “Advanced” and click “Change”.
Step 4. Locate the drive letter of SSD, deselect “Automatically manage paging file size for all drive”, tick “Custom size” and enter the initial size and maximum size, and then click “Set” and “OK”.
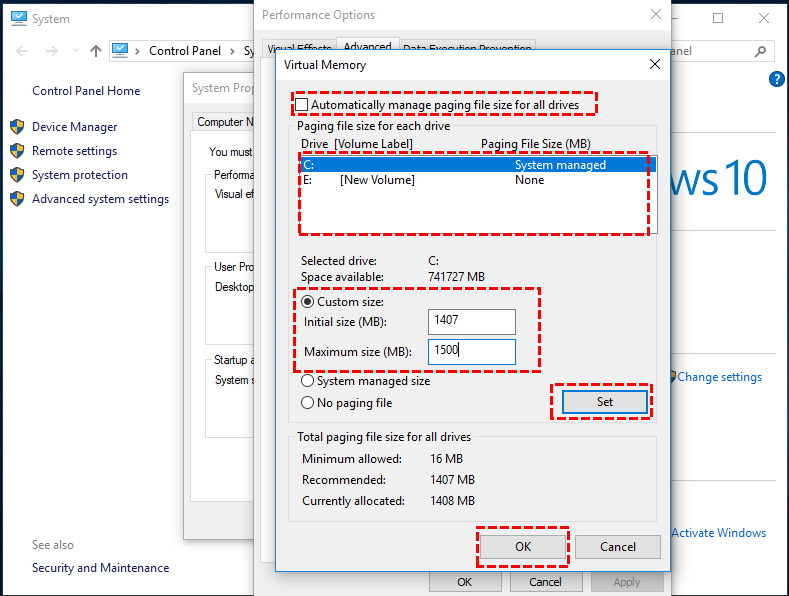
Step 5. Finally, reboot your computer.
Then, you can allocate the size of Virtual Memory according to your computer's situation. Setting a certain size of virtual memory will greatly benefit the smooth operation of the system, so it is not advised to cancel virtual memory directly.
▌Solution 3. Convert MBR SSD to GPT
If your SSD drive is over 2TB but initialized to be MBR, there is a very strong chance that the SSD reports wrong size. That is because the MBR partition style only works with disks up to 2TB in size and cannot recognize the surpassing space. The rest space will be shown as unallocated space in Disk Management and you cannot see it in Windows File Explorer. So you may find the SSD shows the wrong capacity. In this case, you can convert the SSD to GPT, which can support disk beyond 2TB. Two methods can finish the conversion.
Method 1. Using Diskpart (data loss)
First of all, you can make use of DiskPart to convert the SSD reporting wrong capacity to GPT. But it can only convert an empty disk to GPT or MBR, so you have to delete all existing partitions, which means you will lose everything on the SSD drive. Therefore, please back up files that are important in advance.
After making a backup, then press “Win+R” simultaneously to open “Run”, type “diskpart” and hit “OK”. Then input the following command:
• list disk
• select disk 1 (replace “1” with the disk number of your SSD)
• clean (delete all partitions on the chosen SSD drive.)
• convert gpt
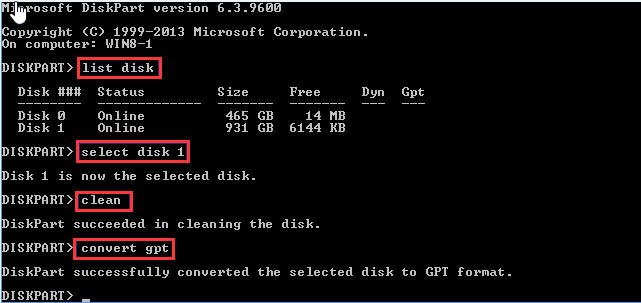
Then, your MBR SSD is converted to GPT successfully, and the rest space over 2TB can be recognized now.
Method 2. Apply a free partition manager (without data loss)
As mentioned above, the Diskpart will require you to delete all partitions first on the SSD, then you can convert it to GPT successfully. So, if you don’t want to clear the disk beforehand, you can turn to a free partition manager called AOMEI Partition Assistant Standard. Different from DiskPart, this freeware can convert any data disk from MBR to GPT, or GPT to MBR without deleting partitions.
▶ Important:
✔ To avoid data loss caused by some uncontrollable factors such as sudden power failure, making a backup is always suggested at any time.
✔If you need to convert boot disk, you can upgrade to AOMEI Partition Assistant Professional.
✔ If your SSD loses data unfortunately on the rest space that doesn't show, you need to perform data recover before you convert it to GPT.
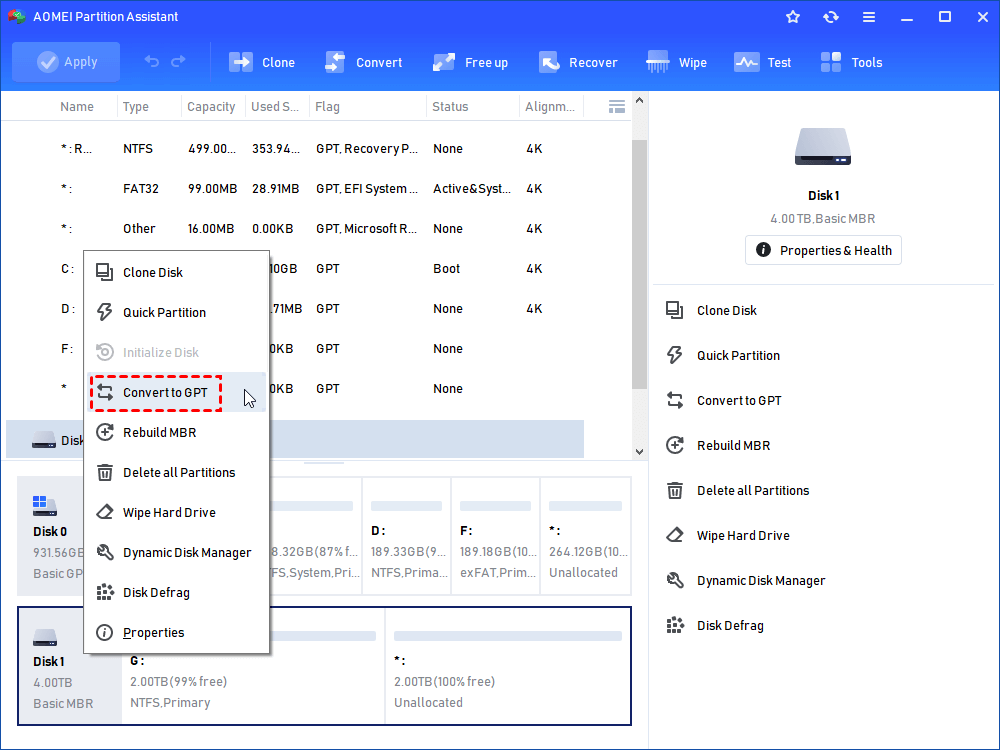
Step 1. Download the freeware, install and run it, right-click the SSD and select “Convert to GPT”.
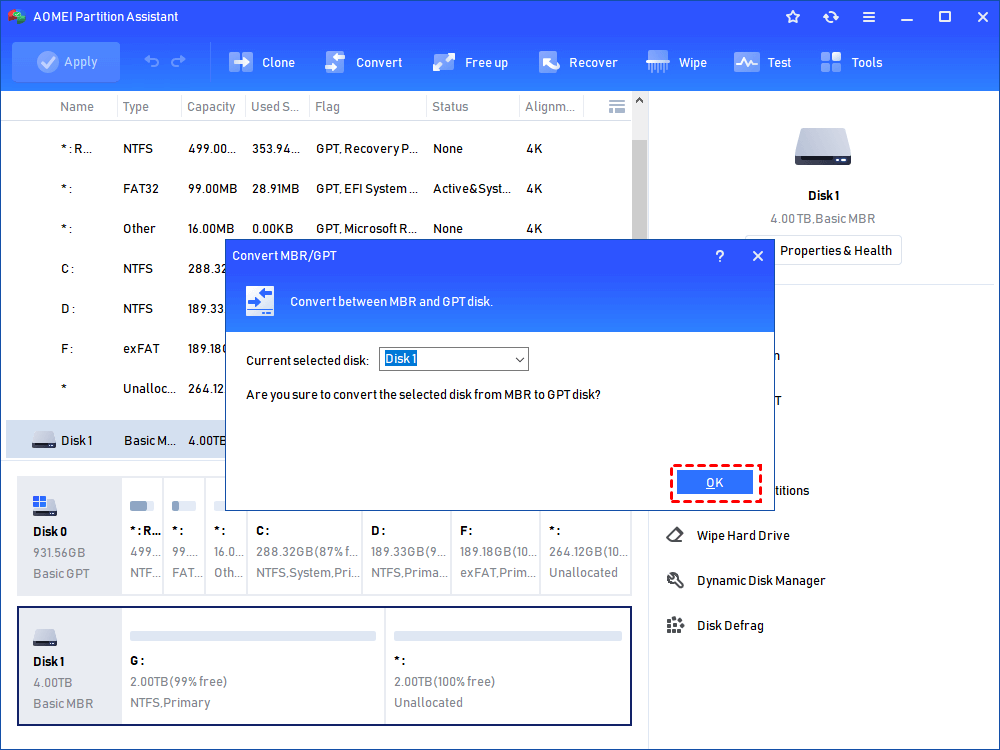
Step 2. It will pop out a window to confirm the operation. Click “OK”.
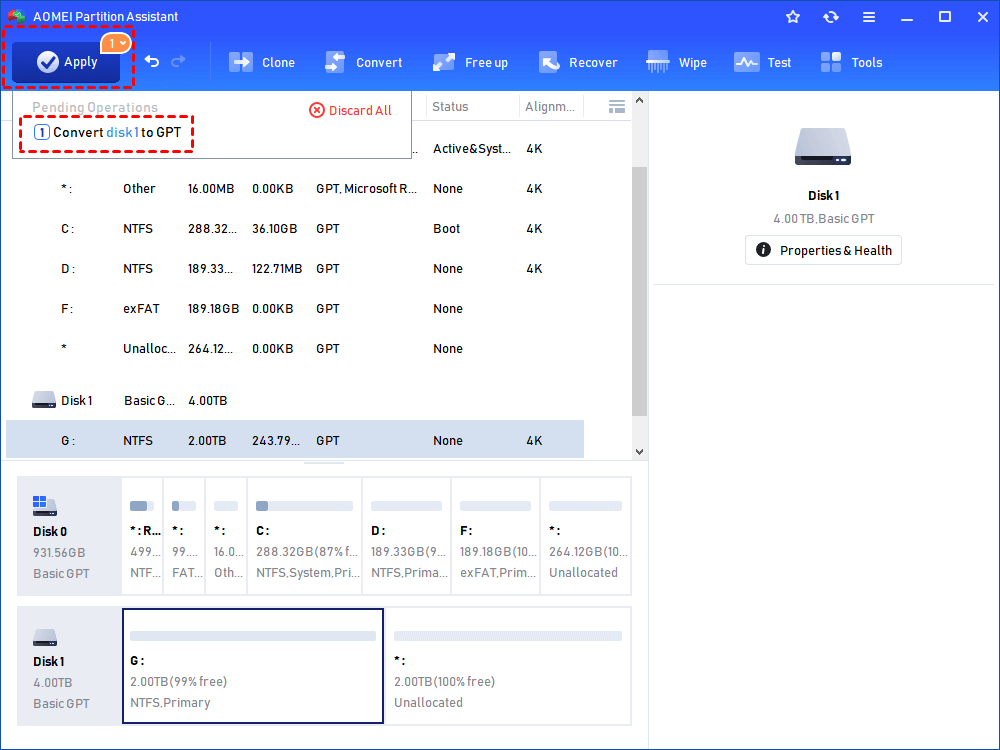
Step 3. Back to the main interface, you can confirm the operations again, if there is no problem, click “Apply” on the toolbar.
Further reading: SSD reports the wrong size after cloning
The "SSD not showing full capacity" issue can also occur after you upgrade to a larger SSD by cloning the old hard disk. After the clone, you may find the SSD has the same disk space as the old one, and the rest disk space is missing. That’s because you have cloned the partition size of the original disk to the SSD drive. Therefore, when the SSD is larger than the old one, the rest beyond capacity will show as unallocated space and cannot be utilized for data storage.
In this situation, you can create a new partition from the unallocated space via Disk Management. Or use AOMEI Partition Assistant to merge the unallocated space into another existing partition (especially the C drive).
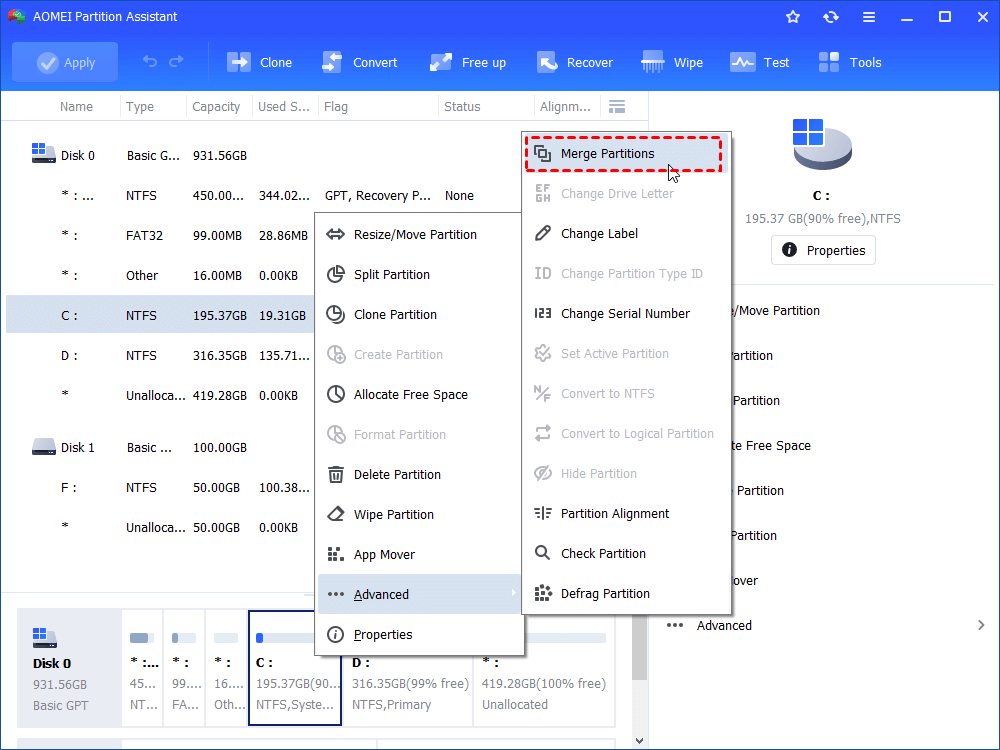
Step 1. Launch this software. Right-click the C drive, point to "Advanced" and select “Merge Partitions”.
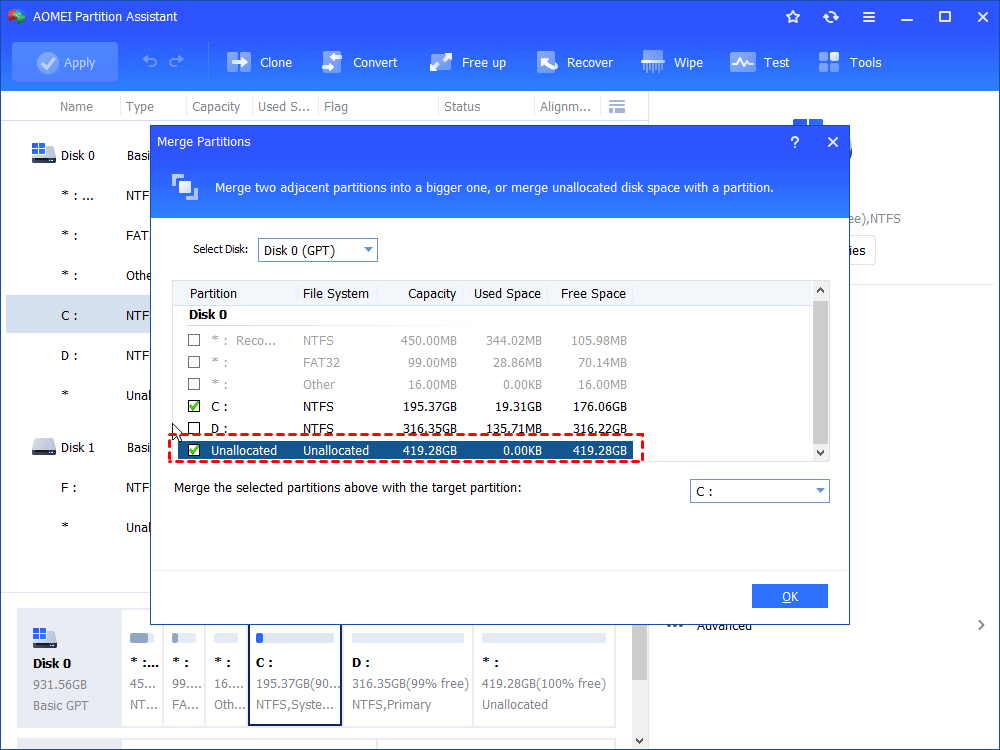
Step 2. Tick the unallocated space and click “OK”.
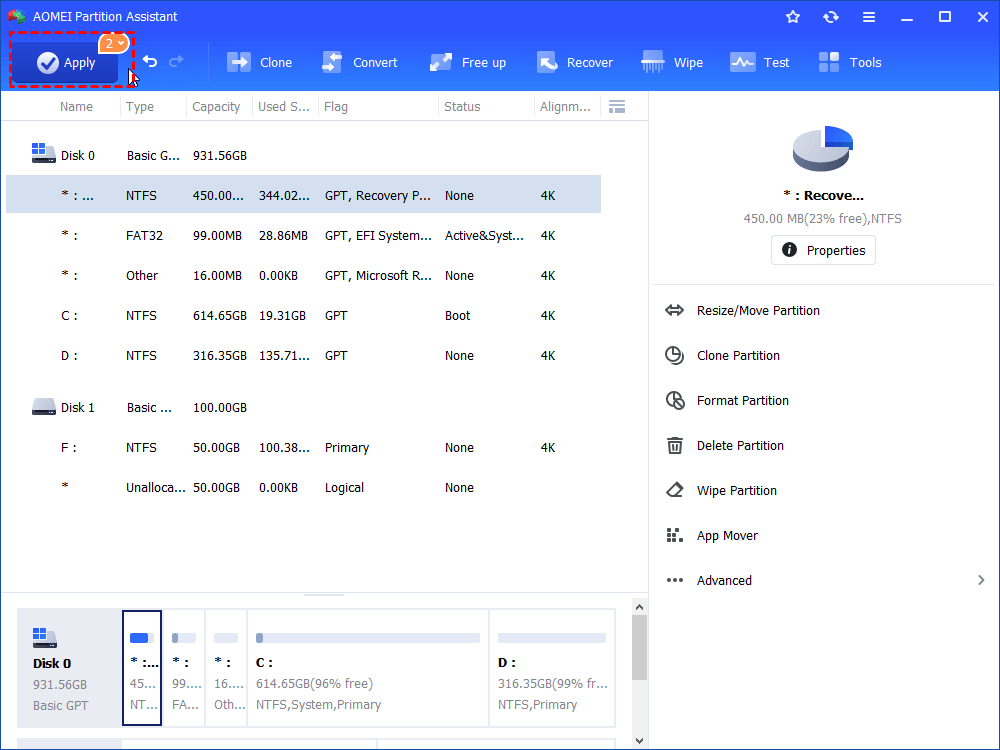
Step 3. Hit on “Apply” to commit the pending operation.
Summary
Now, you are sure to know what to do when SSD reports wrong size under different situations. The recommended software (AOMEI Partition Assistant Professional) also has other amazing features for SSD drives such as aligning SSD partitions, securely erasing SSD drive, transferring OS to SSD drive, cloning SSD to SSD/HDD, etc. If you are a Windows Server user, please switch to the Server partition manager, which is compatible with both Server and Windows PC.
FAQs about 'SSD reports wrong size'
1. How do I know if my SSD size discrepancy is normal or a problem?
A small difference (a few gigabytes) is usually normal. However, a significant discrepancy could indicate a problem. Check your SSD's advertised capacity and compare it to the reported size in your operating system. If the difference is substantial, further investigation is needed.
2. What are the consequences of an SSD reporting the wrong size?
If your SSD reports the wrong size, you may experience issues with installing operating systems or applications, or you may run out of storage space unexpectedly. In some cases, the issue can also lead to data loss or corruption.
3. Is an SSD that reports the wrong size still usable?
While an SSD that reports the wrong size may still be usable, it's not recommended to continue using it until the issue is resolved. Using a drive with an incorrect capacity can lead to data loss, corruption, or other issues that can compromise your system's stability and performance.
4. How can I prevent SSD size discrepancies in the future?
While you can't eliminate the possibility of discrepancies, you can minimize the risks by:
- Purchasing SSDs from reputable brands: Established manufacturers are less likely to have significant discrepancies in reported storage.
- Checking reviews and specifications: Before buying an SSD, research its actual reported capacity by users and compare it to the advertised size.
- Keeping your system and SSD firmware updated: Updates often include fixes for storage reporting issues.

