Learn How to Unhide/Show Recovery Partition in Windows 10/8/7
Usually a recovery partition is hidden by default and cannot be seen in Windows 11/10/8/7 File Explorer. However, you can unhide a recovery partition to make it visible by DiskPart or 3rd-party partition manger so that you can view the files in it.
By AOMEI / Updated on May 27, 2025
What is a Recovery Partition?
Recovery Partition is a part of hard disk, which is hold the image file for your Windows 7/8/8.1/10/11 operating system, known as WinRE. In most cases, the recovery partition is hidden by default in case of unintentional deletion and formation, and you can’t see the recovery partition in Windows Explorer (File Explorer),
How to Access Recovery Partition Windows 10: go to This PC>Manage to openComputer Management, then select Storage> Disk Management.
Under some circumstances, you may want to unhide recovery partition; there are two ways to meet your needs in Windows OS.
1️⃣Unhide Recovery Partition with DiskPart Command: command prompt provides a comprehensive solution for solving Windows system problems. However, the tool requires you to be familiar with command prompt parameters. Any wrong parameter may lead to irretrievable data loss. Experienced users can opt for this method.
2️⃣Unhide Recovery Partition with Third-Party Tool: Choosing a professional tool can help you tool like an expert. AOMEI Partition Assistant provides a straightforward way to unhide partitions. It is a comprehensive disk management tool. And you can even enjoy more advanced features.
The Best Windows Disk Partition Manager and PC Optimizer
Please keep in mind, that it’s not recommended to unhide hidden recovery partition in case the Windows operating system cannot restore.
Unhide Recovery Partition with DiskPart Command
you could unhide the recovery partition on a basic disk with DiskPart:
-
Input cmd into Windows search box to open the Command Prompt.
-
Then type diskpart.
-
Type list disk command to list all your hard disks in the computer.
-
Input select disk n, where is n is the number of the hard disk that the recovery partition on it.
-
Type list partition to show all the partitions on the selected MBR/GPT hard disk.
-
Type select partition m, where m is the number of the Dell/Asus/HP recovery partition.
-
Then type assign: the system will assign a drive letter automatically.

After these commands, you can see the recovery partition in Windows Explorer. If you want to hide it, basically the same as the steps of unhide, the only different is the last step: type remove letter=e, the e is the drive letter of the recovery partition.
How to Unhide Partition via Third-Party Tool
Another reliable way to unhide recovery partition is taking advantage of AOMEI Partition Assistant, which is a powerful disk partitioning software for Windows users, and fully supports Windows 11, 10, 8, 8.1, 7, all 32-bit and 64-bit editions included. This software offers many advanced functions for more professional use. To further effectively manage hard disks, it is also recommended to upgrade to its higher edition like AOMEI Partition Assistant Professional. It provides various PC management solutions including hide/unhide, extend, resize, format, check, delete partitions, and NTFS to FAT32 converter, migrate OS to SSD, convert disk between MBR and GPT without losing data, and more.
The Best Windows Disk Partition Manager and PC Optimizer
Below we will try to describe how to unhide the recovery partition on GPT hard disk with details.
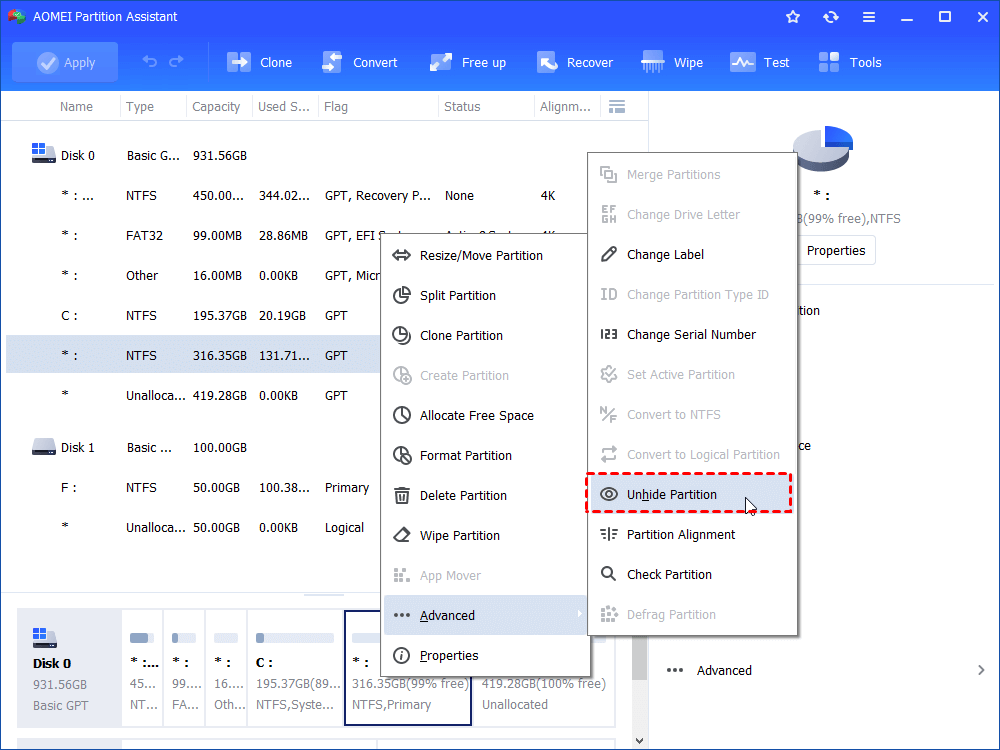
Step1: Download AOMEI Partition Assistant, install and launch the program. On the main window, click the recovery partition, go to "Advanced" and select Unhide under the left Partition Operations panel, or right click the recovery partition, select Advanced>Unhide at the drop-down menu.
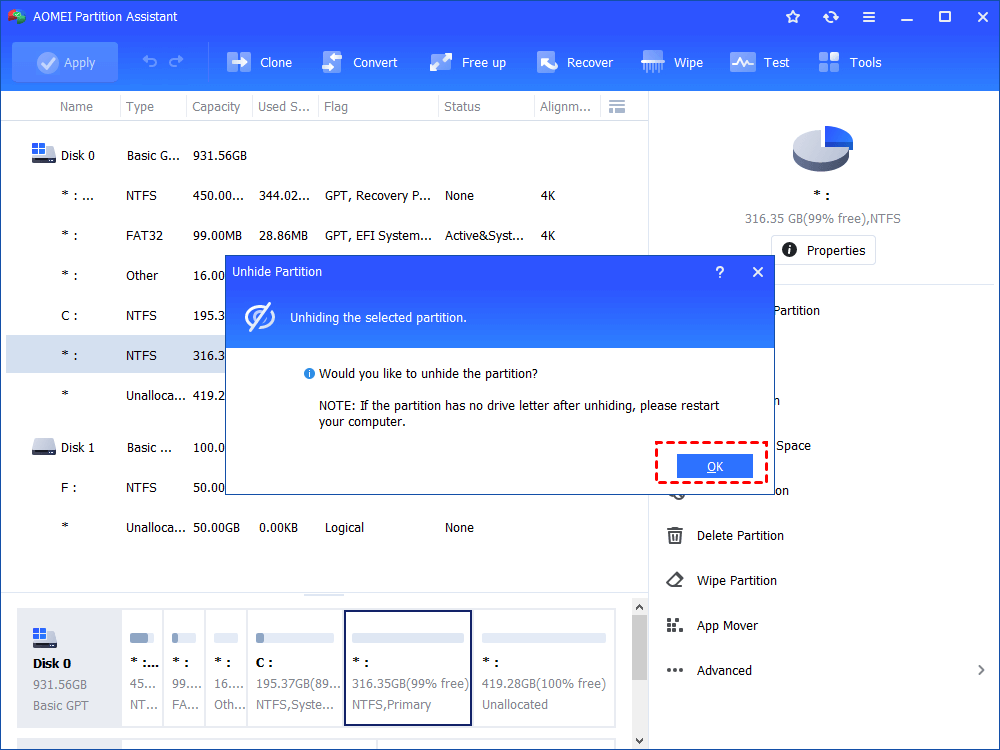
Step 2: At the next window, click OK to continue.
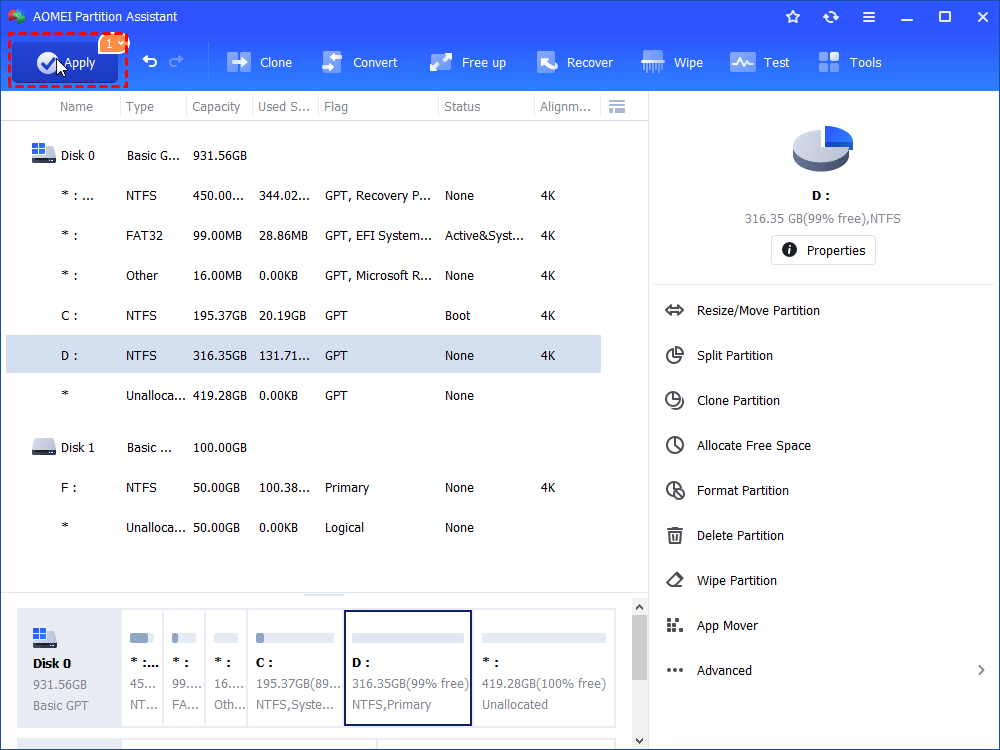
Step 3: Check the result of Pending Operations and the changes of recovery partition. Then click Apply on the toolbar to show recovery partition and hidden files in Windows 7/8/10.
With the help of AOMEI Partition Assistant, you will find unhide recovery partition has been successfully and the recovery partition is visible in File Explorer. Please note that do not delete and format this partition to prevent from stucking in the unbootable situations, or you can hide partition. For server users, the AOMEI Partition Assistant Server is more suitable for you with all advanced features, like dynamic disks and dynamic volumes management, converting primary to logical and vice versa, etc.
Conclusion
This passage introduces how to unhide recovery partition. The recovery partition is a hidden part of your hard drive that helps bring your Windows system back to normal if something goes wrong. It’s kept out of sight to prevent accidental deletion or changes. If you ever need to unhide it, there are two main ways: using the DiskPart command if you're comfortable with command lines, or a simpler option—using software like AOMEI Partition Assistant. This tool makes the process easier, especially for everyday users. Still, unless you have a specific reason, it’s safer to keep the recovery partition hidden to avoid causing system issues.

