Free and Powerful VHD Resizer Download - AOMEI Partition Assistant
VHD resizer is the main topic of this post. You’ll know what VHD is and its features. Then, an amazing third-party VHD resizer and its use will be recommended.
Knowledge of VHD
The full name of VHD is Virtual Hard Disk. It is a file formatted to be structurally identical to a physical hard disk. It is typically used in various virtualization packages, and can be used to install a wide variety of operating systems (various versions of Windows and Linux).
Virtualization now has become one of the most used features in personal computers and data centers. Since the standalone application “Virtual PC 2007” back in Windows XP days up to current Hyper-V feature in Windows 7, the number of users has been steadily growing. VHD resizer is also growing at the same time.
Steps to create a VHD in Windows 11/10/8/7
Windows 11 is the most popular Windows OS today, so here I take Windows 11as an example.
1. Open disk management, click the “Action” button then select “Create VHD” option.
2. In the pop-up window, select the VHD format and location on the machine. Click “OK”.
3. After it is initialized, you can create partition on it.
Why need to resize VHD?
Above I taught you how to create VHD. You see, to create a Windows VHD either through Virtual PC or Virtual Server, you have to specify the maximum size of the file first. You can set the VHD to be a fixed or dynamically sized file, the total size the VHD is determined at the time you create it. either by mistake, on purpose, because you were in a hurry, or by ignorance. Or even you just found it there, you clicked on the default options and create a dynamic 19.53Gb VHD.
Whatever the case is, over time, you may actually realize that the amount of VHD assigned storage is far away from enough and plan to extend the total size of the VHD file to allow more space for program installation and data files. So, we need a VHD resizer to resize VHD.
How to use VHD resizer?
First, we should know what is VHD Resizer. Windows 11 built-in Disk Management can perform as a VHD resizer, which allows you to extend or shrink the attached VHD as same as physical disks. However, Disk Management has 2 critical limits:
1. Only a disk in NTFS or RAW can be extended or shrunk.
2. To extend a volume on a VHD, there must be a piece of unallocated space contiguously on the right side of the volume or the button for extension will be greyed out.
So, here, I recommend an alternative VHD resizer tool to Disk Management. You can try the third-party resizer - AOMEI Partition Assistant Professional. it not only helps you resize VHD partition but also performs some other advanced partition operations: splitting VHD partition, converting FAT to NTFS, converting dynamic to basic, copying partition, and so on.
Resizing the Partition on VHD with AOMEI Partition Assistant
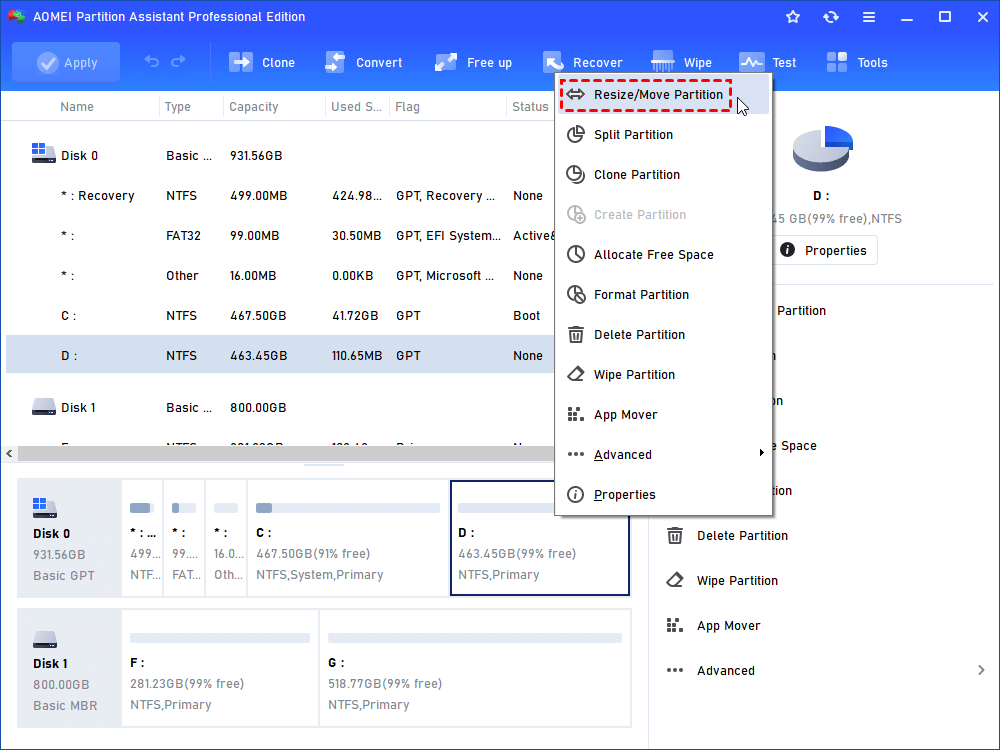
1.Download AOMEI Partition Assistant Professional Edition, install and run. In the main interface you will directly get the hard drive information like disk model, partition file system, capacity, etc. Right-choose the partition on the VHD that you want to resize, click "Resize/Move Partition".
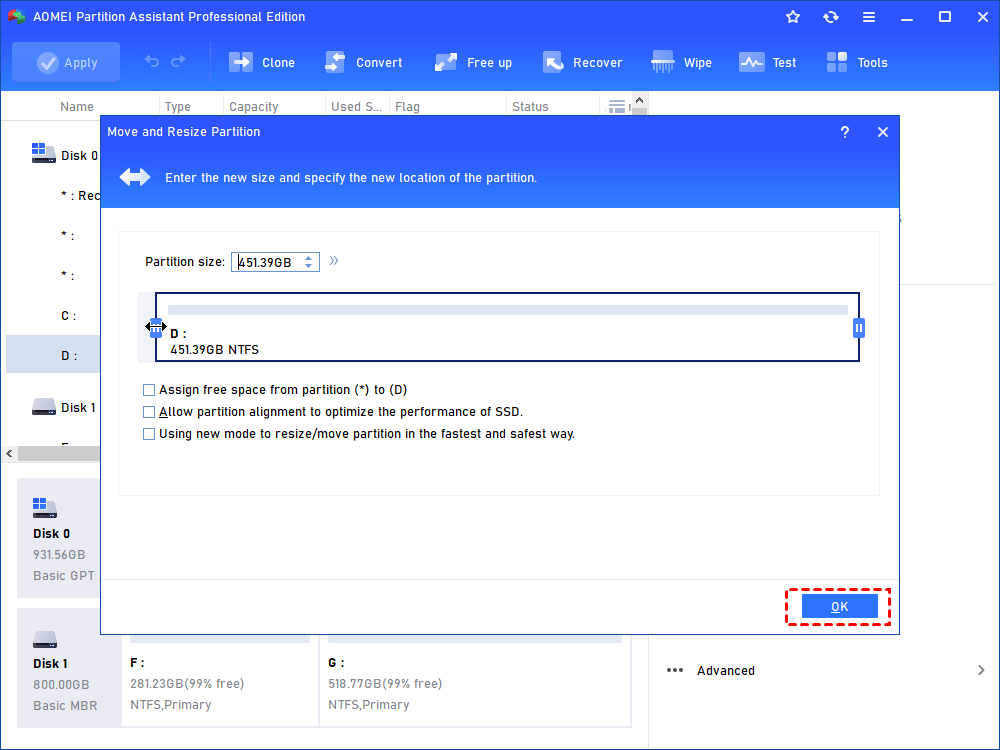
2. In the pop-up window, drag the partition handle leftwards to extend the one you decided to resize.
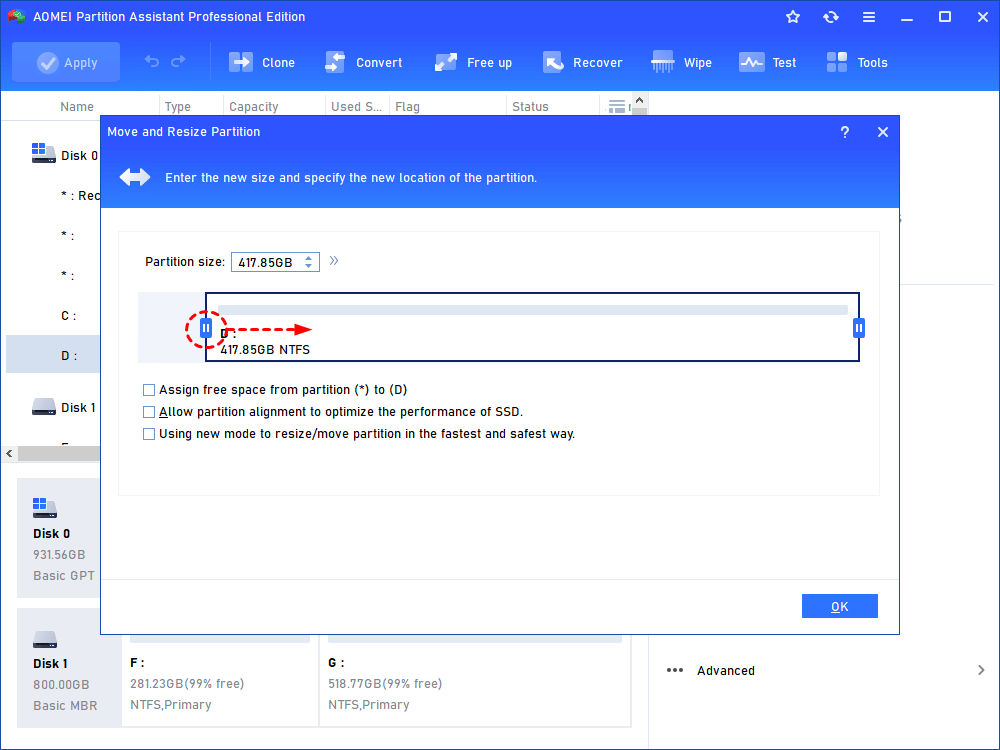
3. You can click “apply” to commit the change on the main interface. Or to extend another partittion, move the D drive to the right-end of the box, and click "OK"
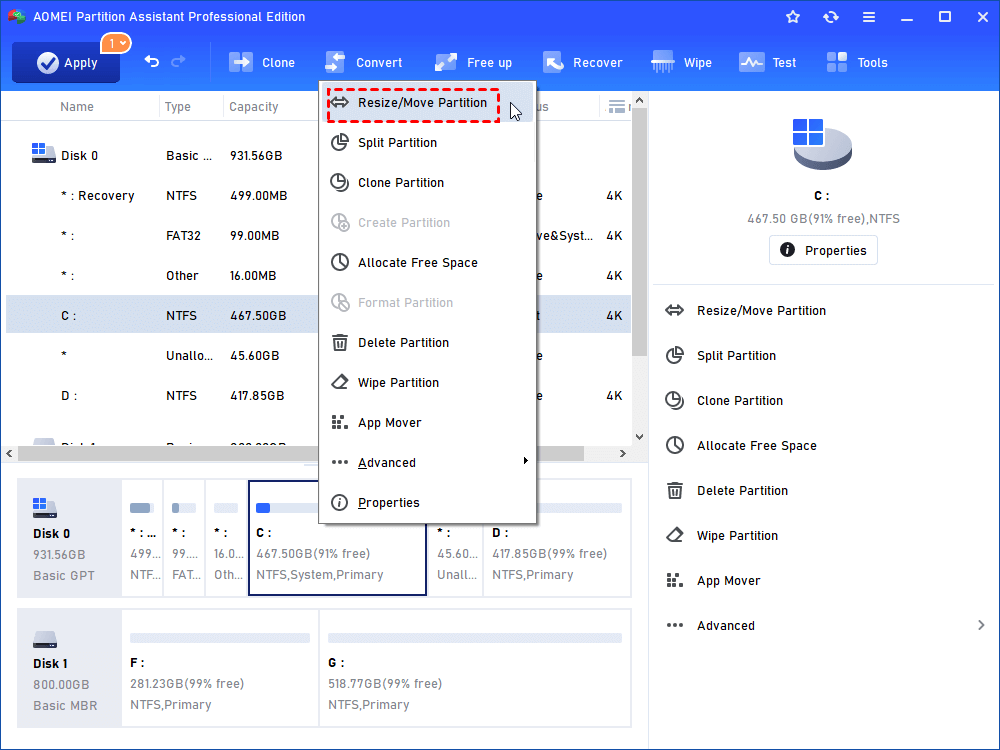
4. Then right-click on the C drive, and choose "Resize Partition". Then extend the partition by dragging the border as the screenshot shows.
5. Click "Apply" on the main interface to commit the operation.
Resizing means shrinking or extending. Above is only an example of shrinking. Maybe you will encounter a situation where you need to expand VHD partition. AOMEI Partition Assistant is able to do this. “Extend Partition Wizard” and “Allocated Free Space” are two practical functions. And this software supports resizing encrypted partition.
More about AOMEI Partition Assistant
AOMEI Partition Assistant is not only a VHD resizer, but also a partition optimization software. You can set partition label freely, change drive letter as you want, check partition and fix errors, etc.
AOMEI Partition Assistant has different editions are designed for different Microsoft platform. Standard Edition is for PC users. As for Windows Server, you can try AOMEI Partition Assistant Lite Edition or Server Edition.


