Easily Fix Windows 7 100% Disk Usage to Optimize Windows PC [5 Ways]
When your windows 7 disk is 100% used, you will find the computer runs slower and slower. So here we collected 5 methods to help solve Windows 7 100 disk usage problem easily.
By AOMEI / Updated on August 1, 2024
Overview of Windows 7 100% disk usage in Task Manager
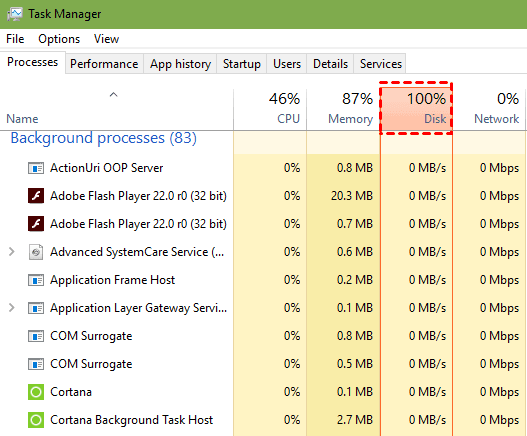
When the Windows 7 hard drive is over-work, there are chances that the Windows 7 hard disk will show 100% disk usage in Task Manager. As a result of that, your computer will be likely to run slower and slower. What’s worse, sometimes the computer might freeze and hang up. Now you are probably wondering what exactly is causing this problem to grind your PC to a halt.
Actually, this 100 disk usage can occur all by itself even though there are not any programs running in the background. Luckily, we have tried some methods and collected the effective fixes for 100% disk usage problem.
How to fix hard disk usage 100% in Windows 7/8/10/11?
To fix Windows 7 100% disk usage, you can first try some quick and easy tricks. For example, stop some programs from running in Task Manager and run anti-virus software to clean up all possible viruses and malware. However, those are just a drop in the bucket. To repair this issue thoroughly, you can try the following technical fixes.
Method 1. Check system hard drive for errors and fix them
In some cases, the 100% disk usage can be caused by unknown system errors. So, check and fix system error may help solve this issue. This can be done by Windows “CHKDSK” tool.
1. Click the Start button, and input “command prompt“ in the Search box. Right-click the Command Prompt from the result list and select “Run as administrator”.
2. In the elevated window, type “chkdsk /f /r c:” to check for and automatically fix errors on your system hard drive. (C is the drive letter of your Windows partition.)
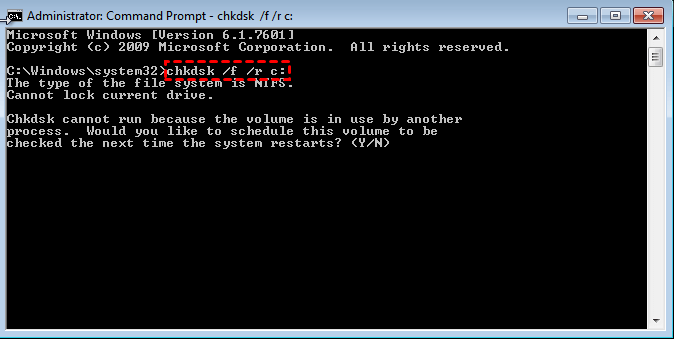
You may get a message saying the hard drive is in use and asking if you would like to check the partition the next time when the system restarts. Then, you can press “Y” and reboot your PC. Then CHKDSK tool will run and check the system partition and fix errors when the computer is rebooted.
Method 2. Cancel some Windows service
Sometimes, the cumbersome background Windows services can also lead to Windows 100% disk usage. So disabling them is also worth trying to repair the full disk usage issue in Windows 7, 8, 10.
1. Click “Start” button and type “services” in the search box and hit “Enter”.
2. In the Services Windows, find and locate the “Superfetch” service. Right-click it and select “Stop”.
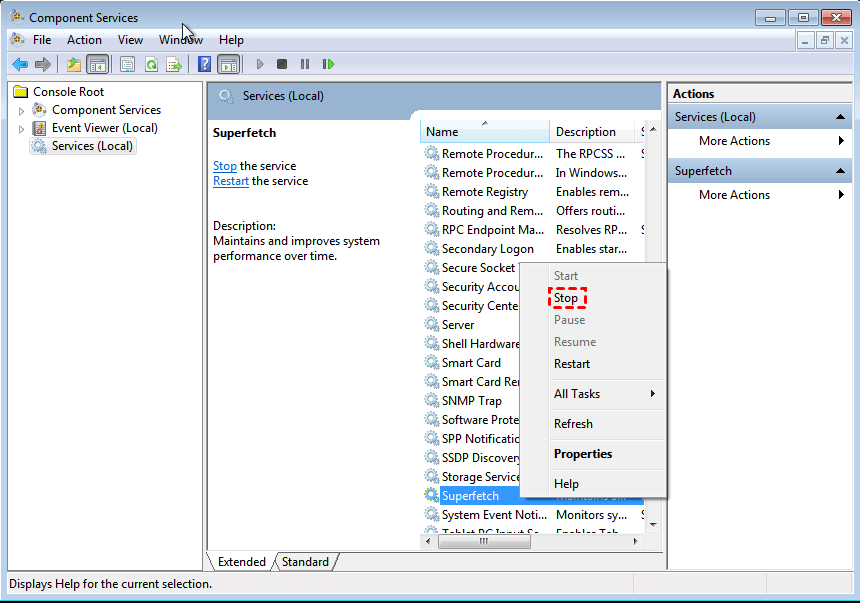
Then you can open Task Manager to see whether the disk usage percent drops or not. If not, you can enable the Superfetch again. Also, you can use the same steps to disable other Windows services like “Background Intelligent Transfer Service” and “Windows Search”. If you find the real culprit and want to disable this service permanently, you can double click it to enter its “Properties” window, and then click “Disabled” in the “Startup Type” drop-down menu.

Method 3. Reset the virtual memory
Virtual memory is a combination of RAM (random access memory) and hard disk space. It is one of the possible causes behind the 100% disk usage issue. If there is not enough RAM to perform a task, the hard disk will be used to supplement the RAM. In such situations, you can reset your virtual memory.
1. Right-click on “My Computer” and choose “Properties”. On the left side, choose "Advanced System Settings".
2. Go to the “Advanced” tab, and then click “Settings”.
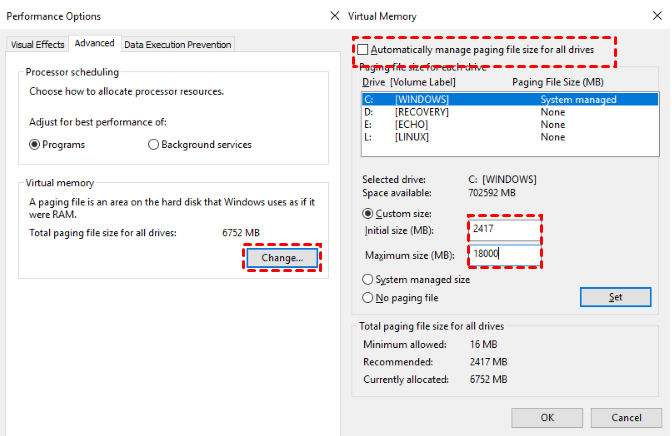
3. Access to the “Advanced” tab again, and choose “Change…” in the Virtual memory section.
4. Untick “the Automatically manage paging file size for all drives” checkbox. And select your windows drive (C:), and enter an “Initial size” and “Maximum size” for your virtual memory.
5. Finally, click “Set”, then click “OK” to continue.
Method 4. Change Pagefile Location
The pagefile is a reserved portion on the system hard disk, an extension of RAM for data in RAM that has not been used recently. So it can relieve the stress on your RAM when doing intensive memory activities on your computer. If your hard disk usage is up to 100%, it could be because your pagefile is constantly being used to process computer information.
Therefore, you can change the pagefile location and move them to a second non-system hard drive to ease the main hard drive strains.
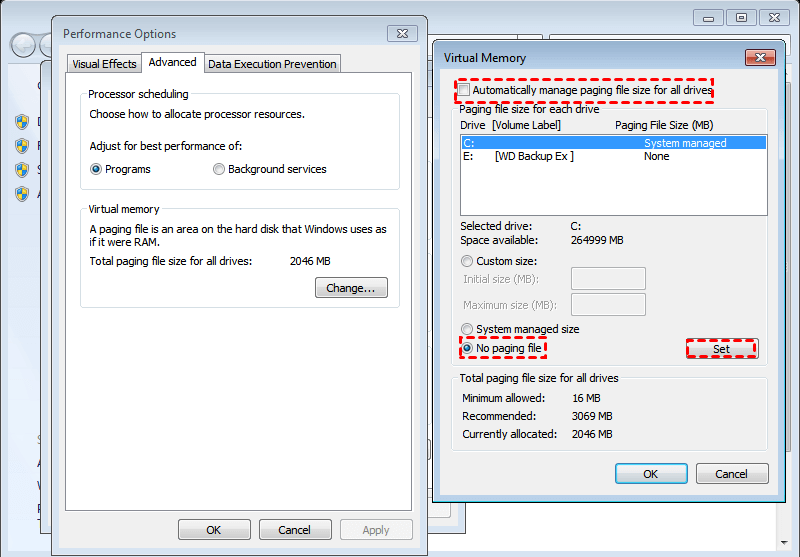
1. Enter “Advanced system settings” as you do in method 3. Then click “Settings” under Performance and then click "Advanced"> "Change".
2. Here you will find the C drive is highlighted as the default pagefile location. Select “No paging file” and click “Set”.
3. Now, select the second hard drive to save your pagefile and click “System managed size” -> “Set”.
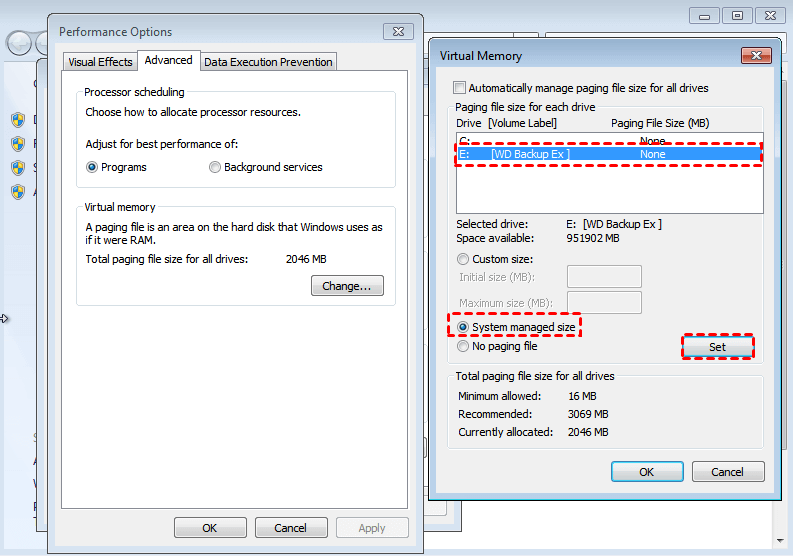
At last, click “OK” and reboot your PC.
Method 5. Upgrade to a larger hard disk (SSD)
One of the above solutions should be able to fix Windows 7 100 disk usage, but if your disk usage keeps spiking to 100 percent in Task Manager, upgrading the current small hard disk to a larger hard disk, especially an SSD drive, can be the ultimate solution.
SSD drive can boost uploading time on your computer and handle many simultaneous tasks and processes without any slowdown. Most importantly, running OS on the SSD and keeping your old HDD as the second hard drive will also help relieve the strains on the HDD. But, how do you easily upgrade the small HDD to a larger SSD?
Here we recommend using AOMEI Partition Assistant Professional. It can realize the hard disk upgrade without reinstalling everything by cloning all contents from another disk to another, and ensure the OS and other programs can boot from the cloned disk successfully. You can download its Demo version to have a try.
Precautions:
◆Ensure the destination SSD or HDD has unallocated space to hold all contents from the source disk.Back up necessary data on the destination disk because everything will be deleted during the process.
◆If the partition tables of the source disk and destination disk are different, you need to ensure your PC motherboard can support the boot mode that destination disk requires. Otherwise, you ought to convert the destination disk from MBR to GPT or GPT to MBR in advance.
Step 1. Install and launch AOMEI Partition Assistant, click "Clone" in the main interface, and select "Clone Disk".

Step 2. Choose the hard disk that you need to clone as the source disk and click "Next".

Step 3. Select another drive as the destination disk, and then click "Next".

Step 4. Then, you can check the source and destination disk in the next window or change to "Sector to Sector clone", and click the "Confirm" button to continue if there is no problem.

Here, you can also click the "Settings" button to adjust the partition size on the destination disk or tick "4k alignment" to improve the reading and writing speed of the SSD.

Step 6. You can preview the disk cloning operation by viewing the "Pending Operations". To commit the "Pending Operations", please click "Apply" and "Proceed".

After finishing the cloning process, you can restart your PC and enter BIOS (constantly press a specific key like F2, F10, DEL, etc before the initial screen) to change boot order, to boot the computer from the destination disk. After all, you can wipe the old HDD for reuse.
Above is how to resolve the “100 disk usage” problem via different methods in Windows PC. At the same time, we can do something to reduce or avoid 100% disk usage in future; for example, perform Disk Cleanup regularly, close the programs running in the background, turn off some unnecessary start-up programs and more.
Summary
So, for the Windows 7 100 disk usage issue, those five methods are worth trying. To get the best result, the last method is highly recommended. If you just want to transfer OS partition to SSD or HDD instead of all partitions, AOMEI Partition Assistant Professional can also help. To solve 100 disk usage in Windows Server 2012, 2016, 2019 and so on, you can try AOMEI Partition Assistant Server to replace the small disk with another large one.

