How to Safely Replace Primary Hard Drive for Windows PC
How can you replace primary hard disk without losing data or having to reinstall Windows? Here's all you need to know about changing a system disk.
By Lucas / Updated on June 12, 2024
Why replacing primary hard drive on Windows?
The primary hard drive of your Windows computer plays a crucial role in its overall performance and storage capacity. Over time, as your system accumulates data and applications, you may find yourself in a situation where replacing the primary hard drive becomes necessary.
1. Replacing a faulty hard drive in Windows 10
If your current hard drive has suffered a hardware failure and requires replacement, consider the following scenario: "I own a Dell XPS15 running Windows 10, but the existing hard drive has completely failed. How can I proceed with the installation and activation of Windows 10 on a new hard drive?" You can replace your old disk with a new one.
2. Upgrading your hard drive for enhanced storage
Over time, you may notice a gradual decrease in your hard drive's performance, with the C: drive running out of space and the entire storage capacity becoming insufficient. To address this issue, consider upgrading to a larger hard drive to accommodate additional data.
3. Enhancing speed with an SSD upgrade
Some users opt to boost their PC or OS performance by transitioning to a faster SSD from the traditional HDD. This choice is motivated by SSDs' superior attributes, offering increased stability and significantly faster read/write speeds compared to conventional hard drives.
So, in this article, we'll explore the reasons why you might need to replace your primary hard drive and provide a step-by-step guide on how to do it without the hassle of reinstalling Windows.
Best primary hard drive cloning software for Windows
Undoubtedly, third-party software can often offer a convenient solution to various challenges. Whether you're dealing with a failing system hard drive or seeking to upgrade your hard drive without the headache of data loss or reinstalling everything from scratch, AOMEI Partition Assistant Professional is the answer.
This advanced software is designed to facilitate the replacement of a hard drive on Windows 11/10/8/7 without the need for reinstalling the operating system and all installed applications. It achieves this by efficiently cloning the entire hard disk.
Additionally, it allows you to boot your computer from the new hard drive once the cloning process is complete. Below, you'll find a comprehensive guide detailing the steps to clone your system hard disk in preparation for a hard drive replacement.
Preparation:
✍ Connect the new hard drive to the computer through the USB port and ensure that it is correctly detected.
✍ Check that the hard disk has adequate space to hold all of the data from the previous hard drive. Otherwise, you can erase or eliminate unwanted data from the original disk ahead of time.
✍ Examine the partitioning styles of the old and new hard drives (MBR or GPT). If the new disk's partition style differs from the old one, you can convert it to GPT or MBR first. Alternatively, after cloning, alter the boot mode (BIOS or UEFI).
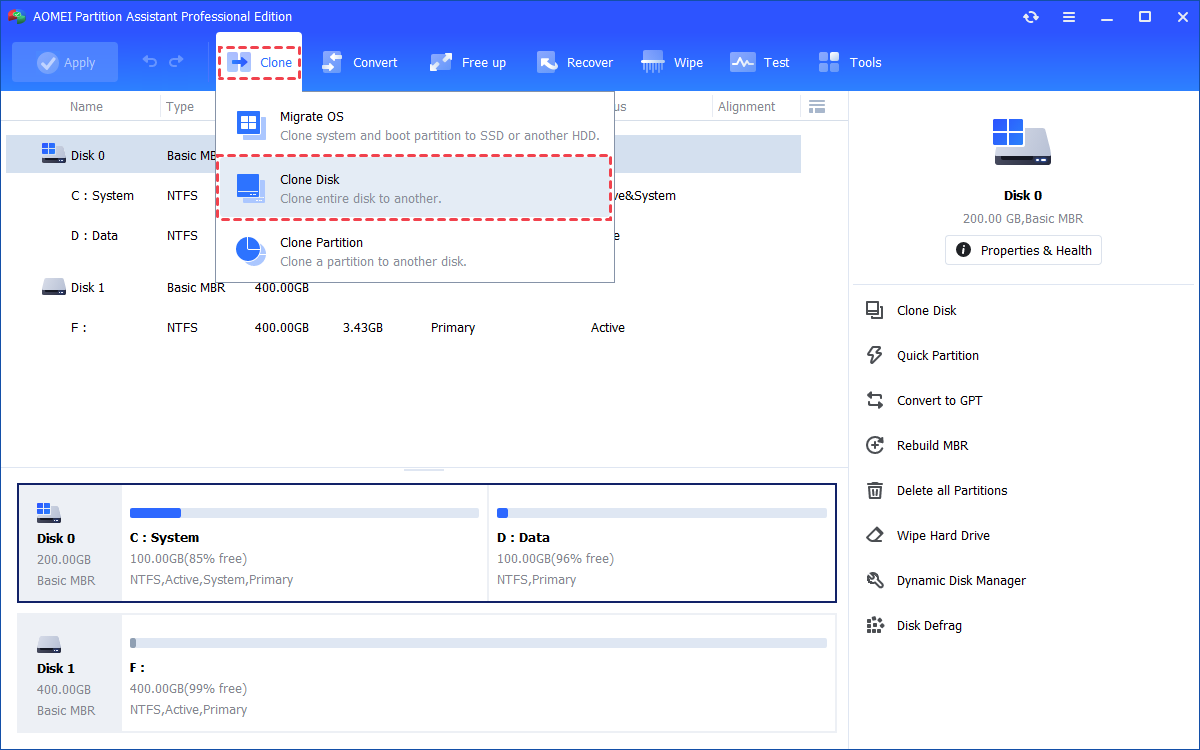
Step 1.Install and launch AOMEI Partition Assistant, click the "Clone" main tab and select "Clone Disk". (You can also right-click the Disk you want to clone and select the "Clone Disk" tool to run disk clone.)
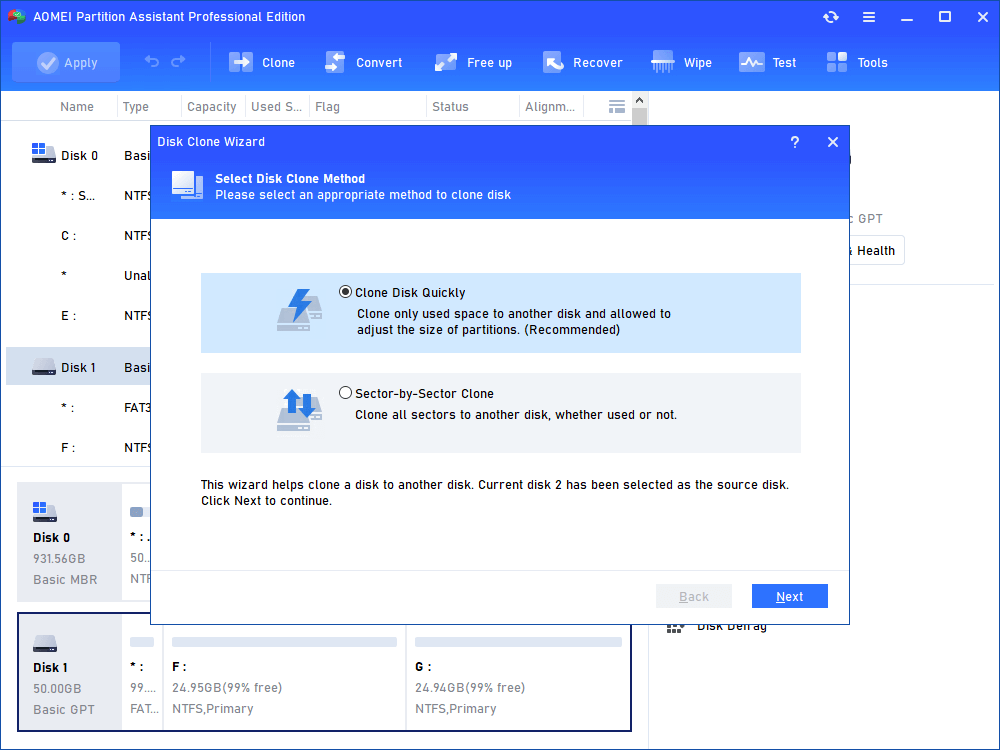
Step 2. Choose the hard disk that you need to clone as the source disk and click "Next".
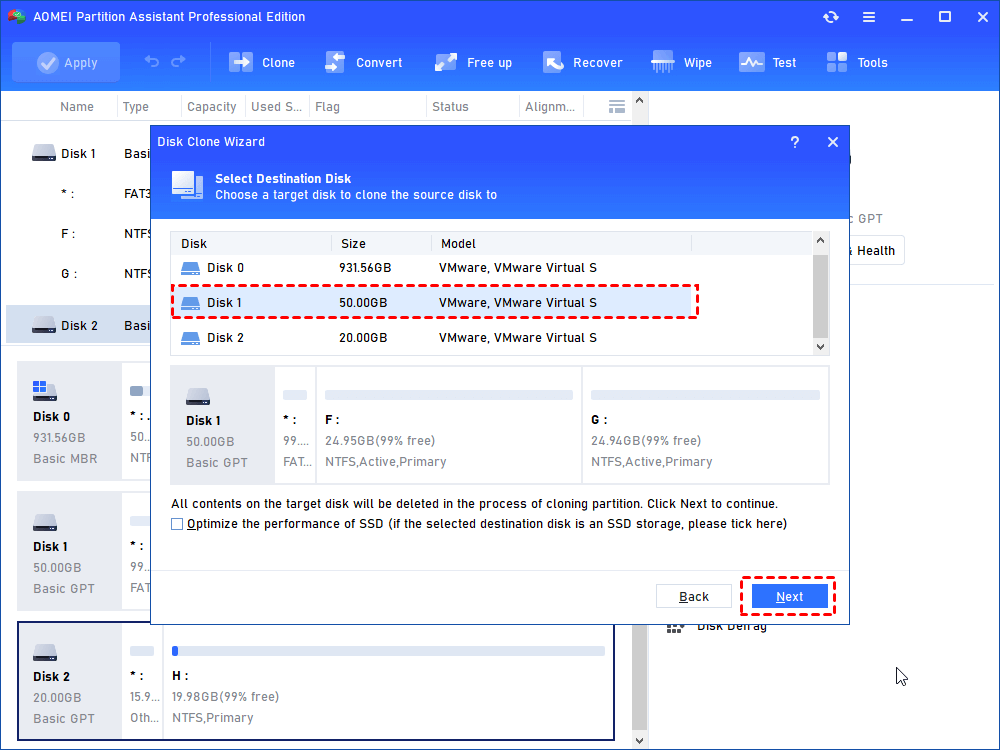
Step 3. Select the destination disk to put the data of the source disk on, and then click "Next".
Step 4. Then, you will enter the Confirm interface where you can check the source and destination disk. After all is set, you can click the "Confirm" button to continue.
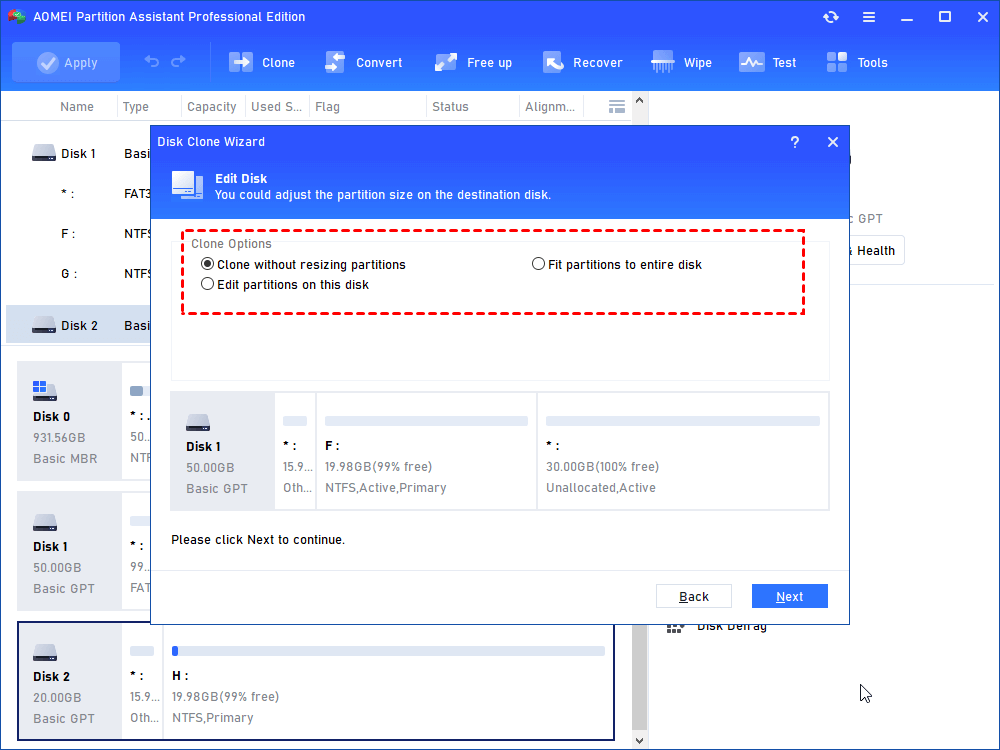
In lower left corner of the window, you can click the "Settings" button to adjust the partition size on the destination disk. There are three options for you:
- Clone without resizing partitions: all partitions will be cloned to the target disk as the original partition size. It is available when the target disk is larger than the source disk. If it is smaller, this option will be grayed out.
- Fit partitions to entire disk: all partitions will be cloned to the target disk and take up its full capacity according to the original partition size proportion.
- Edit partitions on this disk: you can change every partition size on the target disk as you need.
After finishing the adjustment, please click "Save".

Notes:
- You can tick "4k alignment" to improve the reading and writing speed of SSD if the selected destination disk is an SSD storage.
- All data on this selected destination disk will be wiped out after you save the operation to physical disk. If there is important data on the destination drive, please make a backup in advance.
- If you clone to a smaller SSD, the first option is grayed out. If you select Sector-by-Sector Clone, it is unable to adjust the size on the destination disk.
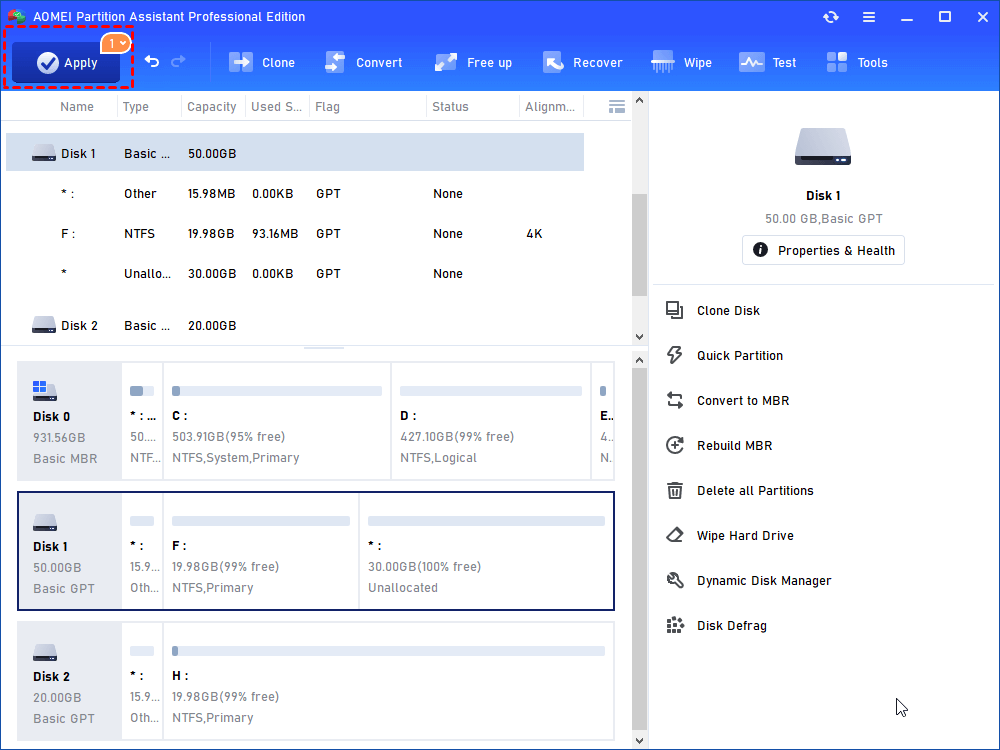
Step 5. You can preview the disk cloning operating by viewing the "Pending Operations". To commit the "Pending Operations", please click "Apply" and "Proceed".
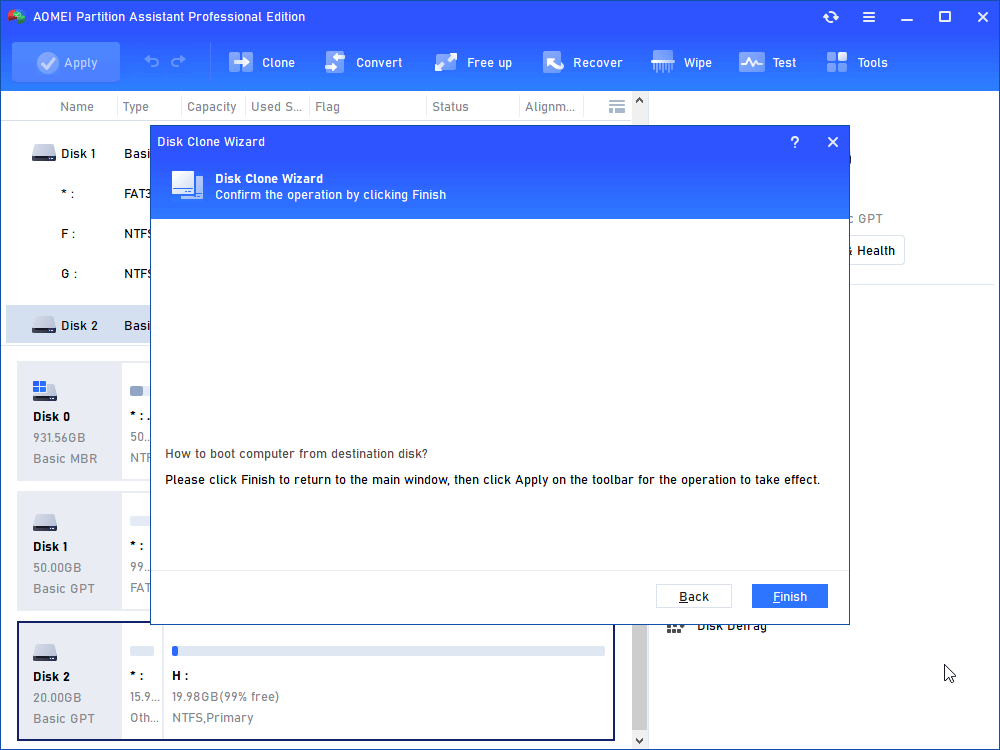
Step 6. The cloning process will start and you can check the cloning process.
After cloning everything from the old hard drive to the new one, you can shut down the computer and install the new disk for replacement.
How to Replace Hard Disk on a Windows Computer
Now that you have successfully cloned your system hard drive using AOMEI Partition Assistant Professional, it's time to physically replace the old hard disk with the new one. For desktops, it is easy to install a second hard drive because it is usually equipped with more than one hard drive bay. Follow these steps:
Turn off your computer: Shut down your computer completely and disconnect any external devices.
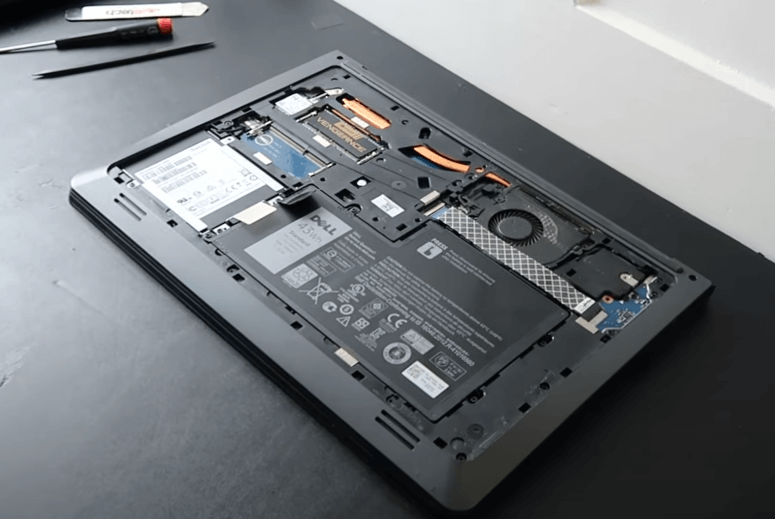
Open the case: Depending on your laptop model or desktop computer, you may need to remove a panel or access a specific compartment to reach the hard drive.
Disconnect cables: Carefully detach the power and data cables connected to the old hard drive.
Remove the old hard drive: Gently remove the old hard drive from its bay or slot.
Install the new hard drive: Insert the new hard drive into the same bay or slot and reconnect the power and data cables.
Close the case: If you had to open the case, secure it back in place.
Power on: Turn on your computer and ensure that it boots from the new hard drive.
After installation, you need to enter BIOS to change boot priority and move the cloned hard disk to the top one of the boot order.

However, if you are replacing a hard drive in a Windows 10/11 laptop, things may be different because some laptops only have one hard drive slot. You need to: Turn off your computer. Remove the old disk, insert the new hard drive, connect the wires, and secure the drive with screws. Clone the case, power it on, and it will boot from the new disk.
To sum up
AOMEI Partition Assistant greatly simplifies the process of replacing a hard disk on a Windows 10 laptop or desktop. Actually, AOMEI Partition Assistant can not only replicate a full hard drive from one to another, but it can also migrate merely the operating system. It also offers many additional sophisticated functions that can compensate for Windows Disk Management's shortcomings, such as converting disks between MBR and GPT without losing volumes and assigning free space from one partition to another.

