How to Fix Dell BIOS Update Failed [3 Ways]
Facing the Dell BIOS update failed issue? You’re in the right place. This guide begins by breaking down the common causes behind the issue, then walks you through three effective solutions.
By Hedy / Updated on July 29, 2025
Why Dell BIOS update failed?
A failed Dell BIOS update can occur due to several reasons, and understanding them can help you troubleshoot and prevent system damage. Here are the most common causes:
1. Power interruption during update: If your device shuts down or restarts during the update due to a power loss or low battery, the BIOS may become corrupted.
2. Incompatible BIOS version: Installing a BIOS version that doesn’t match your Dell model or motherboard version can cause the update to fail.
3. Corrupted BIOS file: Sometimes, the downloaded BIOS update file can be incomplete or corrupted, leading to a failed installation.
4. Interrupted update process: If the update process is interrupted by forced shutdowns, freezes, or crashes, it may fail and potentially brick your system.
5. Third-party software conflicts: Antivirus programs or background services may interfere with the BIOS update utility.
6. Outdated drivers or Windows issues: System instability caused by outdated drivers or OS bugs can affect the BIOS update process.
7. Hardware issues: Defective RAM, failing SSDs, or overheating CPUs can disrupt the BIOS update process.
8. Wrong update method: Using the wrong tool (like trying to update from Windows when it should be done via bootable USB or BIOS Flash) may lead to failure.
How to fix Dell BIOS update failed issue on Windows
A failed BIOS update means that you cannot keep using your Dell computer as normal. You'll need to find ways to fix the issue first. This section will discuss three methods to fix the problem as follows:
Fix 1. Install BIOS in order
If your Dell PC can still boot, this approach is a practical solution. Rather than jumping straight to the latest BIOS, the process involves gradually updating through available versions—starting with the one currently compatible with your system. Once each version installs correctly, you can proceed to the next until you're fully up to date.
Step 1. Visit Dell’s official support website.
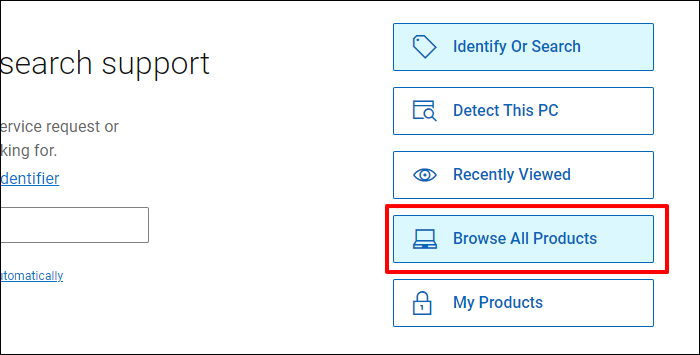
Step 2. On the right side of the page, scroll down and click “Browse All Products”.
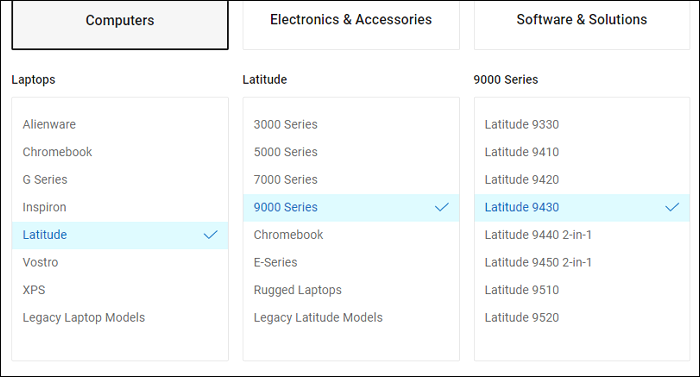
Step 3. Navigate to “Computers” > “Laptops”, then choose your specific Dell model.
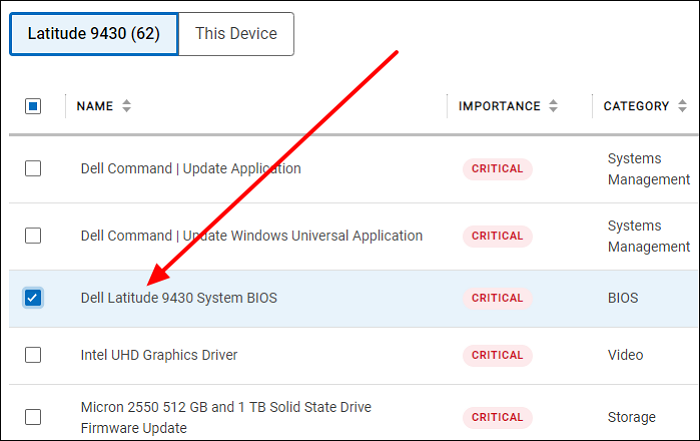
Step 4. Click “Drivers & Downloads”, then expand the available options. Select “Dell System BIOS” and hit “Download” to save the BIOS file to your PC.
Step 5. Once the download finishes, double-click the file to launch the installation. Follow the on-screen prompts to begin the BIOS update. When finished, restart your computer to complete the process.
Fix 2. Update BIOS with USB
This method involves updating the BIOS using a bootable USB drive. To proceed, carefully follow the steps outlined below:
Step 1. Use a tool like Rufus or the Dell Diagnostic Deployment Package (DDDP) to create a bootable USB drive.
Step 2. Go to Dell’s official website and download the appropriate BIOS update for your specific system model.
Tip: Make a note of the BIOS file name—it’ll be needed later. After downloading, move the BIOS file onto the bootable USB drive.
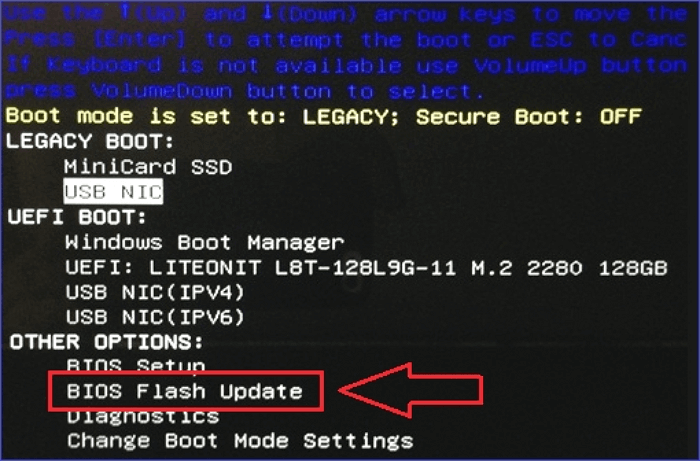
Step 3. Restart your computer and press F12 during startup to access the boot menu.
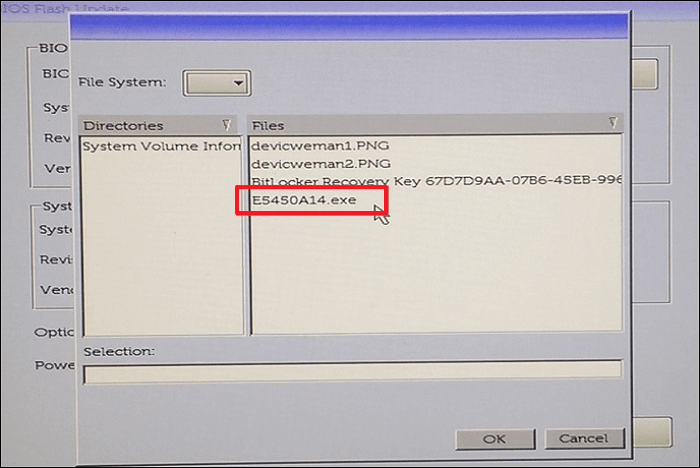
Step 4. Choose “BIOS Flash Update” from the menu and press Enter. Then select “fs1” as the file system and click “Browse” to locate the BIOS executable file on the USB.
Step 5. Double-click the .exe BIOS file and follow the on-screen instructions to install the update directly from the USB drive.
Fix 3. Recover BIOS
This solution is ideal if your computer is unable to boot due to a corrupted BIOS installation. By recovering the BIOS, you can restore it to a functional version. Follow these steps:
Step 1. Restart your computer and press CTRL + ESC simultaneously. Keep holding the keys until the BIOS recovery screen appears.
Step 2. Choose “Reset NVRAM” and press Enter.
Step 3. Select “Disabled” to retain your current BIOS settings, then hit Enter.
Step 4. When the BIOS Recovery menu appears, click on “Recover BIOS” and select “Continue”. Follow the on-screen instructions to complete the BIOS recovery process.

Bonus tip: How to recover data from the "Dell BIOS update failed" error
If you've recently encountered the dreaded “Dell BIOS update failed” error, you’re not alone. This issue can prevent your PC from booting properly and even risk data loss. While fixing the BIOS problem is crucial, what truly matters afterward is retrieving your important files—documents, pictures, videos, or work data—that may have become inaccessible.
That’s where PartitionAssistant Recovery comes in. Its powerful Recovery feature can help you rescue data from a non-bootable or corrupted drive after BIOS repair.
Step 1. Install and launch PartitionAssistant Recovery. Choose the exact partition or disk where your data is lost and click Scan.

Step 2. Then, the recovery tool starts to scan and search. It will execute the “Quickly Scan" first for finding your deleted data fast, and then execute the “Deep Scan" for searching other lost data.

Step 3. Once the scan is completed, all deleted files, recycle bins, and other missing files will be displayed. Please select the file you would like to recover and then click "Recover".

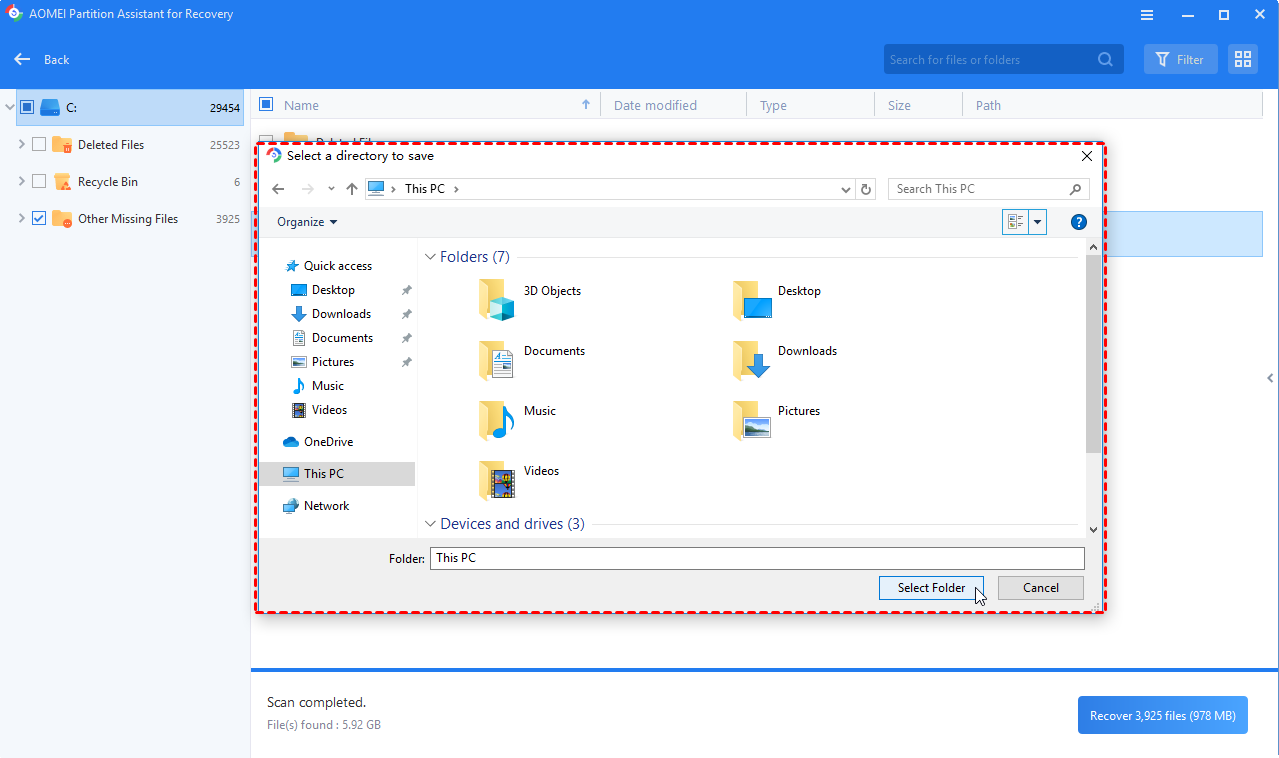
Step 4. Then, select a folder path to save your recovered files.
Step 5. Wait patiently for this process of recovery to end.
Conclusion
The "Dell BIOS update failed" error can occur for several reasons, including a corrupted BIOS file, power interruption, hardware failure, or downloading an incompatible BIOS version. To resolve this issue, you can either update the BIOS using a USB drive or perform a BIOS recovery. Afterward, use PartitionAssistant Recovery to retrieve lost data from unbootable systems and ensure your important files remain safe.

