DiskDigger Photo Recovery: Retrieve Lost Files on Windows PCs
DiskDigger is a powerful data recovery tool. This article provides a detailed guide on how to perform a photo recovery with DiskDigger on Windows PCs and Android devices. If you're facing this issue, follow the steps below to restore your photos.
By Gia / Updated on January 2, 2025
What is DiskDigger?
DiskDigger is a powerful data recovery tool that helps you recover photos, videos, music, documents, and other files from various storage devices. It can recover accidentally deleted and lost files even if they are no longer visible in file explorers or have been emptied from the Recycle Bin. With its wide compatibility, DiskDigger supports file recovery on Windows and Android, while the Pro version also supports Linux systems.
How to Perform Photo Recovery with DiskDigger on Windows PCs?
Performing DiskDigger photo recovery for PC is very simple. If you unexpectedly lose your photos on Windows PCs, follow these steps to recover them:
Step 1: Go to the official website of DiskDigger and download it to your PC. Then extract the zip file, open it, and click on Agree to the terms of use to install the software in your system.
Step 2: After launching DiskDigger, a list of drives will appear on the interface. Select the drive or partition you want to scan. If you are scanning an external drive and it was connected after DiskDigger was opened, click Refresh list to detect the drive.
Step 3: When scanning, DiskDigger will let you choose between the Dig Deep and Dig Deeper modes. It is advised to choose the Dig Deeper mode for photo recovery.

Step 4: Additionally, you can specify the type of files you want to search for. For instance, you can choose Specific types of files to narrow down the scanning scope. Then, click Next to proceed.
Step 5: Next, DiskDigger will scan specific files on your drive. Once the scanning is complete, you'll see them showing up in the list on the left. Select the files that you wish to recover by checking them and clicking on Recover Selected Files.
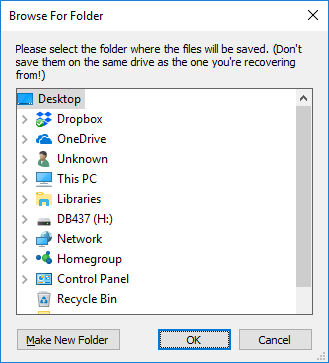
Step 6: Finally, specify a destination for the recovered files. Once the saving process is complete, it will automatically open the folder containing the saved files.
Alternative Ways to Recover Lost Files on Windows PCs
Now that you know how to use DiskDigger for photo recovery on Windows PCs, let’s explore several other solutions to restore lost photos. Scroll down to select the one that suits you best.
Way 1. Recover Files from the Recycle Bin
If you accidentally deleted a photo on your Windows PC, restoring it from the Recycle Bin is the most direct way. This special folder temporarily saves deleted items and allows you to recover them when necessary. Follow these steps to recover files from the Recycle Bin:
Step 1: Double-click the Recycle Bin icon on your desktop to open this folder.
Step 2: Browse the contents of the Recycle Bin and find the file you want to restore.
Step 3: Right-click on the file and select the Restore option. Then it will be moved to its original location.
Way 2. Recover Permanently Deleted Files Using Software
Recovering files from the Recycle Bin is simple but doesn’t work in all situations. If you deleted a file by pressing Shift + Delete or manually removed it from the Recycle Bin, you cannot restore it using the previous method.
So, how can you recover permanently deleted files on Windows PCs? No worries. Professional data recovery software can save your files. We’d like to introduce another excellent tool called PartitionAssistant Recovery. This software is designed to recover lost photos and other important files from your Windows PC (11, 10, 8.1, 8, 7) and Servers. Whether you've deleted files by mistake or your system has encountered any issue, this user-friendly tool can help you restore lost data with minimal effort. You can download this software for free and give it a try:
Let’s use PartitionAssistant Recovery to recover lost files:
Step 1: Install and launch PartitionAssistant Recovery. Then choose the exact partition or disk where your files were stored and click Scan.
Step 2: Then, the recovery tool starts to scan and search. It will execute the Quick Scan first for finding your deleted data fast and then execute the Deep Scan for searching other lost data.
Step 3: Once the scan is completed, all deleted or lost files will be displayed. Please select the file you want to recover and click Recover.
Step 4: Select a folder path to save your recovered files and wait patiently for this process to end.
Way 3. Recover Files Using File Recovery
In addition to using PartitionAssistant Recovery, using Windows File Recovery to recover lost files on Windows PCs is also a viable option. It is a command-line utility that can recover data from various storage devices. Here’s how to recover files using this tool:
Step 1: Go to Microsoft Store to install Windows File Recovery and run it as an administrator.
Step 2: Type the command: winfr source-drive: destination-drive: [/mode] [/switches] and press the Enter key.
- source-drive: The drive where the files were deleted.
- destination-folder: The folder where the recovered files are to be saved.
- /mode: Choose between Regular for recently deleted files or Extensive for files deleted a long time ago or from a formatted drive.
- /switches: Additional filters, such as file extensions.
Step 3: Wait for the process to complete and check if your files have been restored.
Way 4. Recover Deleted Files from Cloud Backups
If you have created backups beforehand, photo recovery becomes much easier. Many users store their photos on cloud-based storage services, such as Google Photos. This allows you to access your files from any internet-connected device. If you upload photos to Google Photos, they will remain safe in the cloud, even if you accidentally delete them from your device. Follow these steps to recover photos from Google Photos:
Step 1: Go to the Google Photos website and log in with your account.
Step 2: Browse through your albums and locate the photos you want to recover.
Step 3: Click the More options in the top right corner and select Download to restore them to your local device.
Bonus Tip: Perform Photo Recovery with DiskDigger on Android Devices
In addition to Windows PCs, DiskDigger also supports recovering photos on Android devices. Here’s how to perform a photo recovery with DiskDigger on Android devices:
Step 1: Install DiskDigger from the Google Play Store or other reliable websites.
Step 2: After launching the app, it will display two options: Basic scan and Full scan. The Basic scan is available on all devices, while the Full scan is only available on rooted devices.
Step 3: Choose the scan type according to your needs and start the photo scan. Once the scan is complete, DiskDigger will show a list of recoverable photos.
Step 4: Select the file you want to restore by tapping on its checkbox. If you want to filter specified files, press on the settings icon to sort the recoverable files according to their name, size, and file type.
Step 5: Finally, save the recoverable files as needed and then click on the Recover button.
You can save your files in any of the three ways listed below:
- Save to an app: Send the recoverable files to another app on your device. It is the most recommended saving way.
- Save to device: Save the recoverable files back to the local device.
- FTP upload: Upload the recoverable files to an FTP server.
Final Words
DiskDigger is a great option for recovering deleted or lost photos. This article explains how to use DiskDigger for photo recovery on both Windows PCs and Android devices. We also provide four alternative methods to assist you in restoring lost files on Windows computers. We hope this guide helps you recover data successfully!

