How to Fix Corrupted Windows 10 Recycle Bin and Restore Lost Data
How to fix corrupted Windows 10 Recycle Bin and restore lost data? This guide provides effective solutions to repair a corrupted Recycle Bin in Windows 11/10/8/7 while ensuring your data remains intact.
By Hedy / Updated on April 1, 2025
What causes a corrupted Recycle Bin?
When you delete files on a Windows PC, they typically move to the Recycle Bin, acting as a temporary storage before permanent deletion. This gives you the opportunity to restore files if needed. However, if you encounter a "Recycle Bin Corrupted" error, you lose access to its functions—you can neither restore deleted files nor empty the bin. This issue can prevent proper file management and may require troubleshooting to fix.
Here are some potential reasons why you may encounter the "Recycle Bin is corrupted" error on your Windows 10 system:
1) Corrupted DLL files
Dynamic Link Library (DLL) files contain essential code and instructions that allow Windows programs to function. They enable multiple applications to share resources and data. If a DLL file related to the Recycle Bin becomes corrupted, it can cause the entire Recycle Bin to malfunction.
2) Unexpected shutdown
An unexpected system shutdown, such as a power failure or forced restart, can disrupt processes and leave files open or improperly saved. This can result in corruption, including issues with the Recycle Bin.
3) $Recycle.bin folder errors
The Recycle Bin you see on your desktop is actually a shortcut to the $Recycle.bin folder, which holds deleted files. Errors or corruption within this folder can directly lead to the "Recycle Bin is corrupted" error.
Part 1. Fix & repair corrupted Windows 10 Recycle Bin
If you're dealing with a corrupted Recycle Bin on your Windows system, here are some solutions to help you resolve the issue:
Method 1. Run CMD to fix corrupted Windows 10 recycle bin
Step 1. Right-click the Start menu and select Command Prompt (Admin) to open the command window with administrative privileges.
Step 2. In the Command Prompt window, type the following command and press Enter:
rd /s /q C:\$Recycle.bin
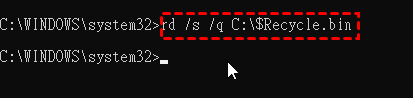
This will remove the corrupted $Recycle.bin folder on the C: drive.
Step 3. For each additional drive (e.g., D:, E:), repeat the following command: rd /s /q D:\$Recycle.bin to reset the Recycle Bin on those drives.
Step 4. Once you’ve run the command for all drives, restart your PC, and the Recycle Bin should function correctly.
Method 2. Repair Your Corrupted Recycle Bin in the Windows Explorer
This method involves changing user permissions and reconfiguring the Recycle Bin folder from scratch. However, please note that this process may delete files and folders in the Recycle Bin, so it’s essential to back up your data before proceeding.
Since the $Recycle.bin folder is hidden by default, you'll need to unhide it before following these steps.
Step 1. Click the Start button and type Control Panel in the Windows search bar. Select Control Panel from the search results.
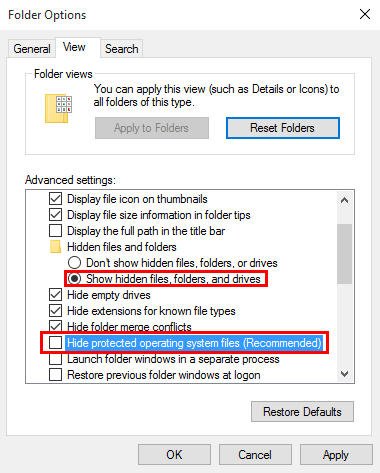
Step 2. In the Control Panel, click on Appearance and Personalization > Folder Options> View tab.
Step 3. Scroll down to Advanced settings and choose Show hidden files, folders, and drives. Uncheck the option Hide protected operating system files (Recommended). Click Apply to confirm the change and then click OK to save.
Step 4. Once you’ve completed these steps, you should be able to access the $Recycle.bin folder and proceed with fixing the corruption.
Part 2. Restore lost data after fixing/repairing corrupted Windows 10 Recycle Bin
Whenever you delete a file on your computer, it typically moves to the Recycle Bin, whether it’s from your internal hard drive, external devices, or different partitions. If you encounter the "Recycle Bin on D is corrupted" error, using the right data recovery tool can help recover your lost files.
One such tool is PartitionAssistant Recovery. It's considered one of the best options for restoring lost or deleted files from a corrupted Recycle Bin. With it, you can easily recover your files in just a few minutes, ensuring that you don’t lose any important data.
Step 1. Install and launch PartitionAssistant Recovery. Choose the exact partition or disk where your data lost and click Scan.

Step 2. Then, the recovery tool start to scan and search. lt will execute the “Quickly Scan" first for finding your deleted data fast, and then execute the “Deep Scan" for searching other lost data.

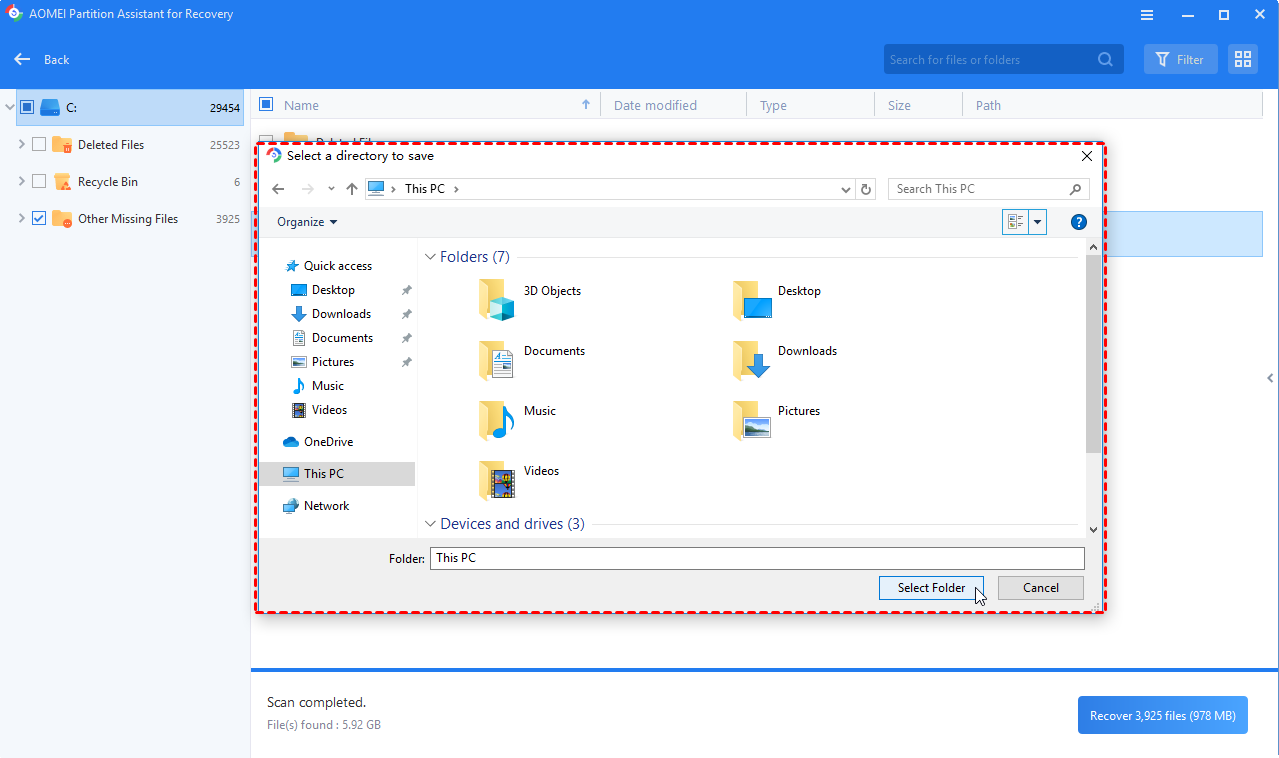
Step 3. Once the scan is completed, all deleted files, recycle bins and other missing files will be displayed. Please select the file you would like to recover and then click "Recover".

Step 4. Then, select a folder path to save your recovered files.
Step 5. Wait patiently for this process of recovering ends.
Conclusion
That’s all about how to fix corrupted Windows 10 recycle bin and restore lost data. Repairing a corrupted Recycle Bin on Windows PCs is a manageable task, and several data recovery tools are available for this purpose. Among them, AOMIE PartitionAssistant Recovery is highly recommended for its efficiency.
This tool is capable of recovering permanently deleted files from the Recycle Bin, even if they’ve been lost due to corruption. The scanning and recovery process is quick, taking just a few minutes, and it provides significant peace of mind by helping you restore important data with ease.

