We Were Unable to Open the File on Disk: What It Means & How to Fix It?
Have you ever encountered the “we were unable to open the file on disk” issue on Windows PCs? Don’t worry, this article will walk you through quick fixes as well as advanced solutions.
By Hedy / Updated on March 5, 2026
The error “We were unable to open the file on disk” usually appears when a program cannot access, read, or locate a file stored on your hard drive or external device. It may be caused by file corruption, permission problems, bad sectors, disconnected drives, or software conflicts.
Below are quick troubleshooting tips followed by advanced solutions to help you fix the issue efficiently. You can also scroll down to get more detailed steps.
|
Quick troubleshooting steps |
Fix 1. Restart your computer |
A simple restart can clear temporary system conflicts, background process errors, or memory issues preventing file access. Save your work, reboot the system, and try opening the file again. |
|
Fix 2. Check if the drive is properly connected |
If the file is stored on an external drive or USB, ensure the device is securely connected. Try another USB port or cable, and confirm the drive appears correctly in File Explorer. |
|
|
Fix 3. Copy the file to another location |
Sometimes the original directory has permission or corruption issues. Try copying the file to your desktop or another internal drive, then attempt to open it from the new location. |
|
|
Fix 4. Run the program as administrator |
Insufficient privileges can prevent files from opening. Right-click the application used to open the file and select “Run as administrator” to grant elevated system access. |
|
|
Fix 5. Check file permissions |
Right-click the file, select Properties, and review the Security tab. Ensure your user account has Full Control permissions. Adjust access settings if necessary to remove restrictions. |
|
|
Fix 6. Temporarily disable antivirus software |
Security software may mistakenly block file access. Temporarily disable your antivirus program, then test the file again. Remember to re-enable protection after troubleshooting is complete. |
|
|
Advanced solutions |
Solution 1. Check disk for errors |
Use Windows’ built-in CHKDSK utility to scan and repair disk errors. Open Command Prompt as administrator and run chkdsk C: /f /r. Replace C with the affected drive letter. |
|
Solution 2. Repair corrupted system files |
Corrupted system files can trigger file-access errors. Open Command Prompt as administrator and run sfc /scannow. This tool scans and automatically repairs damaged Windows system files. |
|
|
Solution 3. Recover data if file is corrupted |
If the file itself is damaged, consider using professional data recovery software such as PartitionAssistant Recovery. It can scan drives deeply and restore inaccessible or corrupted files efficiently. |
|
|
Solution 4. Check for bad sectors using disk properties |
Open File Explorer, right-click the affected drive, select Properties → Tools → Error Checking. This process scans for bad sectors and repairs logical file system issues. |
|
|
Solution 5. Reinstall or repair the application |
If only one program cannot open the file, it may be corrupted. Go to Control Panel → Programs and Features, then repair or reinstall the affected application. |
What does this error actually mean?
The error message “We were unable to open the file on disk” appears when a program tries to access a file stored on a drive but fails to do so. Essentially, it indicates that the operating system or application cannot read, load, or interpret the file from its current location.
The message does not specify the underlying cause; it simply communicates that the file cannot be opened at that moment. This can occur with various file types, such as documents, images, or spreadsheets, and may affect local drives, external storage, or network locations. When this error appears, the file remains on the disk, but the program is unable to process it, meaning users cannot view, edit, or interact with it through that application.
The error can happen intermittently or persistently, depending on the file’s state or the system environment. Programs usually generate this message as a generic alert to inform users that their requested operation—opening the file—cannot proceed, leaving the file inaccessible until further action is taken. It is a standard system-level warning that signals the interruption of normal file access.
Why does “We were unable to open the file on disk” happen?
Here’s the honest truth: this isn’t a single bug with one solution. Instead, multiple different problems can trigger the same error message.
1. File corruption: If the file is damaged — either during transfer, download, or storage — the application simply can’t read it. Even if the file plays in other apps (like VLC), editing software might still fail.
2. Missing media components on Windows: Some Windows editions (especially “N” versions) do not include the Media Feature Pack, which is required for certain media functionalities. Without these codecs, apps like Premiere can’t open media files.
3. Variable frame rate issues: Some cameras record video with a variable frame rate. While players like VLC can handle this, editing tools often require a constant frame rate (CFR). If the file uses a variable frame rate, the software may refuse to import it.
4. Incompatible codecs: Files saved with codecs not recognized by your editing software will cause this message. For example, certain versions of ProRes Alpha files might play fine elsewhere but won’t import correctly.
5. Storage or disk problems: If the drive where your file lives has issues (bad sectors, file system errors), the app might be unable to read the file even if other software can.
How to fix the “We were unable to open the file on disk” issue
This error typically occurs when a file cannot be accessed by a program due to permission, corruption, or storage issues. Here’s a complete guide to quickly troubleshoot and fix it.
Part 1. Quick fixes
These are simple steps you can try first to see if the issue resolves quickly. They often fix minor software or connection glitches.
Fix 1. Restart your computer
Sometimes the simplest solution works best. Restarting your computer clears temporary glitches, resets program states, and can restore access to files that were previously locked or in use.
Step 1. Save all open work to avoid losing progress.
Step 2. Click the Start Menu → Power → Restart.
Step 3. After reboot, try opening the file again.
Fix 2. Check if the drive is properly connected
Files stored on external or secondary drives may fail to open if the connection is loose or faulty. Ensuring the drive is securely connected can solve access problems.
Step 1. If using a USB drive or external HDD, unplug it safely.
Step 2. Reconnect it firmly to another USB port if possible.
Step 3. Check for lights or sounds indicating the drive is active.
Step 4. Try opening the file again.
Fix 3. Copy the file to another location
Sometimes the file’s current location is problematic due to permission or path issues. Moving it to another location can allow the program to access it correctly.
Step 1. Right-click the file → select Copy.
Step 2. Navigate to Desktop or another local folder.
Step 3. Right-click → Paste.
Step 4. Open the file from the new location.
Fix 4. Run the program as administrator
Access errors may occur because the program lacks permission to read certain files. Running the program with administrative privileges can grant it full access.
Step 1. Right-click the application icon.
Step 2. Select Run as administrator.
Step 3. If prompted by UAC, click Yes.
Step 4. Open the file within the program.
Fix 5. Check file permissions
Windows restricts access to certain files for security. Ensuring your user account has proper permissions may solve the issue.
Step 1. Right-click the file → Properties → Security tab.
Step 2. Select your user account → Edit.
Step 3. Check Full Control and Modify permissions.
Step 4. Click Apply and OK, then try opening the file.
Fix 6. Temporarily disable antivirus software
Antivirus programs may block files mistakenly, causing access errors. Disabling antivirus temporarily allows you to determine if it’s the cause.
Step 1. Open your antivirus program.
Step 2. Locate Real-time Protection or similar feature.
Step 3. Temporarily disable it (remember to re-enable afterward).

Step 4. Attempt to open the file.
Part 2. Advanced solutions
If quick fixes fail, these steps address deeper system or file issues.
Solution 1. Check disk for errors
Disk errors or corruption can prevent files from opening. Running a disk check can identify and fix these issues, restoring access to the file.
Step 1. Open This PC → right-click the drive containing the file → Properties.
Step 2. Go to the Tools tab → click Check under Error checking.
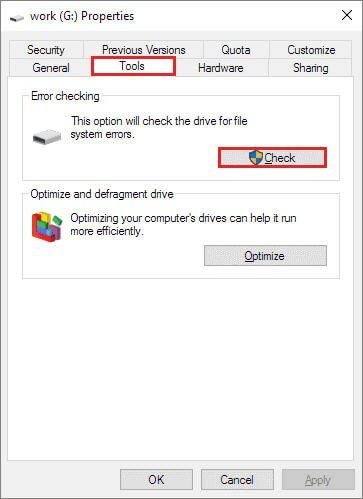
Step 3. Follow prompts to scan and repair the drive.
Step 4. Retry opening the file.
Solution 2. Repair corrupted system files
System file corruption can interfere with file access. Using Windows’ built-in repair tools can restore system integrity.
Step 1. Press Windows + S, type cmd, right-click → Run as administrator.
Step 2. Enter the command: sfc /scannow and press Enter.

Step 3. Wait for the scan to complete and repair any corrupted files.
Step 4. Restart your computer and try opening the file again.
Solution 3. Recover data if file is corrupted
When a file becomes corrupted, it may fail to open, display error messages, or appear completely unreadable. In such situations, using a reliable data recovery tool can help retrieve the original files or recover lost data. PartitionAssistant Recovery is a tool designed to recover lost or inaccessible data caused by file corruption, accidental deletion, formatting, or system crashes.
PartitionAssistant Recovery works by performing a deep scan on the affected drive, locating recoverable files even if the file system structure has been damaged. It supports a wide range of storage devices, including HDDs, SSDs, USB drives, SD cards, and external hard drives. The tool can recover various file types such as documents, photos, videos, archives, and more.
Overall, PartitionAssistant Recovery provides a practical and efficient solution for recovering data from corrupted files or damaged storage devices. Follow the following guide to see the detailed steps.
Step 1. Install and open PartitionAssistant Recovery on your computer. From the main interface, locate the partition or disk where the files were lost. Select the correct location and click Scan to begin the recovery process.

Step 2. The program will immediately start searching for recoverable files. It first performs a Quick Scan to rapidly locate recently deleted data. After that, it automatically runs a Deep Scan to thoroughly search the disk for additional lost files.

Step 3. Once the scanning process finishes, the tool displays all detected files, including deleted items and data from the Recycle Bin. Browse the results, select the files you want to restore, and click Recover.

Step 4. Choose a secure location where the recovered files will be saved. It is recommended to store them on a different drive to avoid overwriting the original data.
![]()
Step 5. Wait for the software to finish restoring the selected files. When the process ends, navigate to the chosen folder to access your recovered data.
Solution 4. Check for bad sectors using disk properties
Bad sectors on a hard drive can prevent access to files. Windows can scan and attempt to repair these sectors to restore file accessibility.
Step 1. Open This PC → right-click the affected drive → Properties.
Step 2. Go to Tools → Check → select Scan drive.
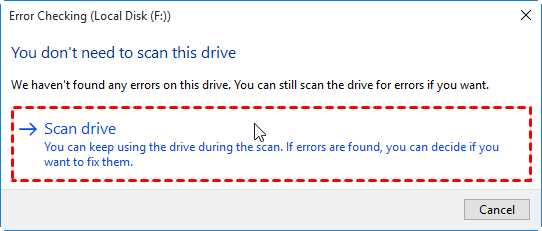
Step 3. Wait for the process to finish; Windows will attempt to repair bad sectors.
Step 4. Attempt to open the file after scanning.
Solution 5. Reinstall or repair the application
If the program opening the file is malfunctioning, reinstalling or repairing it can resolve file access issues caused by software corruption.
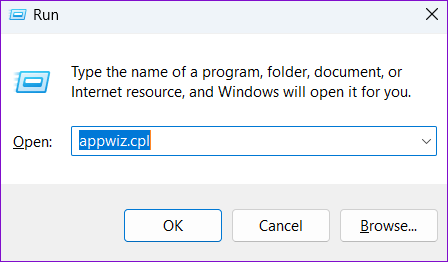
Step 1. Press Windows + R, type appwiz.cpl → Enter.
Step 2. Locate the application → right-click → Repair (if available) or Uninstall.
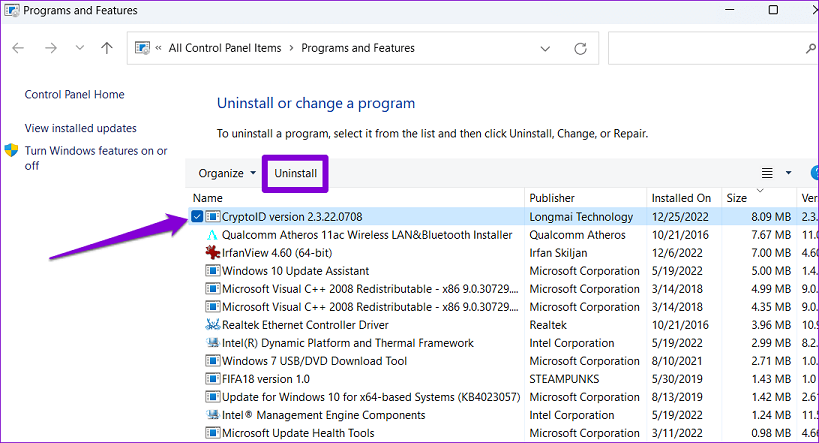
Step 3. If uninstalled, download the latest version and reinstall.
Step 4. Launch the program and attempt to open the file.
FAQs
1. Can this error happen with audio files or only video?
Yes — it can happen with audio files like MP3 or WAV if the file is corrupted, compressed, or has unexpected metadata.
2. Does this mean the file is permanently lost or corrupt?
Not necessarily. Often the file still works in other players — it just has incompatible codecs or format for your specific software.
3. Will updating my editing software fix this error?
Sometimes. Software updates can improve format support, but they won’t fix corrupted files or missing system codecs.
4. If VLC can play the file, why can’t Premiere open it?
Because VLC is a very flexible media player with support for many codecs, while editing software has stricter requirements for formats and metadata.
5. Does copying the file to a local drive help?
Yes, copying media to a local SSD or internal drive before editing often avoids read issues from external, network, or cloud-synced locations.
Conclusion
In conclusion, the “We were unable to open the file on disk” error simply indicates that a program cannot access or read a file from its current storage location. While the message itself is generic, it usually stems from file corruption, permission conflicts, software incompatibility, or disk-related issues. By applying quick troubleshooting steps and advanced solutions, most users can restore file access and continue working with their data without permanent loss.

