

Detailed Tutorial for Cleaning A Gaming PC
Cleaning a gaming PC is not hard work. In this post, you can learn how to clean your gaming PC with detailed steps and how to clean up disk space with freeware.
By Lucas / Updated on July 10, 2025
Cleaning gaming PC is an inevitable job for gamers. Usually, normal users may need to clean their computers once a year if they don’t have pets. However, for a gamer, the dust cleaning frequency would better be twice a year, and the disk cleaning can be a regular job.
Some users might not know how to clean their gaming computers for the case installs many components. Therefore, we’ll use this tutorial to help you clean your case and do a disk cleanup with detailed steps.
Preparation for cleaning a gaming pc
First, you need to prepare some tools. Never use your vacuum, as it may produce static electricity and cause harm to your parts.
Here, we list some tools, some are optional, and you can choose some of them according to your habits.
• A can of compressed air
• An electric air duster designed with computer cleaning
• Microfiber cloth (it can be damp, but not wet)
• Cotton swabs
• Screwdrivers
• Small paintbrush (optional)
…
Then you can move the case to the garage or somewhere dry and bright. If you’re going to clean your PC in a room, you can put some old sheets down and wear a mask.
Steps of clean your gaming PC
It’s not as difficult as you thought. You can follow the steps to clean the case.
First, turn off your PC and disconnect all cables and peripheral devices, and move your PC to a flat, ventilated area.
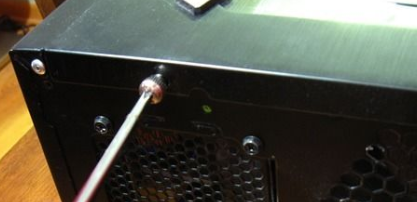
Step 1. Open the case or the cover of your laptop with screwdrivers. If you've never opened yours before and are having difficulty, examine your computer's handbook or try searching online for information unique to your model. Now you can use the compressed air and a damp cloth to clean the cover.
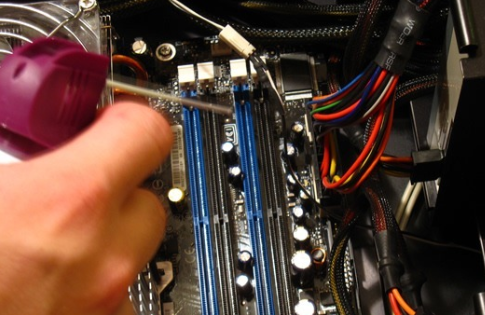
Step 2. To thoroughly remove layers of dust and compacted dirt inside, please remove all components that may be readily removed so that you can clean them more completely. You can remove RAM sticks, video cards, and hard drives from most desktop computers.
Step 3. Use short bursts of compressed air to remove dust from filters and wipe remaining debris from filters using a microfiber cloth. Repeat the same steps for the fans and RAM and disk slots. Please use a pen or pencil to prevent the fans from spinning when you use air to blow the blades.
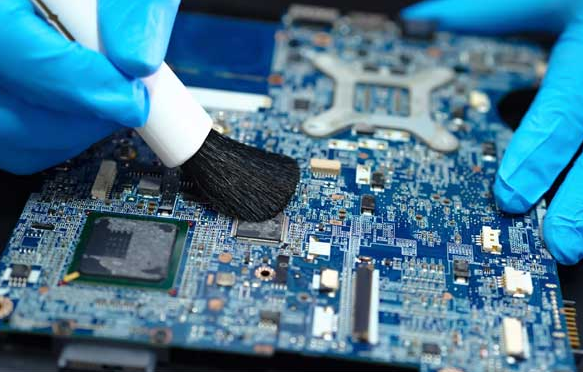
Step 4. This step is for users who want to clean motherboard. You’ll need to prepare isopropyl alcohol: Using short bursts of compressed air, remove larger clumps of dust from your motherboard and graphics card. Now dip a cotton swab in isopropyl alcohol and gently clean the surface of your motherboard and other delicate areas. Allow the motherboard to dry for a full 24 hours before replacing it on your computer.
How to clean hard drive/SSD?
After you clean the dust and dirt and install all components back as before. Now you can boot your computer and we’ll move on to clean the disk.
For gamers, how to clear the game cache on PC deeply and thoroughly is also important. All programs will generate cache files, registry files, and other junk files. Most of these files will soon be outdated and accumulated on the disk, and the system won’t automatically remove them. Thus, how to clean up disk space and remove junk files from the disk is another job you need to keep in mind.
To thoroughly dig all junk files out and securely avoid crucial files in your PC, we suggest you use the PC cleaner tool to do this for you. AOMEI Partition Assistant for Cleanup is such a tool. It’s a free disk and partition manager for all Windows 11/10/8/8.1/7/XP users. The “PC Cleaner” function can scan your disks and system to make sure no junk files are left. After the scan, users only need to click a button, then the junk files will be removed.
Free Up Disk Space To Keep Your PC Running Smoothly and Efficiently
Step 1. Initiate Clean Junk Files. Install and launch AOMEI Partition Assistant for Cleanup. Click the "Clean Junk Files" tab.

Step 2. Start scan junk files. Click the "Scan Now" button to start the process of scanning junk files.

Step 3. After the scan process is finished. All system junk files (including recycle bin files, temporary files, log files, invalid shortcuts, and so on) and registry junk files (including DLL registry, system registry, and program registry) will be displayed.

Step 4. You can also click the button behind to view the junk files details.

Step 5. And, you can click the button behind to locate the file.

Step 6. Select junk files to start cleanup. By default, the program will select some junk files to clean up, for example, temporary files, log files, and so on. You can also manually check to select more or uncheck to deselect fewer listed junk files. Or, click "Select All" to select all junk files to clean up if you need to clean up all.
After selecting junk files that are not needed anymore, you can click the "Clean Now"button to start the cleanup.

Step 7. Cleanup completed. The process of the cleanup might take time, and the selected files will be cleaned up. After the process is finished, you will get a cleanup completed window displaying how many files you have cleaned and not yet cleaned.

The garbage files have been removed. If necessary, you may use "Delete Large Files" to find deeply hidden large files that are no longer needed by your operating system and delete them to clean up disk space.
To sum up
How to clear game cache on PC, how to clean PC, and how to clean up disk, all these problems can be solved in this tutorial for cleaning a gaming PC. AOMEI Partition Assistant for Cleanup can help you a lot.

