

How to Delete Page File in Windows 10?
How to delete page file in Windows 10 if you wish to free up some space on the storage device? You’ll learn detailed steps in this guide to fix this problem.
By Lucas / Updated on July 11, 2025
What is pagefile.sys?
Pagefile.sys is a file built to support the RAM if it runs out of memory. Windows 10 employs a way of moving part of the contents of RAM to a hard drive file called Pagefile.sys. It has been demonstrated through the use of the Hiberfil.sys file for saving the complete contents of RAM while the machine is set to hibernate. The only problem with these files is that they take up a lot of space on the disk. Like the Hiberfil.sys, it retains a snapshot of the current session when the machine is set to hibernate.
When the actual RAM becomes full and a virtual RAM is required, the contents of the RAM are transferred. This often occurs when a user repeatedly opens apps on his computer while shutting those that are no longer required. Pagefile.sys also preserves information about Windows' present status if the operating system unexpectedly freezes or crashes.
Can I delete pagefile.sys?
In all, the more RAM your PC has, the less you need pagefile.sys.
If your computer has a considerable amount of physical RAM, like 16 GB, and you don't have any program that consumes many resources, you should remove the Pagefile.sys. This way, you may save a lot of space for other important things like films and photographs.
Pagefile.sys, on the other hand, is a blessing for individuals with less RAM, since Windows 10 maintains its working with the tiny RAM and transfers the data to the disk and remembers it as needed. Also, for individuals who use high-end applications such as video editing and conversion, or who play games that demand high specifications, Pagefile.sys is a crucial component since you never know when you'll need that extra RAM.
If you delete pagefile.sys, the effects will only show when your RAM reaches 100% usage. In this instance, because the RAM has not been allotted room on the hard drive to shed its burden, the computer will cease responding, freeze, crash, and shut down. In addition, all unsaved work will be lost. However, systems with more than 8GB of RAM are less likely to have problems.
Check pagefile.sys in Windows PC
Because Pagefile.sys is a system file, it is well concealed from common users' sight. These files are kept secret because they do not want unskilled or inexperienced people to mess with them. The Pagefile.sys file is found on the Windows installation drive.
Step 1. Open the C drive folder from This PC or Windows Explorer.
Step 2. On the top, choose Options and click on it, and select Change Folder and Search options.
Step 3. A new window will open and click on the View tab. Locate Show hidden files, folders, and drives and check the radio button beside it.
Step 4. Scroll down and locate Hide Protected Operating System files and uncheck it. Click on Apply and return to the folder displaying the contents of the C drive.

Now, you can see some new files in the C drive.
How to delete page file in Windows 10?
Deleting any system file in Windows 10 is not a simple operation, and these files cannot be erased from Windows Explorer by just using the delete key on the keyboard. To remove any file, first, disable the functionality that needs it, and then delete it. In this instance, we must disable Windows 10's Page Files capability.
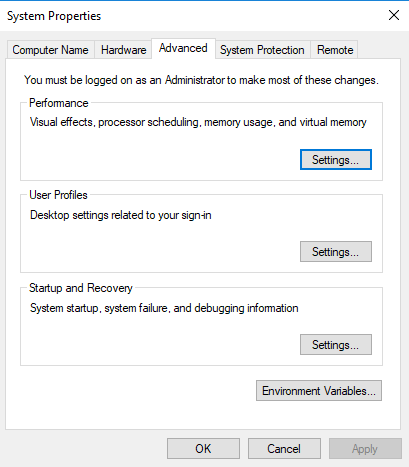
Step 1. Press Win + S to open Windows Search. Type SYSDM.CPL in the search box located on your taskbar.

Step 2. Select the Advanced tab, and in the Performance section, click the Settings button.
Step 3. Switch to the Advanced tab. In the Virtual memory section, you can see the size of the paging file. Click on the Change button to open the Virtual Memory dialog.
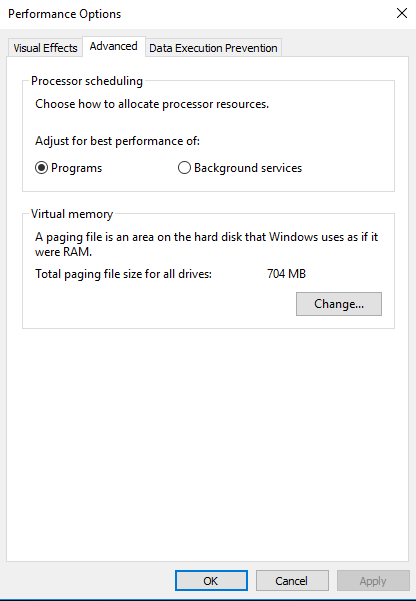
Step 4. Uncheck the Automatically manage paging file size for all drives. Select No paging file radio button. Click the Set button. Click the Yes when you get the warning dialog and click the Apply button.

When you are asked to reboot, restart your computer once to delete the pagefile.sys file. Be sure to restart the PC even if you are not asked to do so.
Further reading: How to clean RAM cache files in Windows 10?
In fact, besides paging files in Windows 10 RAM, the RAM cache files are also able to delete to retrieve more RAM resources back.
Cached RAM (CPU memory) is a sort of high-speed Static Random Access Memory. The goal of cached RAM is to make the CPU function faster and more smoothly. Cache RAM is linked to the CPU either directly or indirectly. The purpose of cached RAM is to store the basic instructions and commands that a computer needs often. And the data that the CPU is expected to demand next. Because the computer can retrieve such instructions from Cache faster than from the main memory, it will assist to improve the application's overall performance.
However, If the cached memory approaches the limit of your RAM usage, especially when you run too many applications or games simultaneously, you may have difficulties such as abrupt slowing and lag when using the application, out-of-memory errors, or even app or game crashing.
So, here we recommend you a free RAM cleaner—PartitionAssistant Cleanup, a disk and partition manager for Windows 11/10/8/8.1/7/XP systems.
This tool can scan your system and disks to filter all outdated and unnecessary files, then you can easily clear all junk files from your PC to protect your devices from running out of resources caused by useless files.
Free Up Disk Space To Keep Your PC Running Smoothly and Efficiently
Step 1. Initiate Clean Junk Files. Install and launch PartitionAssistant Cleanup. Click the "Clean Junk Files" tab.

Step 2. Start scan junk files. Click the "Scan Now" button to start the process of scanning junk files.

Step 3. After the scan process is finished. All system junk files (including recycle bin files, temporary files, log files, invalid shortcuts, and so on) and registry junk files (including DLL registry, system registry, and program registry) will be displayed.

Step 4. You can also click the button behind to view the junk files details.

Step 5. And, you can click the button behind to locate the file.

Step 6. Select junk files to start cleanup. By default, the program will select some junk files to clean up, for example, temporary files, log files, and so on. You can also manually check to select more or uncheck to deselect fewer listed junk files. Or, click "Select All" to select all junk files to clean up if you need to clean up all.
After selecting junk files that are not needed anymore, you can click the "Clean Now"button to start the cleanup.

Step 7. Cleanup completed. The process of the cleanup might take time, and the selected files will be cleaned up. After the process is finished, you will get a cleanup completed window displaying how many files you have cleaned and not yet cleaned.

Summary
To delete page file in Windows 10, you can follow the steps we’ve shown above. If you wish to deeply clean your computer, PartitionAssistant Cleanup is a great option.

