

Download Windows Free Up Disk Space Program for Windows Users
Windows free up disk space program aims to clear useless files and other unnecessary data from your Windows computer. Read this article and get 2 inbuilt disk cleaner as well as a third-party PC cleaning tool.
By Hedy / Updated on July 10, 2025
Overview of Windows free up disk space program
Are you constantly battling with low disk space on your Windows computer? Don’t worry; you’re not alone. Over time, Windows accumulates unnecessary files, temporary data, and other clutter that can slow down your system. Thankfully, Windows provides an efficient built-in solution – the free up disk space program.
Windows free up disk space is a built-in utility designed to help users clear unnecessary files, manage storage, and maintain system performance. It scans your system for various file types that can be safely deleted without affecting your system’s functionality.
2 Windows built-in free up disk space programs
Need to free up disk space on your Windows computer? You’re in luck. Windows offers built-in tools to help you reclaim valuable storage space without the hassle of installing third-party software. These tools are efficient, user-friendly, and perfect for keeping your system running smoothly.
Option 1. Disk Cleanup
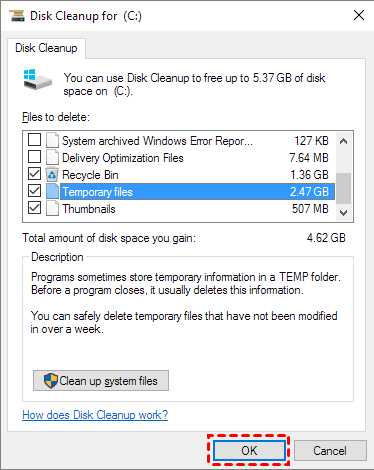
Disk Cleanup offers a convenient way to clear unnecessary files from your system, including temporary internet files, Recycle Bin contents, and even remnants of previous Windows installations, making it especially effective for freeing up space on the C drive.
Step 1. You can access it by typing "Disk Cleanup" in the search box, or right-clicking the C drive, selecting "Properties", and choosing "Disk Cleanup".
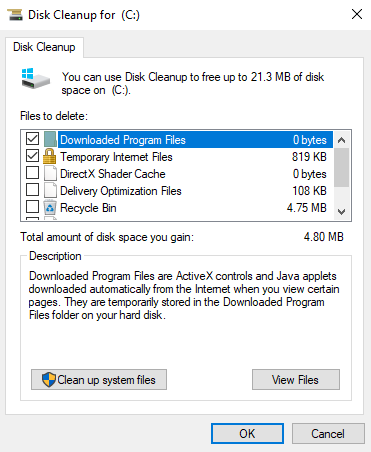
Step 2. In the Disk Cleanup window, choose the files you wish to delete and click "OK".To clear system files like old Windows installations, click "Clean up system files" for more options.
Option 2. Storage Sense
The Windows 10 Creator Update (version 1703) introduces Storage Sense, a handy feature that automatically frees up disk space by removing unnecessary files. This feature is disabled by default, but you can easily activate it.
Step 1. Go to "Settings" > "System" > "Storage".
Step 2. Locate the "Storage Sense" option and switch it from "Off" to "On". For more control, click "Change how we free up space" to customize the cleanup process.
.png)
Best Windows free up disk space program for Windows 10
One of the best ways to free up disk space and optimize your system is by using a reliable disk management tool. And when it comes to the best option to free up disk space Windows, PartitionAssistant Cleanup stands out from the crowd.
AOMEI Partition Assistant is a versatile disk cleaning tool designed to simplify complex disk operations. Unlike the standard Windows Disk Cleanup tool, which offers basic cleaning options, PartitionAssistant Cleanup provides a range of powerful features, including clearing junk files, temporary files, and other unnecessary data with just a few clicks.
Free Up Disk Space To Keep Your PC Running Smoothly and Efficiently
Feature 1. Clean Junk Files
Step 1. Install and launch PartitionAssistant Cleanup. Click the "Clean Junk Files" tab.

Step 2. Click the "Scan Now" button to start the process of scanning junk files.

Step 3. After the scan process is finished. All system junk files (including recycle bin files, temporary files, log files, invalid shortcuts, and so on) and registry junk files (including DLL registry, system registry, and program registry) will be displayed.

You can also click the button behind to view the junk files details.

Step 4. And, you can click the button behind to locate the file.

By default, the program will select some junk files to clean up, for example, temporary files, log files, and so on. You can also manually check to select more or uncheck to deselect fewer listed junk files. Or, click "Select All" to select all junk files to clean up if you need to clean up all.
Step 5. After selecting junk files that are not needed anymore, you can click the "Clean Now"button to start the cleanup.

The process of the cleanup might take time, and the selected files will be cleaned up. After the process is finished, you will get a cleanup completed window displaying how many files you have cleaned and not yet cleaned.

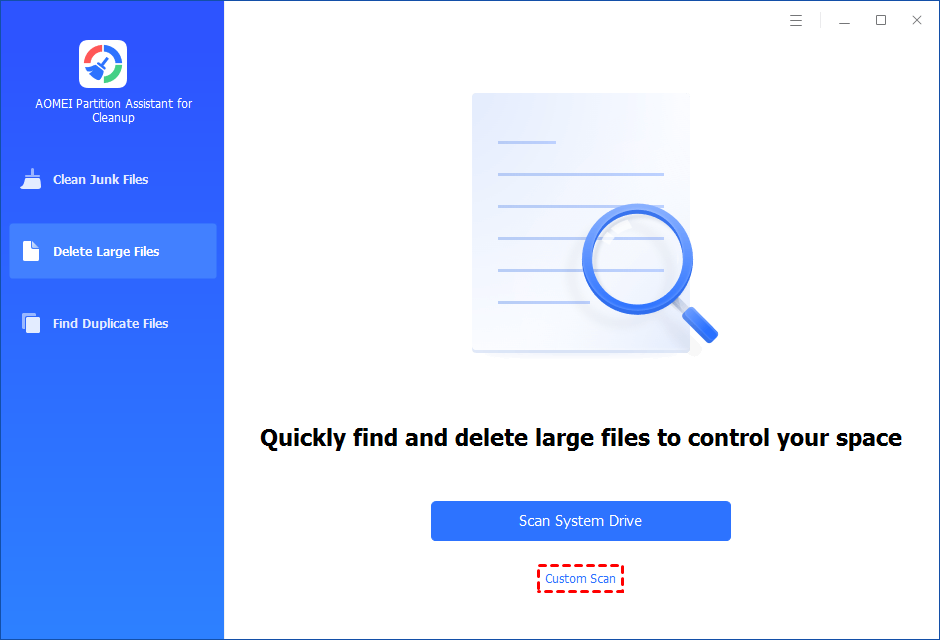
Feature 2. Delete Large Files
Step 1. Install and launch PartitionAssistant Cleanup. Click the "Delete Large Files" tab.
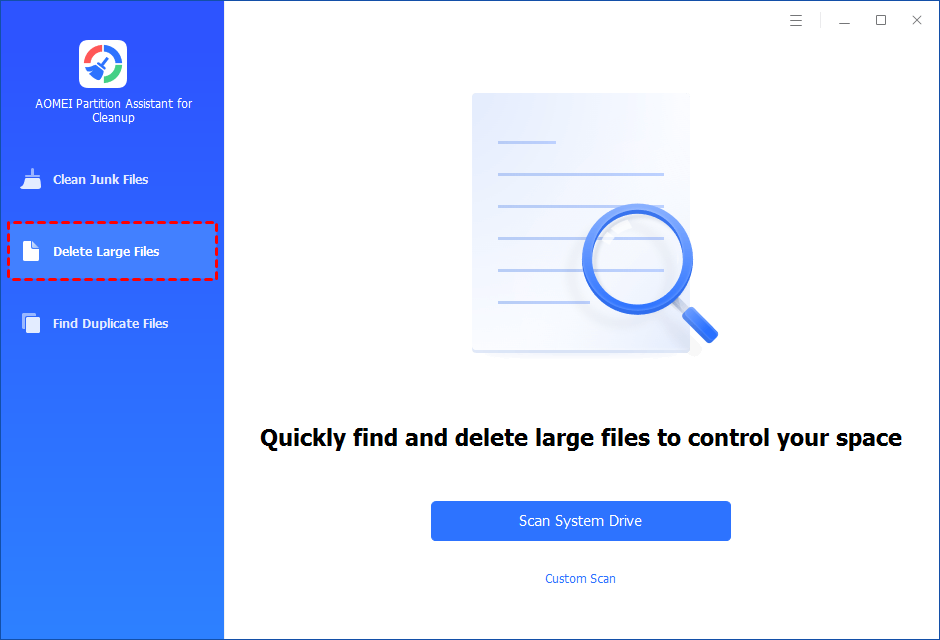
Step 2. You can either click "Scan System Drive" to start the scan of your system C: drive. Or, click "Custom Scan" to manually select paths to be scanned. (Here, we take the "Custom Scan" as an example.)
Step 3. After clicking "Custom Scan", all local and external drives on your PC and the common Desktop, Documents, and Downloads paths will be displayed. You can manually select paths to be scanned. Once necessary paths are added, you can click the "Scan Now" button to start the scan process.

The scan process might take time. After the scan is complete, all large files found will be listed.
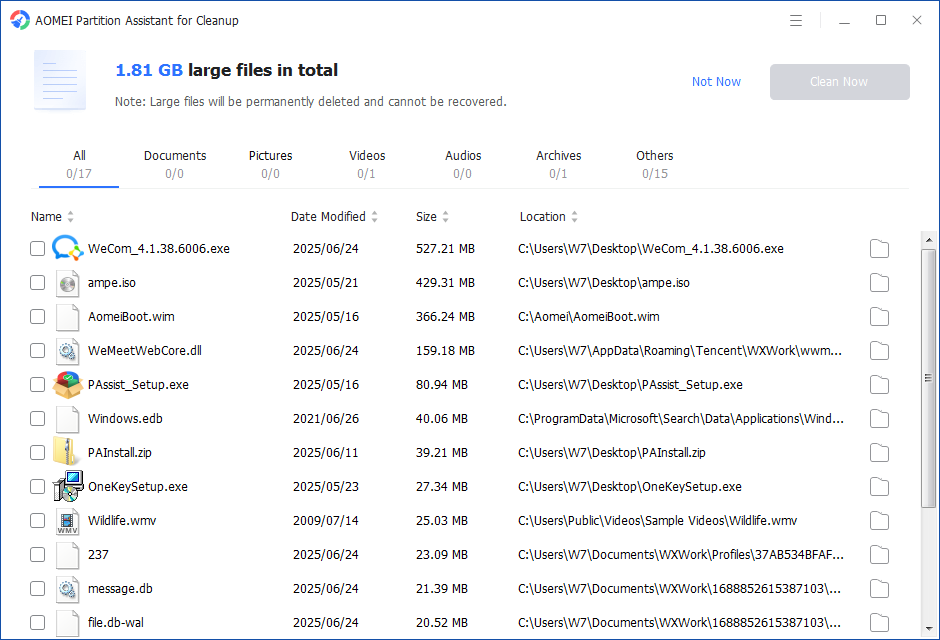
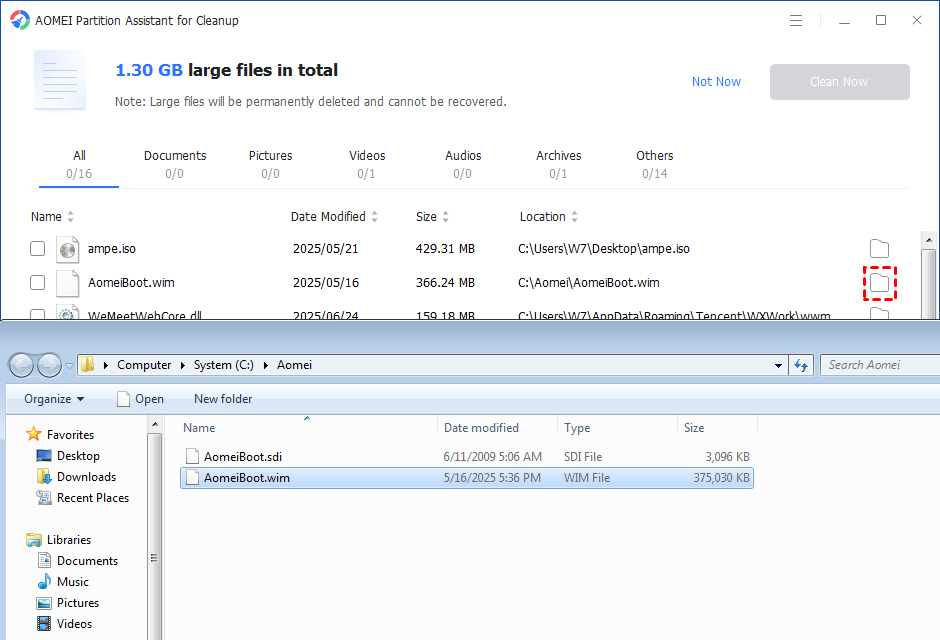
You can also check the large files and click the button behind to locate them.
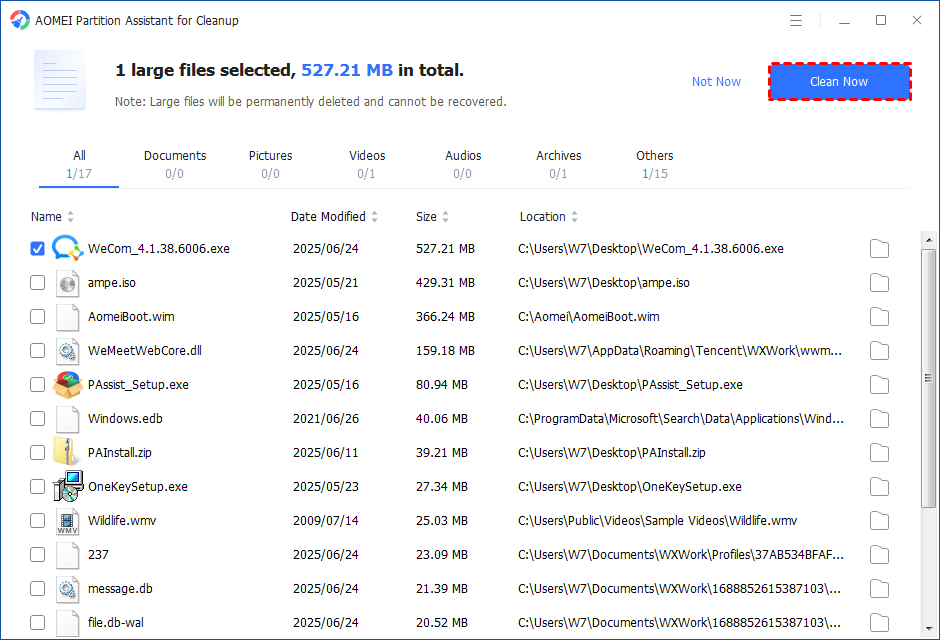
Step 4. Tick the files you want to delete, and then click the "Clean Now" button to start the deletion.
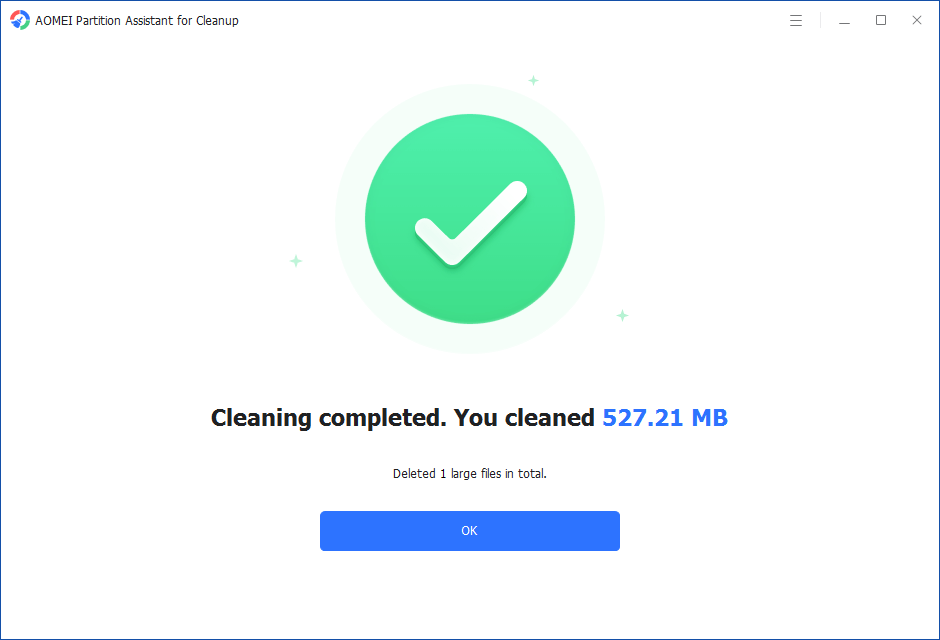
Step 5. The deletion might take time. After the process is finished, the selected files will be deleted, and you will get a cleaning completed window displaying how much data you deleted in total.
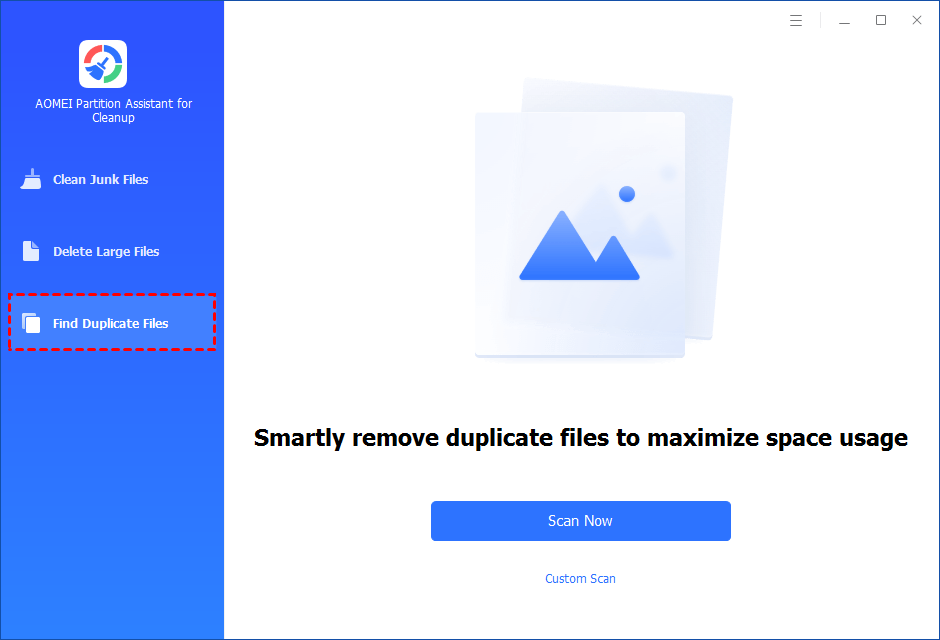
Feature 3. Find & Delete Duplicate Files
Step 1. Install and launch PartitionAssistant Cleanup. Click the "Find Duplicate Files" tab.
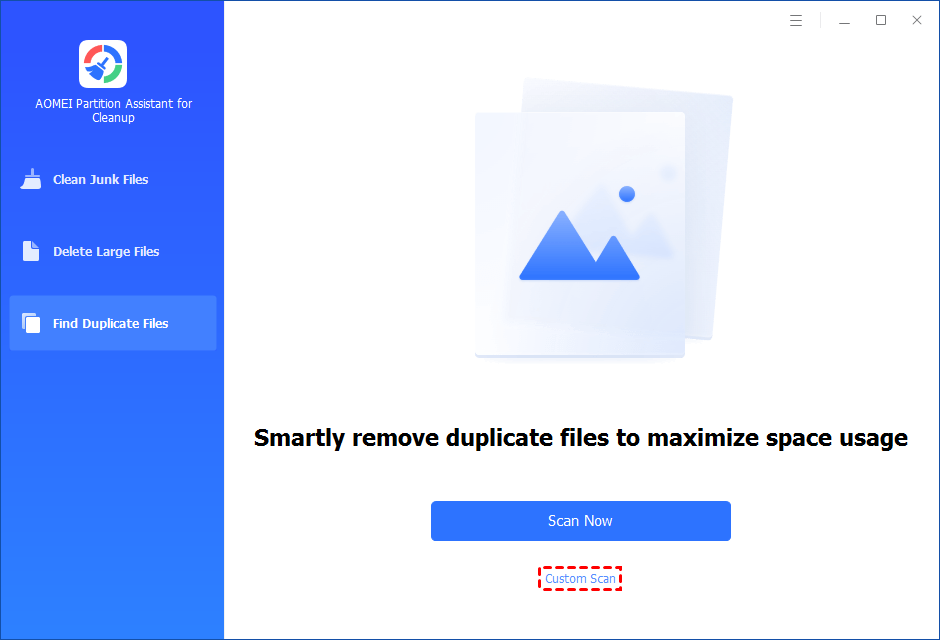
Step 2. You can either click "Scan Now" to start the scan of your system C: drive. Or, click "Custom Scan" to manually select paths to be scanned. (Here, we take the "Custom Scan" as an example.)
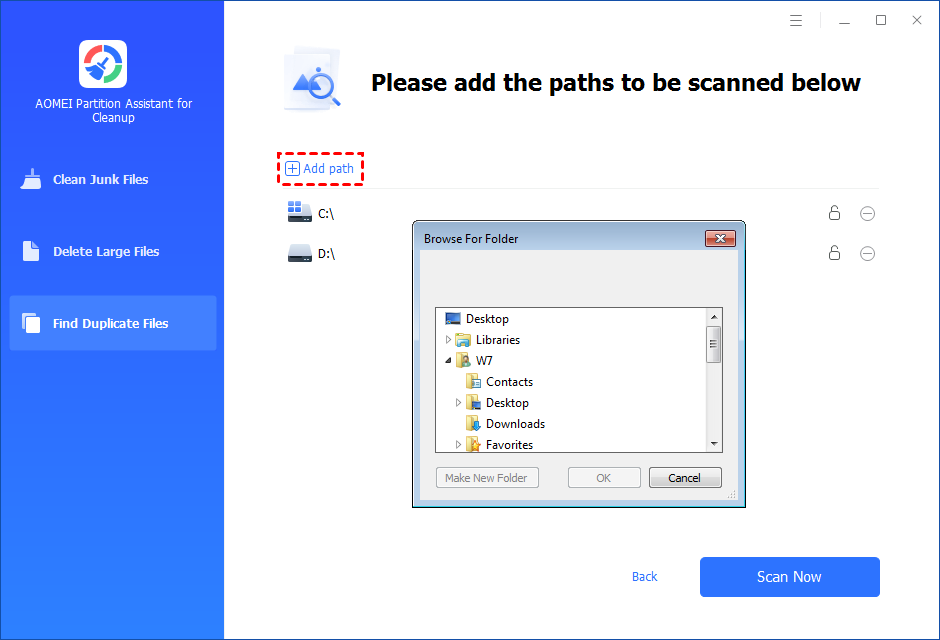
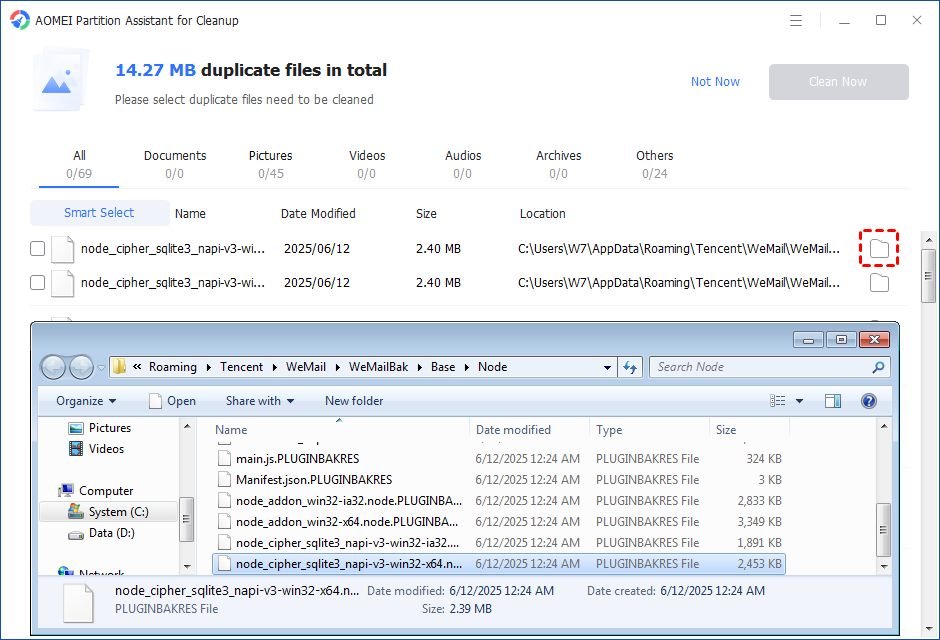
Step 3. After clicking "Custom Scan", all local and external drives on your PC will be displayed. You can also click the "Add Path" button, and then a browse folder window will pop up. So you can add more paths on this PC, like Desktop, Downloads, and other folder paths.
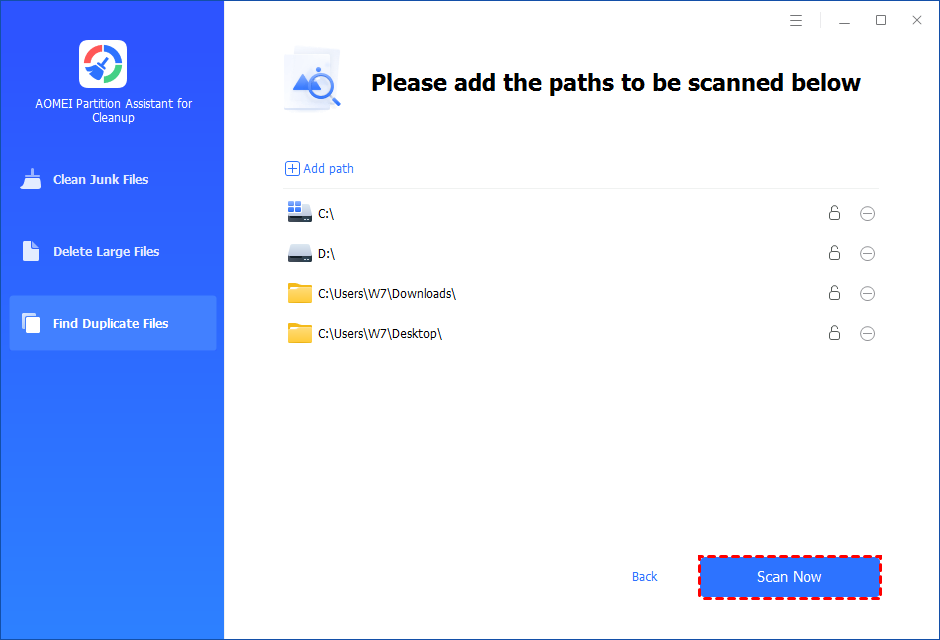
Step 4. Once necessary paths are added, you can click the "Scan Now" button to start the scan process.
The scan process might take time. After the scan is complete, all duplicate files will be listed. You can click the button behind to locate them.
You can either manually select duplicate files, or click the "Smart Select" button to automatically select unnecessary duplicate files to delete.
Tips: If the "Smart Select" is ticked, only the oldest duplicate file will be unticked. It means that all duplicate files except the oldest one will be ticked to delete. (The oldest file means the file that was created first. This file will not be deleted. All other duplicate files are considered copies of the oldest file. )
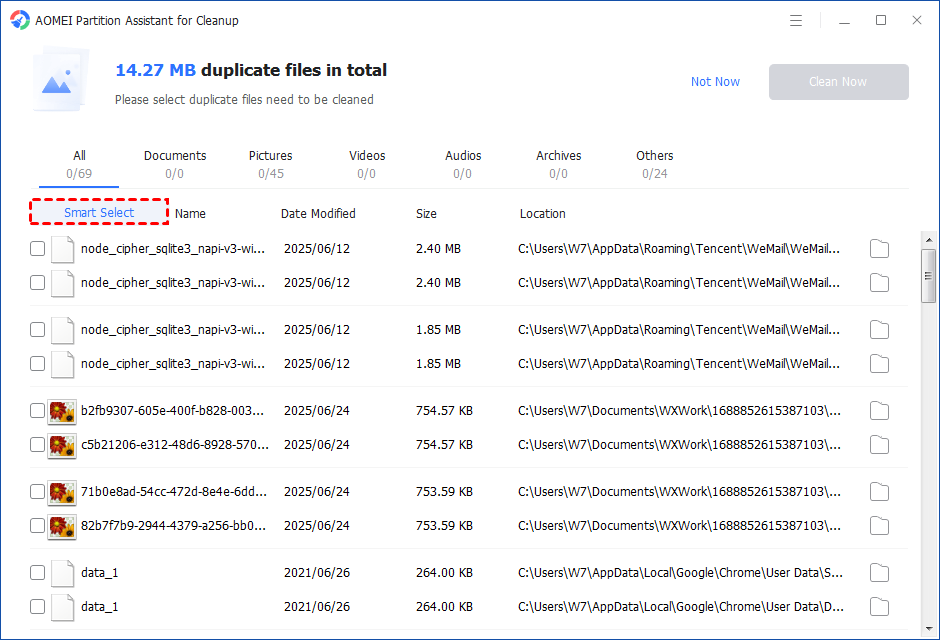
If you manually select all copies of duplicate files, you will get a pop-up warning window to keep at least one copy of the duplicate files. If you indeed want to delete all copies of duplicate files, you can click "OK" so all copies of duplicate files will be selected to delete.

After unnecessary duplicate files are selected, please click the "Clean Now" button to start the deletion.

Step 5. The deletion might take time. After the process is finished, the selected files will be deleted, and you will get a cleaning completed window displaying how much data you deleted in total.

Conclusion
Using Wise Disk Cleaner on Windows 10 is an effective way to clear free space, but if you’re looking for more advanced options, consider PartitionAssistant Cleanup. This powerful PC cleaner offers versatile cleaning methods and can even securely erase SSDs when needed.

