Step-by-Step Guide to Installing Windows 10
This guide offers comprehensive, stepwise instructions for installing Windows 10, from preparation to setup completion, ensuring a successful installation for users of all skill levels.
By Irene / Updated on April 10, 2024
How to Do Window 10 Install?
To install Windows 10, you'll need a Windows 10 installation media (either a USB drive or a DVD) and a valid Windows 10 product key. Here's a general and comprehensive guide on how to install Windows 10:
To install Windows 10, you will need a bootable installation media (USB or DVD) and a valid product key to activate your Windows system. Here are the stepwise steps to follow:
-
Create Installation Media: Use the Media Creation Tool from Microsoft's official website to create a bootable external disk with AOMEI Partition Assistant.
-
Backup Data: Please back up important data in advance to avoid potential loss during Windows 10 installation.
-
Access BIOS/UEFI: Restart your computer and enter BIOS/UEFI settings by pressing the specific keys (e.g., F2, F10, F12, Del) to change boot priority to the bootable USB/DVD.
-
Install Windows 10:
- Insert the installation media and reboot the system.
- On the Windows Setup screen, set your preferences and click "Next."
- Click "Install Now," enter your product key, or select "I don't have a product key" for a trial, and accept the license terms.
- Choose "Custom: Install Windows only (advanced)" for a clean installation.
- Select the target drive for installation. Windows will handle partitioning if required.
- Follow the prompts to complete the installation, allowing the system to reboot as needed.
-
Setup Windows: In this step, you can configure initial settings, user accounts, and preferences post-installation. Or you can just skip it and configure it later.
-
Install Drivers and Updates: Finally, install the necessary hardware drivers, software, and refresh the Windows updates to ensure your system is up-to-date and running smoothly.
By following these steps, you can efficiently install Windows 10 without extra hassle or problems.
Windows 10 Install on Windows 7 or Windows 11
To download and install Windows 10 from a system running either Windows 7 or Windows 11, the steps are very similar, but there are some specific considerations for each scenario. Here’s a separetely processes for you:
Downloading Windows 10 on Windows 7
Preparation:
- Check Compatibility: Ensure your Windows 7 PC meets the minimum requirements for Windows 10. If your device doesn't meet, please use the first method to create a Windows To Go bootable USB for Windows 10 install.
- Backup Your Data: Always back up important files before upgrading your OS.
Steps to Download and Install:
- Visit Microsoft’s Download Site: Go to the Download Windows 10 page.
- Download the Media Creation Tool: Click on ‘Download tool now’ and run it once downloaded.
- Upgrade or Create Installation Media:
- To upgrade directly, choose “Upgrade this PC now” when prompted. Follow the on-screen instructions to download and install Windows 10.
- To create installation media, select “Create installation media for another PC.” Choose the language, edition, and architecture. Follow instructions to create a bootable USB or DVD.
Installation:
- If you choose to upgrade directly, the tool will guide you; you can just follow the instructions on the screen. If using installation media, boot from it and follow the prompts to install Windows 10.
Post-Installation:
- Windows 10 should activate automatically using your digital license for Windows 7.
Downloading Windows 10 on Windows 11
Preparation:
- Check System Requirements: Even though Windows 11 has more requirements, Windows 10 can be installed on any machine that can run Windows 11.
- Backup Your Data: Safeguard your personal files.
Steps to Download and Install:
- Visit Microsoft’s Download Site: Navigate to the same Download Windows 10 page.
- Download the Media Creation Tool: Click on 'Download tool now' and run it.
- Create Installation Media: Choose “Create installation media for another PC.” Set your preferences for language, edition, and architecture. Follow the steps to make a USB drive or DVD.
Installation:
- Insert the bootable media, reboot your PC, enter the BIOS/UEFI to set the USB/DVD as the primary boot device, and proceed with the installation by following the on-screen steps.
Post-Installation:
- Windows 10 will typically activate automatically if you're reinstalling. If this is a new installation on a system previously running Windows 11, you might need a new Windows 10 license.
Key Differences:
- Upgrade Option: Window 7 provides a straight upgrading method that can keep files, apps, and settings, which is not often recommended for Windows 11 because it would be a downgrade.
- System Requirements: Systems on Windows 11 are generally newer and may not have drivers immediately available for Windows 10, though this is less likely due to backward compatibility.
- BIOS/UEFI Access: Seeing BIOS/UEFI settings differs significantly between newer systems (usually running Windows 11) and older systems (such as those running Windows 7).
In many cases, you can create a bootable USB or DVD using the Media Creation Tool to make sure you install Windows 10 cleanly. However, updating or installing Windows 10 directly on your system during installation may affect system stability and performance, so backing up is important to avoid data loss.
Install AOMEI Partition After Downloading Windows 10
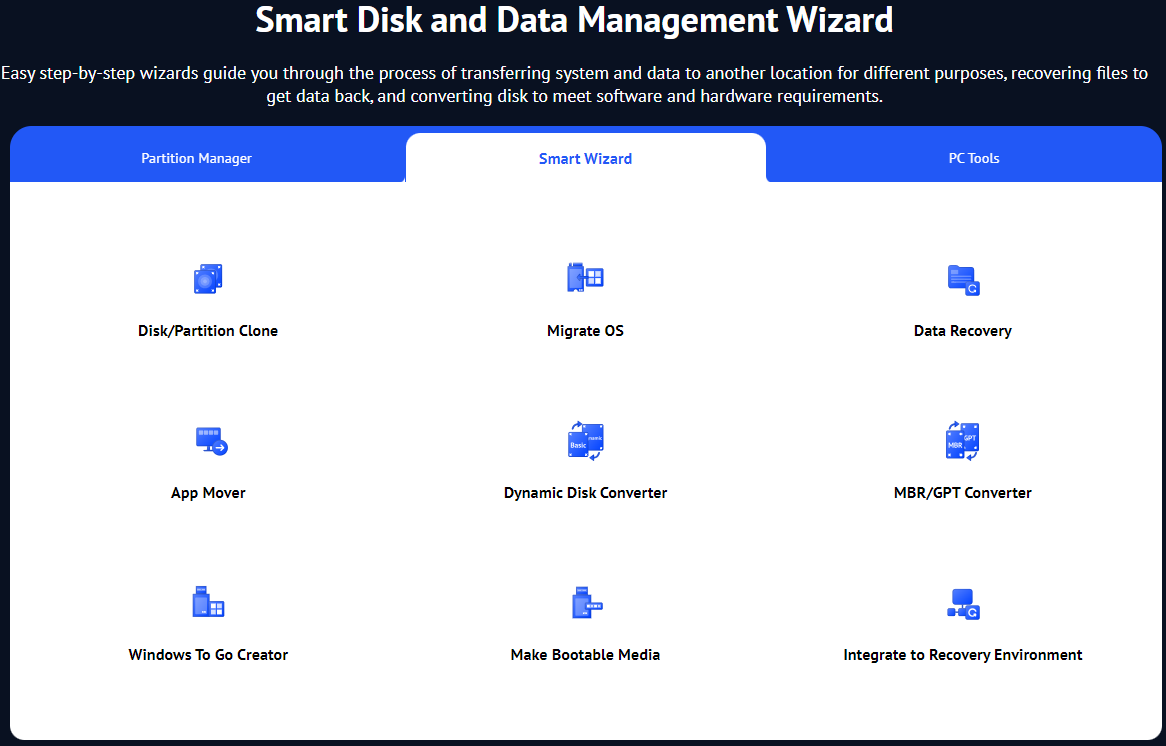
After succesfully install Windows 10, please download a powerful tool to enhace your OS running performance. AOMEI Partition Assistant is a multifunctional disk management software designed for Windows operating systems. It can make the disk partition management process easier with many practical features. Windows Users can easily extend disk space and make full use of your disk to ensure the system runs efficiently and stably.
The Best Windows Disk Partition Manager and PC Optimizer
Here are the main features of AOMEI Partition Assistant for Windows 10:
-
Partition size adjustment: This tool allows users to adjust partition size without losing data, whether partition size expansion or decrease will meet user storage needs to optimize disk usage.
-
Create and delete partitions: Users can quickly create, delete, or format partitions with just one click so that disk space management is very flexible.
-
Copying and Cloning Drive: AOMEI Partition Assistant enables smooth data transfer and backup by creating a complete copy of your disk or partition to ensure your data is secure. For example, you can transfer HDD OS to SSD without any data loss and reinstalling on Windows 11,10,8,7.
-
Partition Recovery: In case of an emergency deletion or loss of partition, this tool allows users to scan partitions to maximize data integrity protection and minimize the risk of data loss.
-
Drive Conversion: Users can easily convert disks between different file systems such as converting from MBR to GPT or converting back without damaging data.
-
Drive Optimization: AOMEI Partition Assistant also features a disk sorting function that optimizes SSD performance and reduces wear and extends drive life. You can run its 4K Alignmnet, Speed Test, and Health Disk Test to monitor your disk status.
-
Drive Data Cleaning: To ensure that the data is completely deleted and the privacy of the user is secure, this tool has a secure data deletion function that allows the user to clean part or entire disk without worry.
AOMEI Partition Assistant has an easy-to-use user interface with many powerful features that make drive management easy and cost-effective, whether distributed storage space, data migration or system optimization, it will offer the perfect solution for both beginners and advanced users to manage drives on Windows 10. Here are some more practical functions you may need:
Conclusion
Finally, whether you're upgrading from Windows 7 or changing to Windows 11. Downloading and installing Windows 10 will require similar procedures, but you need to consider different factors depending on your original operating system. Microsoft's media generator provides a simple and efficient way to create installation media and upgrade directly.
The main differences to bear in mind are: Upgrading directly from Windows 7. It allows you to maintain existing files and applications. And considering newer hardware when downloading it from Windows 11, regardless of which operating systems you use. Please make sure that the information is backed up to prevent possible data loss occurring during installation, proper preparation and following the detailed installation process will ensure that changes to Windows 10 install are smooth.
FAQs
-
Can I upgrade to Windows 10 from Windows 7 or Windows 8 for free?
- Yes, you can upgrade to Windows 10 for free if you have a genuine copy of Windows 7 or Windows 8. Microsoft offered a free upgrade promotion for a limited time after the release of Windows 10.
-
Do I need to back up my data before upgrading to Windows 10?
- It's highly recommended to back up your important data before upgrading to Windows 10 to prevent any potential data loss during the upgrade process.
-
How do I check if my computer meets the system requirements for Windows 10?
- You can check the minimum system requirements for Windows 10 on the official Microsoft website. Additionally, the "Get Windows 10" app can scan your system and provide a report on compatibility issues.
-
What happens to my files and applications during the upgrade to Windows 10?
- During the upgrade process, you'll have the option to keep your personal files and applications. However, it's always a good idea to back up your data beforehand as a precaution.
-
Do I need a product key to upgrade to Windows 10?
- If you're upgrading from a genuine copy of Windows 7 or Windows 8, you typically don't need a product key as the activation should carry over. However, if you're performing a clean installation, you'll need a valid Windows 10 product key.

