[Quick Guide] How to Map Network Drive in Windows 11
You can map network drive in Windows 11 to save and share files, applications with users in the same network. In this post, you’ll how to map a network drive in Windows 11 OS.
By Lucas / Updated on February 2, 2024
The Benefits of Mapping a Network Drive in Windows 11
Understanding "why map a network drive in Windows 11" is essential for maximizing your system's capabilities. Whether you're looking to expand local storage, accelerate file transfers, or enhance data protection, mapping a network drive presents a solution. By following these steps, you can seamlessly integrate this feature into your Windows 11 environment.
How to map network drive in Windows 11
If you find yourself questioning how to map a network drive in Windows 11, rest assured that we have a comprehensive guide for you. The steps outlined below are applicable not only to Windows 11 but also to Windows 10/8.1/8/7/XP/Vista and Windows Server computers.
1. Enable Network Discovery, File Sharing, and Password Protected Sharing
To prevent unnecessary errors, it is crucial to activate Network Discovery settings in Windows 11. Follow these steps:
Step 1: Type "Control Panel" in the search box and open it.
Step 2: Click on "Network and Sharing Center" and then "Change advanced sharing settings" on the left pane.
Step 3: Under the Private section, enable "Turn on network discovery" and "Turn on file and printer sharing."
Step 4: In the Guest or Public section, also enable "Turn on network discovery" and "Turn on file and printer sharing."
Step 5: Under All networks, activate "Turn on password protected sharing" and click "Save changes" to apply the changes.
2. Map a Network Drive in Windows 11
After configuring the network discovery and file-sharing settings, follow these steps to map a network drive:
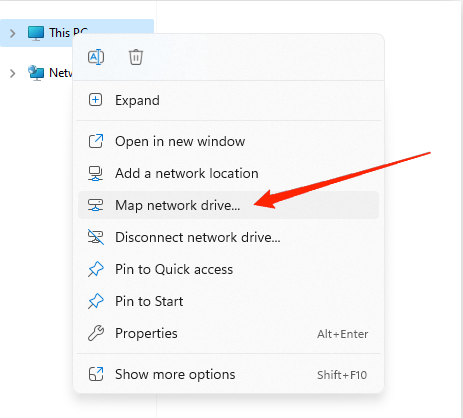
Step 1: Double-click "This PC" from the Windows 11 desktop.
Step 2: In the top menu, locate and click "Map network drive" and select "Map network drive."
Step 3: Choose the drive letter and click "Browse" next to the Folder section to select the desired network drive folder.
Step 4: Enter network credentials if required and click "OK" to confirm.
Step 5: Check "Reconnect at sign-in" and click "Finish" to complete the mapping process.
Bonus Tips for Optimal Network Drive Usage in Windows 11
Now that you've successfully mapped a network drive, leverage these bonus tips for a seamless experience.
Keep your network connection stable to avoid disruptions, and always copy files to the network drive instead of cutting from your local Windows 11 computer.
Don’t forget to set a secure password for accessing vital data, and maintain sufficient free space on the local drive connected to the network drive for efficient file transfers.
Conclusion
By mastering the art of mapping a network drive in Windows 11, you open the door to enhanced productivity and collaboration. Explore the benefits, troubleshoot potential issues, and follow our step-by-step guide for a smooth experience. Empower your Windows 11 journey and embrace the efficiency of mapped network drives.

