Full Guide on Fixing My Passport Read Only Mac
Is your My Passport read only Mac? This issue can prevent you from editing, deleting, or transferring files to the drive. This guide walks you through the full steps to address the issue.
By Hedy / Updated on March 6, 2026
Many Mac users encounter a situation where an external hard drive or USB device becomes read-only. This issue can appear unexpectedly and may stem from several different causes. Because the underlying reasons vary, the methods used to resolve the problem can also differ.
This guide uses the example of a WD My Passport drive that becomes read-only on a Mac. The following sections explain practical ways to remove the restriction and restore full access, allowing the drive to be used normally for reading and writing files on macOS.
|
Fix 1. Run First Aidor format WD Passport |
If your WD Passport is showing read-only on Mac, the issue might be a disk formatting error. |
|
Fix 2. Ignore permissions on Mac |
Sometimes, macOS blocks access to external drives due to permission settings. |
|
Fix 3. MakeMy Passport Readable and Writable |
Macs do not natively support NTFS drives, so you need a third-party solution to enable full read/write access. |
"When I connected my WD Drive to my MacBook air, it goes mounted fine, I can open files and copy the data. But I'm unable to delete data or rename folders. The status is read-only on the WD drive. How do I change it?"
"I safely eject my WD My Passport external hard drive from Windows and connect it to Mac. It won't open. I check its state, showing as read-only. How do I change WD My Passport from Read-Only on Mac?"
Many Mac users report encountering situations similar to the examples above, where their storage devices suddenly become read-only. This problem can prevent files from being edited, copied, or deleted, causing significant inconvenience during daily use.
So, how can it be resolved? The following guide provides clear and practical steps to remove read-only restrictions from external drives such as WD My Passport, Seagate, Toshiba, and other storage devices, restoring full read and write access on a Mac.
Why is WD My Passport showing read-only on Mac?
If your WD My Passport external hard drive shows read-only on a Mac, it means macOS can detect the drive but doesn’t allow you to modify, delete, or add files. This issue usually occurs due to file system compatibility, permission settings, or disk errors.
Here are the most common reasons:
◈ NTFS file system format: Many WD My Passport drives are formatted with the NTFS file system, which macOS can read but does not natively support for writing. As a result, the drive appears read-only.
◈ Insufficient drive permissions: The drive’s permission settings may restrict your user account. If your account does not have write privileges, macOS only allows read access.
◈ macOS compatibility issues: Certain macOS versions may not fully support the drive’s configuration or installed drivers, causing the system to mount the disk in read-only mode.
◈ Disk errors or file system corruption: If the drive contains logical errors or corrupted file system structures, macOS may automatically mount it as read-only to prevent further damage.
◈ External drive encryption: If the drive is encrypted and the correct password or authentication process has not been completed, write access may be restricted.
◈ File system incompatibility between macOS and Windows: If the drive was heavily used on Windows systems, compatibility conflicts between Windows and macOS file systems can cause the drive to appear read-only.
How to fix the “My Passport read only Mac” issue
By applying the appropriate method and following the detailed instructions, the read-only problem on your Mac storage device can be resolved effectively. Each solution is explained step by step to make the process straightforward and easy to follow.
With the right approach, you can remove the read-only restriction and restore full access to your external drive, allowing you to read, edit, copy, and manage files on your Mac without limitations.
Fix 1. Run First Aid or format WD Passport if drive contains formatting error
If a WD My Passport drive develops internal issues or formatting errors, running a repair check can often resolve the problem. In many cases, using the built-in First Aid feature in Disk Utility helps detect and repair disk-related errors. If the problem persists, reformatting the drive may be necessary.
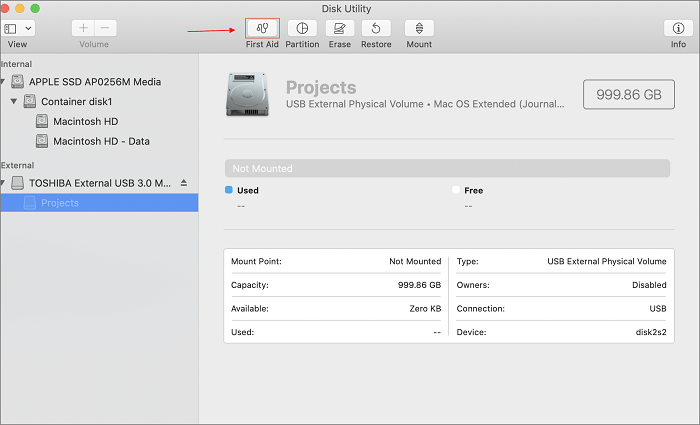
1. Run First Aid in Disk Utility
Follow these steps to scan and repair the WD drive:
Step 1. Ensure the WD My Passport drive remains connected to the Mac.
Step 2. Open Disk Utility by navigating to Applications > Utilities, then locate and double-click Disk Utility.
Step 3. In Disk Utility, select the WD drive from the sidebar. Click First Aid at the top of the window, then choose Run. After the process finishes, click Done.
Once the repair is complete, check whether the drive can be accessed normally. If the issue remains unresolved, proceed to reformat the drive.
2. Format the WD drive using Disk Utility
Reformatting an external drive removes all existing data. Important files should be backed up or recovered before proceeding.
To format the WD drive on Mac, follow these steps:
Step 1. Connect the WD My Passport drive to the Mac.
Step 2. Press Command + Space to open Spotlight. Type Disk Utility and press Return.
Step 3. In Disk Utility, select the WD drive from the device list and click Erase in the top menu.
Step 4. Choose a format compatible with macOS, then click Erase to begin the formatting process.
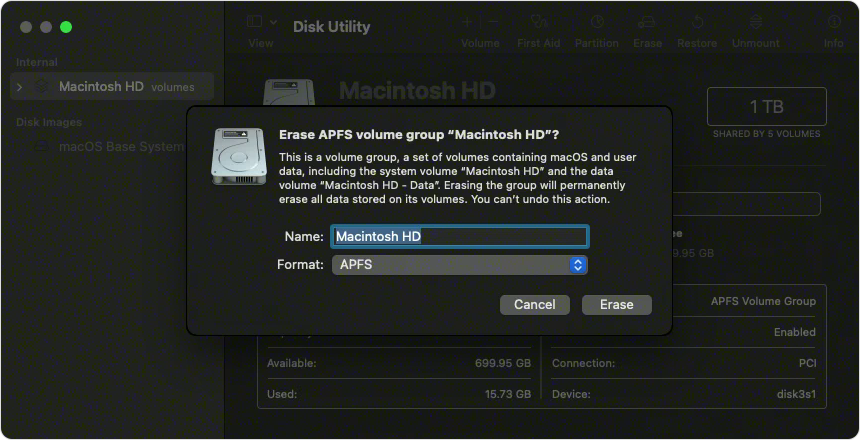
Step 5. When the process finishes, click Done.
After formatting, the drive will be ready for normal use, allowing files to be stored, edited, and managed freely on the Mac.
Fix 2. Ignore permissions on Mac, making WD My Passport drive accessible
When permission restrictions are applied to an external drive—such as a backup disk—macOS may prevent direct access to its contents. In this situation, modifying the drive’s permission settings can restore normal read and write capabilities.
Follow these steps to adjust the permissions:
Step 1. Connect the WD My Passport external drive to your Mac.
Step 2. Locate the drive in Finder, right-click it, and choose Get Info from the menu.
Step 3. In the information window, expand the Sharing & Permissions section. Click the lock icon to authenticate with your administrator credentials, then enable Ignore ownership on this volume.
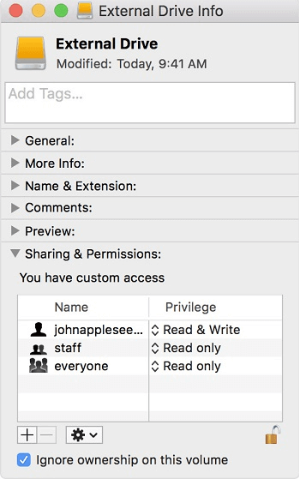
After updating the permissions, the drive should become fully accessible, allowing you to view, edit, and manage files on the WD My Passport device from your Mac.
Fix 3. Enable NTFS WD My Passport drive readable and writable on Mac
When a WD My Passport drive is formatted with the NTFS file system, Mac won’t be able to access its contents directly. By default, the drive appears as read-only on macOS. To resolve this, you'll need NTFS for Mac software to enable full access to the drive.
PartitionAssistant NTFS for Mac offers a quick solution with its "Enable Writable" feature, allowing you to gain full control of the drive with just a single click. It unlocks NTFS drives and allows Mac users to read, write, edit, and transfer files between macOS and Windows systems without reformatting the disk.
✍ It comes with the following powerful features:
✎ Complete file control: Provides full management of files and folders on Western Digital NTFS drives directly in macOS Finder. Users can read, write, rename, delete, and move data without restrictions.
✎ Wide device compatibility: Works seamlessly with various WD storage devices, including HDDs such as My Passport, SSD models like My Passport SSD, USB flash drives, and memory cards including SD and CF.
✎ Extensive file system support: Handles multiple file systems, including NTFS (from Windows NT 3.1 through Windows 11), FAT32, and exFAT, ensuring flexible cross-platform use.
✎ Optimized for modern Macs: Fully supports macOS 12 and newer versions, operating natively on both Intel-based Macs and Apple Silicon devices such as M1, M2, and M3 systems.
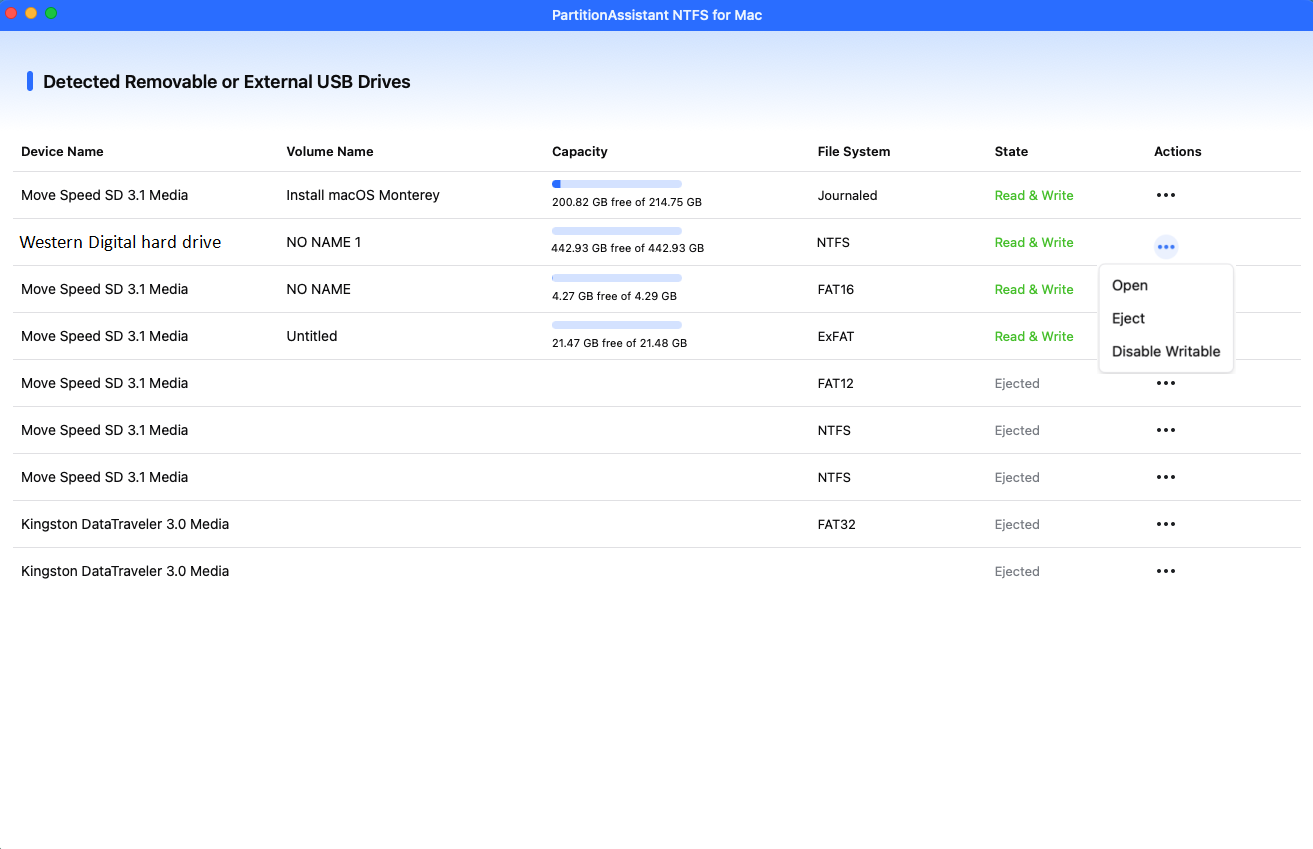
Step 1. Run Partition Assistant NTFS for Mac and connect your My Passport drive.
Step 2. The connected, removable, and My Passport NTFS drive will be mounted and listed.
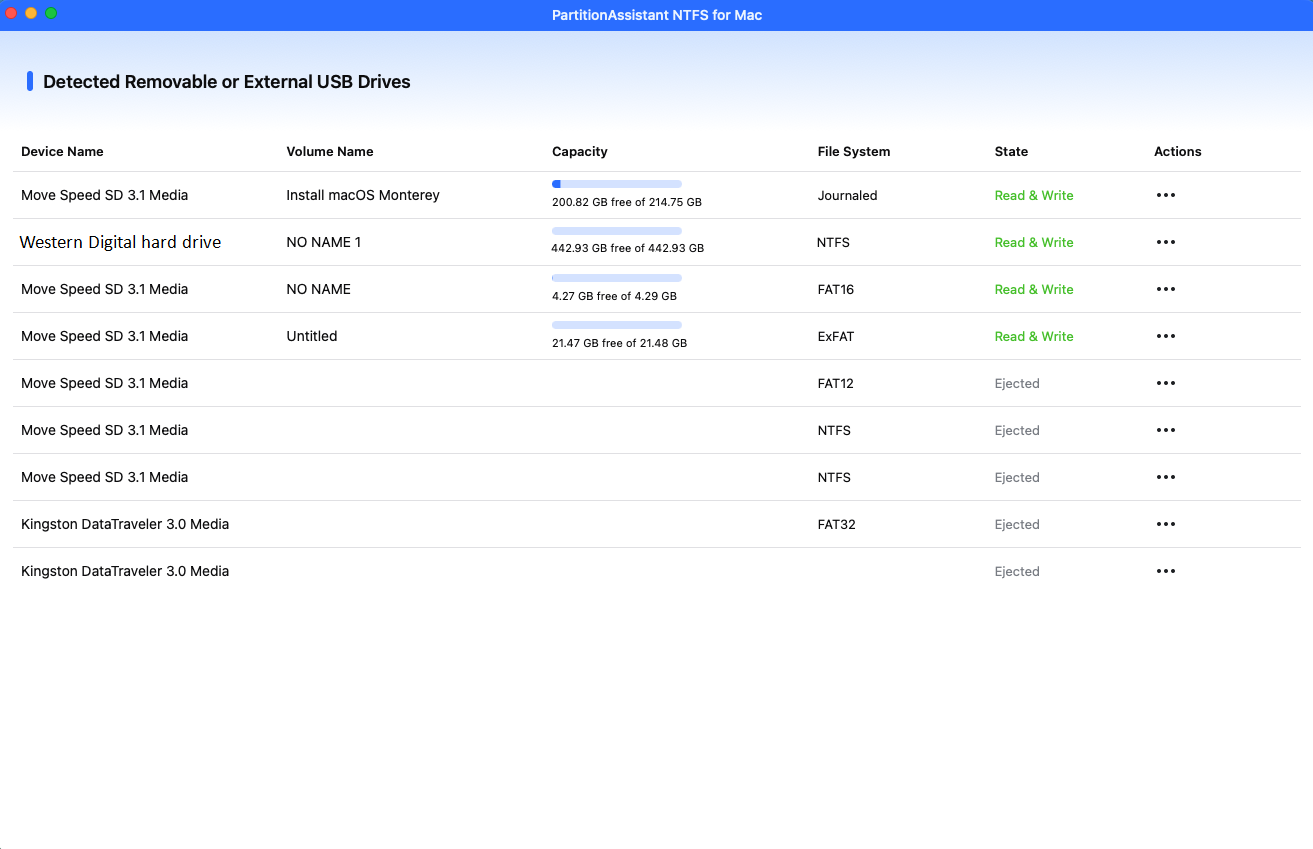
Step 3. Select the drive you want to operate and click "Open".
Step 4. Now you can copy files on your Mac and click "Paste Item" to copy the files to WD My Passport drive.
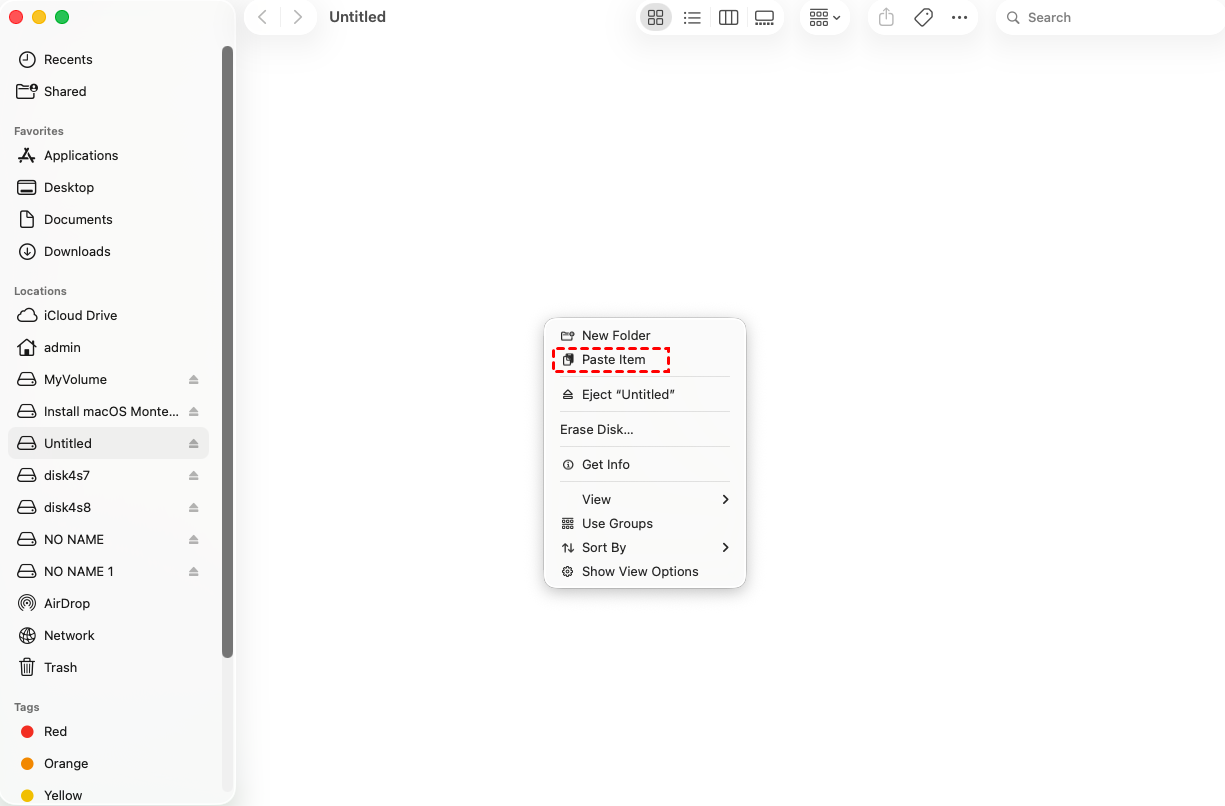
After all operations are complete, please click "Eject" to disconnect the WD My Passport drive from your Mac.
Conclusion
In conclusion, a WD My Passport drive showing as read-only on Mac is usually caused by NTFS formatting, permission restrictions, or disk errors. By running First Aid, adjusting drive permissions, or using NTFS for Mac software like PartitionAssistant NTFS for Mac, you can effectively restore full read and write access. Once the issue is resolved, your external drive can function normally again for managing, editing, and transferring files on macOS.

