How to Create Windows Server 2019 Bootable USB
Do you know how to create Windows Server 2019 bootable USB for installation, repairing errors, or portable Server OS? Check all details from this post to find the best way.
By Lucas / Updated on December 4, 2024
| 📃 Page includes | |
| 💡 Why do you need a Windows Server 2019 USB? | |
| 🔧 How to create bootable USB for Windows Server 2019 | 1. Create bootable USB drive for Windows Server 2019 installation |
| 2. Make a Windows Server 2019 bootable USB (on Mac/another PC) | |
| 3. Create a Windows Server 2019 bootable USB for repairing | |
| 📌 Final lines | |
| 🖋 FAQs about Windows Server 2019 bootable USB | |
Why do you need Windows Server 2019 USB?
A bootable USB drive is a removable device that includes the operating system and may be used to start a computer or laptop. Most people intend to build a bootable USB drive for one of the three reasons listed below:
▶ An installation media
You can use it as an installation media to perform a clean installation of the Server 2019 operating system. This is faster and easier than installing the operating system from a CD or DVD-ROM.
▶ Create a portable Server 2019 device
The bootable USB drive may also function as a portable Windows Server 2019 device, allowing you to carry your server environment with you and experience it on other computers, even on brand-new ones without an operating system installed.
▶ For repairing errors
One of the most common reasons for creating a bootable USB drive is to rescue a PC that cannot boot due to issues like viruses, major system failures, faulty hard drives, or other disk-related problems. With the bootable USB, you can boot into Windows Server 2019 and fix these issues.
How to create bootable USB for Windows Server 2019
No matter which reason brings you here, we should solve the problem. Different situations require different methods, so now, we’ll show 3 ways to create Windows Server 2019 USB for different cases.
1. Create a bootable USB drive for Windows Server 2019 installation
First, we’ll use CMD to create a Windows Server bootable USB as an installation media.
• Download the Windows Server 2019 ISO files from Microsoft's official web.
• A USB with a capacity of more than 8 GB. Windows Server 2019 uses at least 4 GB, yet when burned to USB, the ISO image is automatically broken into portions larger than 3 GB. As a result, it requires additional room.
• If you have any files on your USB device, make a backup before formatting.
Step 1. Connect your USB, and run CMD as admin.
Plug your USB in, click “Start”, input “cmd” in the search box and right-click on the search outcome, then click "Run as administrator" to open the Command Prompt.
Step 2. Type “diskpart” and press “Enter” to open the Diskpart tool.
Type all the following commands and press “Enter” to execute them one by one:
• list disk
• select disk x (x is the number of your USB flash drive)
• clean
• create partition primary
• select partition 1
• format fs=ntfs quick (if you want to create UEFI bootable USB, type “format fs=fat32 quick”).
• active
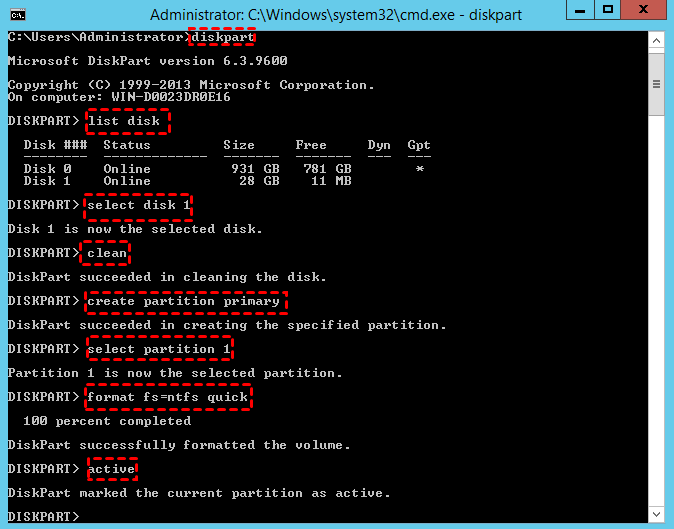
Step 3. Type “exit” and press Enter to close the diskpart command window.
Do not close the Command Prompt. Your USB disk is bootable, please mount the Windows Server 2019 ISO and proceed with the procedures below to copy/burn Windows Server 2019 files to a USB drive:
Step 4. Type “xcopy D:\*.* E: /s/e/f” in the Command Prompt and press “Enter”.
D is the ISO image drive, and drive E: is the USB drive letter. You can change the letter for your case.
Step 5. Type “D:\Boot\Bootsect /NT60 E: /force /mbr”.
This command is to write a bootloader to your USB drive.
Now, you can install Windows Server 2019 on the target PC.
2. Make a Windows Server 2019 bootable USB (on Mac/another PC)
The first way is to create an installation media for a qualified PC; however, if you need to run Server 2019 on a Mac or a PC that doesn't meet the system requirements, you can use AOMEI Partition Assistant Server to create a portable Server 2019 USB. This will allow you to run Windows Server 2019 on any computer, including Mac.
The “Win To Go Creator” function is what we need, it can separate your original Windows OS from the target OS on USB, therefore, you can securely run your Server 2019 on any device.
• A USB with at least 13GB space, and please backup all important files because all data will be wiped.
• Download Windows Server 2019 ISO files from Microsoft official web.
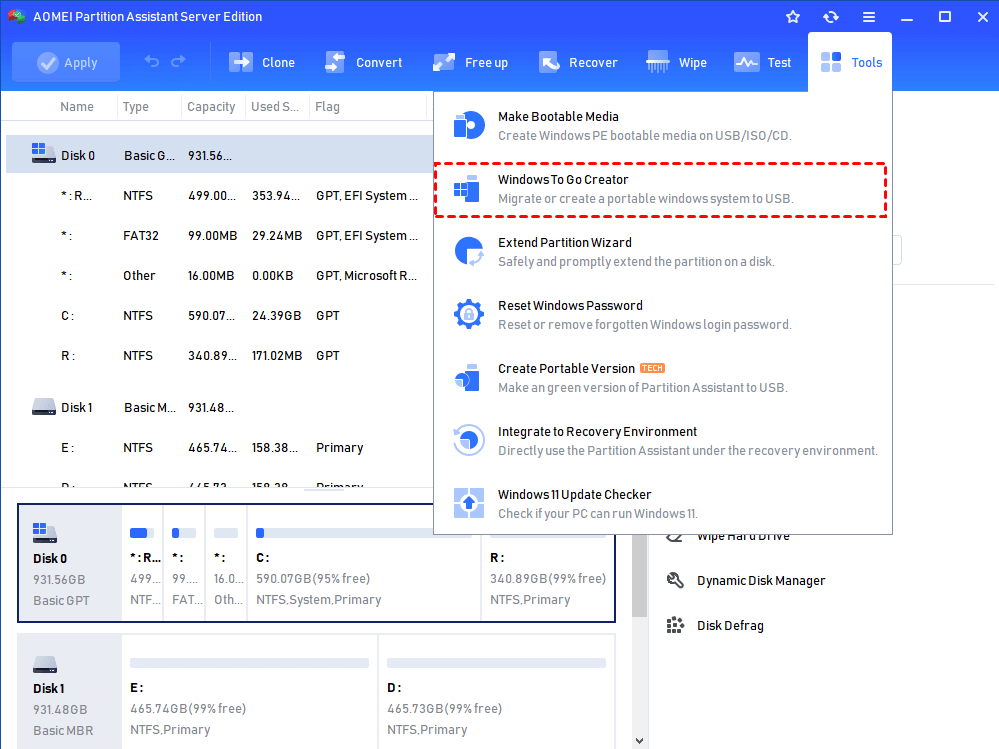
Step 1. Install and open AOMEI Partition Assistant Server.
Connect a USB drive to a computer. Click “Tools” in the top toolbar, and choose “Windows To Go Creator”.
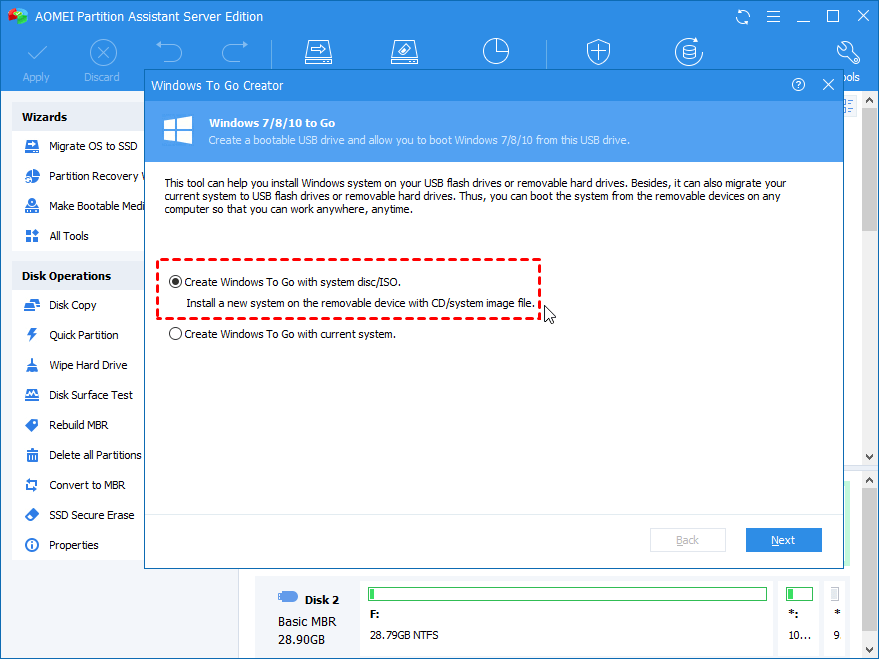
Step 2. Choose “Create Windows To Go with system disc/ISO” and click “Next”.
If your current OS is Server 2019, and you wish to create a portable USB with the current Server OS, you can choose “Create Windows To Go with the current system”.
Step 3. Select a USB drive.
In this window, you just need to choose your USB. If it doesn’t show, click “Refresh”.
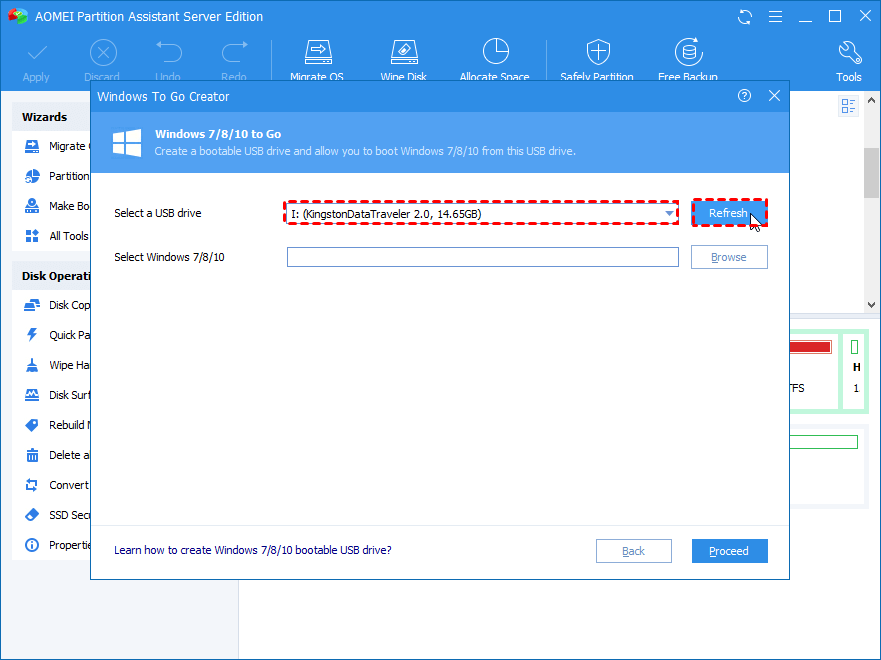
Step 4. Add ISO files.
Click "Browse” to select Windows Server 2019 ISO file.
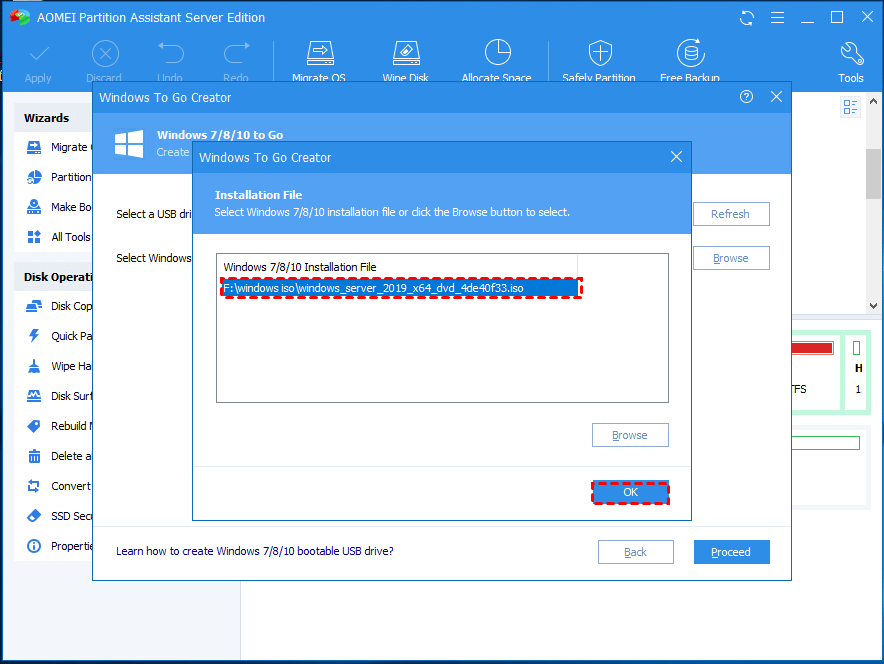
Step 5. Check the information and continue the operation.
Then you'll be warned that the operation will delete the data on the selected USB device, so make a backup of any files you need ahead of time. Make sure you've backed up any vital files before clicking "Yes." And then click "Proceed."

Then you need to wait for a while, after the task is finished, you can try to boot another PC with this USB with Server 2019:
Step 1. Insert the USB, and turn on the PC. When the logo appears on the screen, immediately tap the BIOS key.
Step 2. In the BIOS setup, use the arrow keys to choose the "Boot" tab, and select "Change boot order".

3. Create a Windows Server 2019 bootable USB for repairing
The third way to create Windows Server 2019 bootable USB is for error repair. When your own Windows Server 2019 cannot boot successfully, you can use the bootable USB we make in this way.
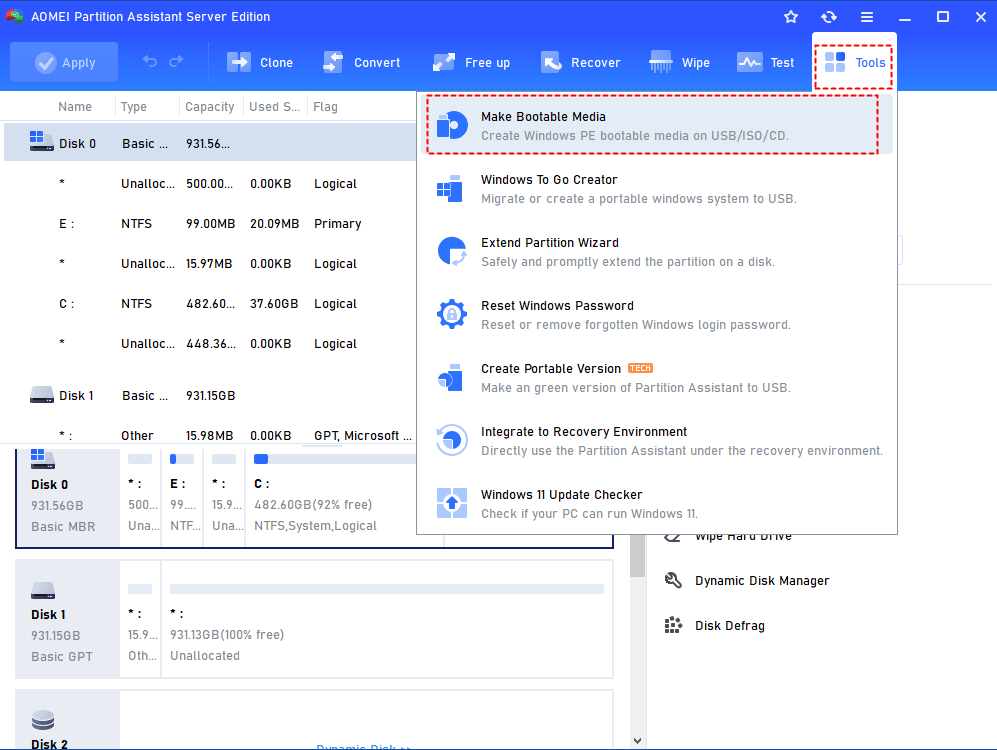
AOMEI Partition Assistant has a special function: “Make Bootable Media”. When you plug the bootable USB device into the unbootable system and enter BIOS to boot Windows Server 2019 from this USB, AOMEI Partition Assistant Server will immediately start when you log in. And then, you can use all functions of this disk manager to fix the errors. For example, you can convert to MBR/GPT disk, convert the file system, and rebuild corrupted Server 2019 MBR…
Step 1. Connect a USB drive to a Windows Server-based machine.
Install and run AOMEI Partition Assistant Server on it. Click “Tools” in the top toolbar, and choose “Make Bootable Media”.
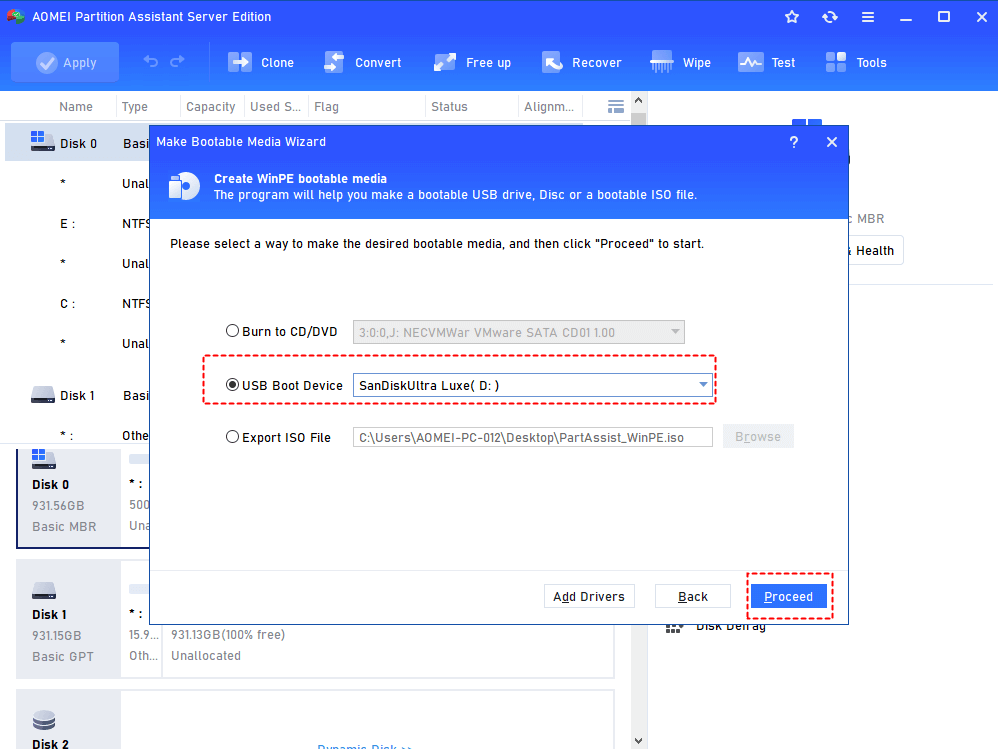
Step 2. Select USB drive.
Choose “USB Boot Device” and click “Proceed”.
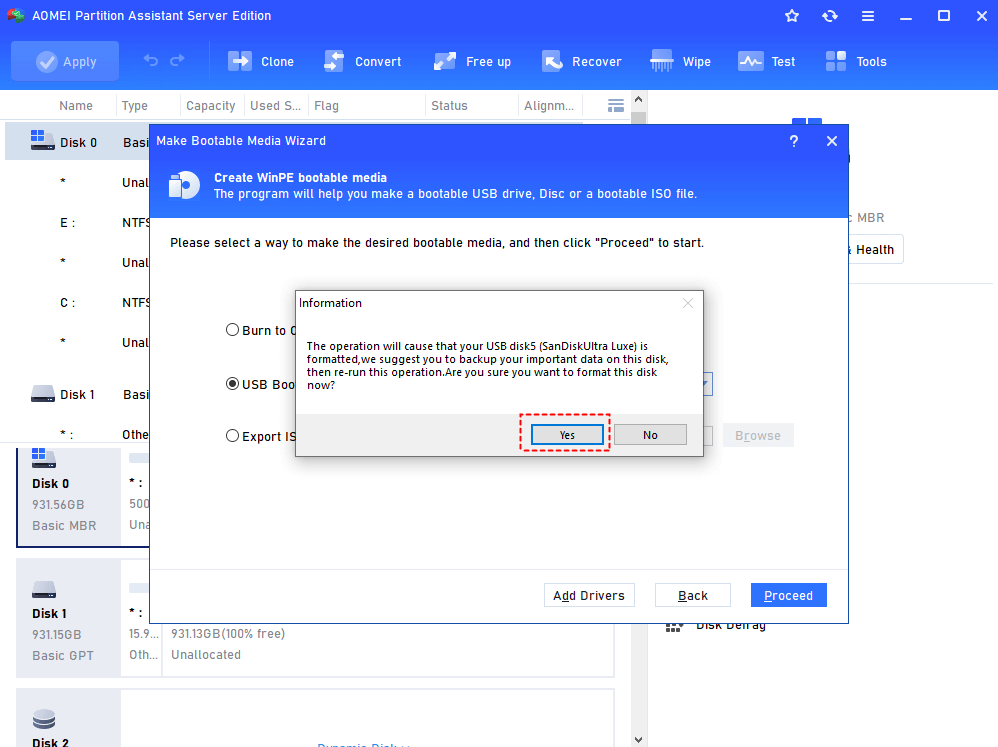
Step 3. Confirm the USB format.
This operation will format the USB drive. Click “Yes” to continue.
Step 4. Finish the process.
When the operation is completed, you’ll see “All have finished successfully! Succeed in creating this USB bootable device.” Click “Finish”.
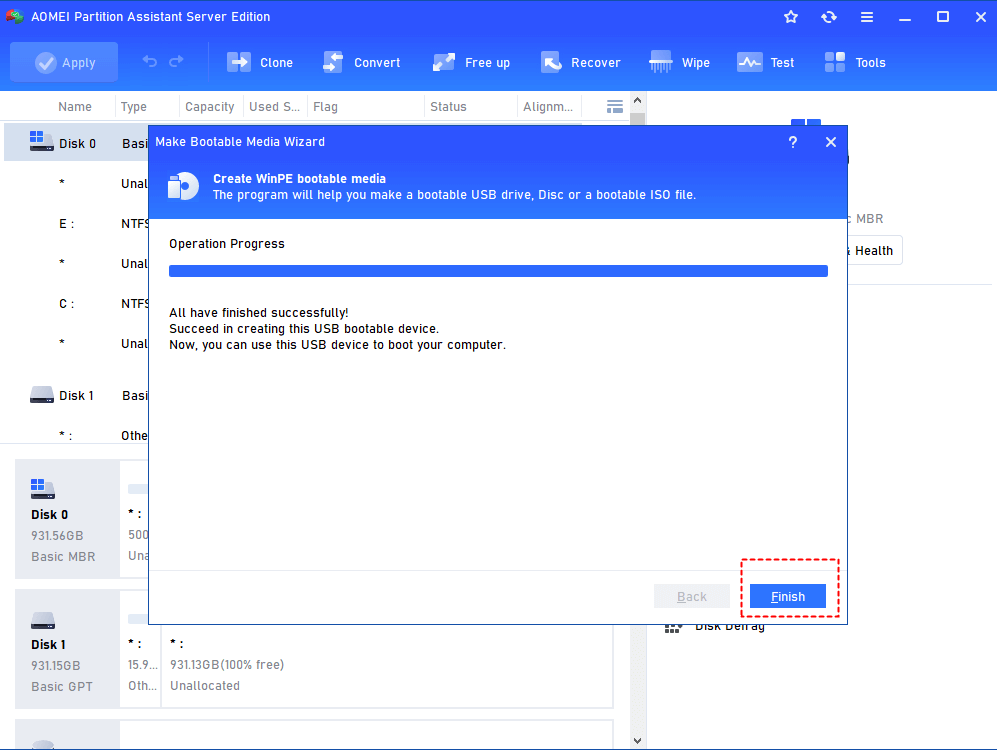
Now you can use this USB for Windows Server OS error repair.
Final lines
These are 3 ways to create Windows Server 2019 bootable USB, do you find your best way? AOMEI Partition Assistant Server is a quite pragmatic Server device manager, it supports Windows Server 2025/2022/2019/2016/2012(R2)/2008(R2), and all Windows PC OS. Remember to follow the instructions carefully, and if you encounter any difficulties or have further questions, you can consult our official documentation or seek assistance from IT professionals.
FAQs about Windows Server 2019 bootable USB
♦ Q1: Can I use a bootable USB drive to install Windows Server 2019?
Yes, you can create a bootable USB drive to perform a clean installation of Windows Server 2019. It offers a faster and more convenient alternative to using a CD or DVD-ROM.
♦ Q2: Can you boot Windows Server from USB?
Yes. By creating a bootable USB drive with the necessary files and configurations, you can initiate the boot process on a computer or server directly from the USB drive. This allows you to install or run Windows Server without relying on traditional installation media like CDs or DVDs. It provides flexibility and convenience, especially in situations where the computer or server lacks an optical drive or when you prefer using a portable and easily accessible USB drive.
♦ Q3: Are there any precautions I should take before creating a bootable USB drive for Windows Server 2019?
It's important to back up any crucial files on your USB drive before formatting it to create a bootable USB. This ensures that you don't lose any data during the process. Additionally, carefully follow the instructions provided for each method to avoid any potential errors or data loss.

