[Full Guide] Easy ASUS TUF A15 Gaming Laptop SSD Upgrade
Learn how to do ASUS TUF A15 gaming laptop SSD upgrade. This guide will help you safely replace SSD for gaming and help you enjoy better gaming experience.
By Irene / Updated on June 20, 2025
What SSD is compatible with the ASUS TUF A15?
Some users may wonder, Can I upgrade my ASUS TUF A15 SSD? The answer is yes. Upgrading the SSD can greatly improve your laptop’s performance by providing faster data speeds, quicker load times, and smoother multitasking. For even better results, you can also consider upgrading the RAM with reliable options from reliable brands to get the most out of your system.
Before you replace or add an SSD, it’s important to know what type of SSD is compatible with the ASUS TUF A15. Understanding the slot type, capacity limits, and supported models will help you choose the right upgrade. Here's a clear guide to help you get started.
| Item | Details |
|---|---|
| Upgrade Possibility | Yes, you can upgrade or add an SSD. |
| SSD Type Supported | M.2 NVMe SSD (PCIe 3.0 & PCIe 4.0) |
| Max Capacity per Slot | Up to 2TB (check BIOS for model-specific limits) |
| Number of M.2 Slots | Varies by model |
| Common Compatible SSDs | Samsung 970 EVO Plus, Samsung 980 Pro, WD Black SN770, Crucial P5 Plus, Kingston NV2 |
| Tools Needed | Phillips-head screwdriver, USB-to-M.2 enclosure (optional for cloning), data migration & backup software (e.g., EaseUS Disk Copy, Todo Backup) |
If you have already choose the ideal SSD, you can now follow the guide to do ASUS TUF A15 SSD upgrade.
How to do ASUS TUF A15 gaming laptop SSD upgrade
Stage 1. Before cloning
Before you start cloning your hard drive to a new SSD, it’s important to follow a few key steps to ensure the process goes smoothly. These preparations will help avoid common issues like data loss, recognition errors, or boot failures after cloning. Here’s what you need to do before starting the SSD cloning process:
1. First, please remove unnecessary files or programs from your current hard disk. This will help shrink its size to fit the SSD drive.
2. Then connect the SSD to your laptop and ensure that it gets recognized properly. You might need an external USB to SATA adapter, dock, or enclosure to do this.
3. Please back up important files you want to keep on the SSD drive. This step is crucial as all data will be wiped during the cloning process.
4. If you're considering cloning an MBR system HDD to a GPT SSD drive, make sure your motherboard supports UEFI boot mode. This is important because you'll need to upgrade the BIOS legacy to UEFI boot mode for successful cloning. Failing to do so might result in being unable to boot from the destination disk.
Stage 2. Clone to your gaming SSD
If you have many games installed on your original disk and want to replace it with a new SSD, you can upgrade your ASUS TUF A15 without losing data or reinstalling anything. Using disk cloning software like AOMEI Partition Assistant is a simple, safe, and effective way to transfer your entire system, including Windows, installed programs, games, files, and settings, from the current drive to the new SSD.
AOMEI supports all kinds of upgrades, including:
It works with both PCIe 3.0 and 4.0 drives, and even if your new SSD has a different capacity (for example, upgrading from 512GB to 1TB), it automatically resizes partitions to use the full space. And you can choose from 2 cloning methods:
✔️ Clone Disk Quickly – Copies only the used space, ideal if your new SSD is smaller.
✔️ Sector-by-Sector Clone – Copies everything, including deleted or empty space, for a complete backup, even if cloning hard drive with bad sectors.
After cloning, your system will boot as usual from the new SSD. If your new SSD is larger, you can use Disk Management to extend the main partition and make full use of the extra space. You can download the free demo of AOMEI Partition Assistant to get started and enjoy a faster, smoother gaming experience with your new SSD.
The Best Windows Disk Partition Manager and PC Optimizer
Step 1. Please select an SSD drive for your laptop depending on disk size, interface, and thickness. Connect it to your laptop using a SATA-to-USB converter, and ensure sure it is identified by your computer.
Step 2. Install and run AOMEI Partition Assistant Professional. Click "Clone" in the main interface, and select "Clone Disk".

Step 3. Choose the hard drive you want to clone as the source disk and click "Next".

Step 4. Select the SSD drive as the destination disk, and then click "Next".

Step 5. Then, you can check the source and destination disk in the next window or change to "Sector to Sector clone", and click the "Confirm" button to continue if there is no problem.

Here, you can also click the "Settings" button to adjust the partition size on the destination disk or tick "4k alignment" to improve the reading and writing speed of the SSD.

Step 6. Finally, click "Apply" on the main interface to actually clone the laptop HDD to SSD.

Stage 3. Replace the disk
Once the cloning process is complete, you can remove the back cover of your laptop and swap out the old SSD for the new one. Follow these steps to do it properly. Firstly, ensure the laptop is powered off and disconnected from AC power. Disable or remove the battery accordingly. For laptops with removable batteries, power off, unlock, and remove the battery. If the battery is integrated, enter the BIOS and disable the built-in battery.

Step 1. Remove the bottom panel or hatch of the laptop. Some laptops have a designated hatch or panel for the drive, while others require removing the entire panel.
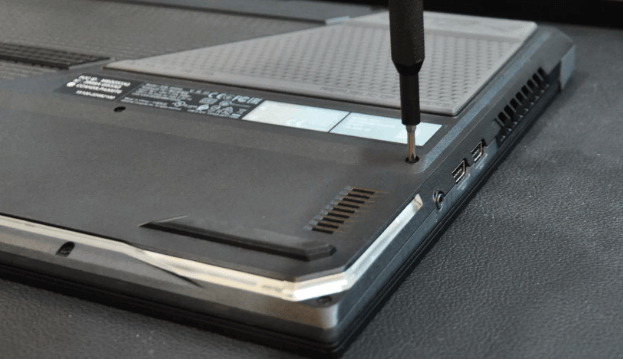
Step 2. Locate the SSD and remove the securing screw.
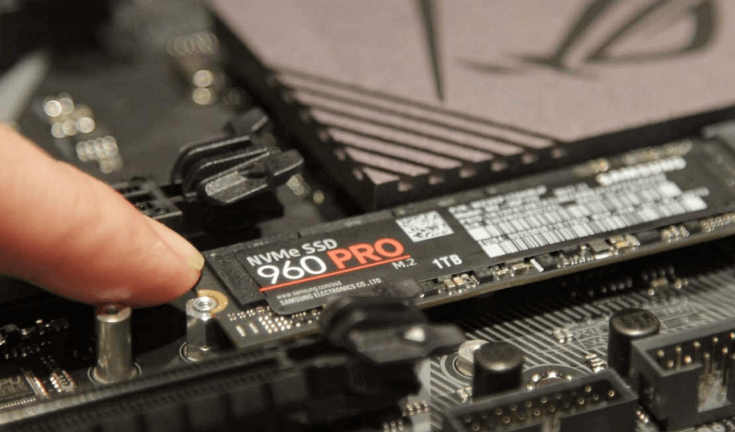
Step 3. Carefully lift the drive from the board with minimal friction, taking note of any adhesive securing the drive and removing it carefully. Insert the replacement drive at an angle and gently push it into place.
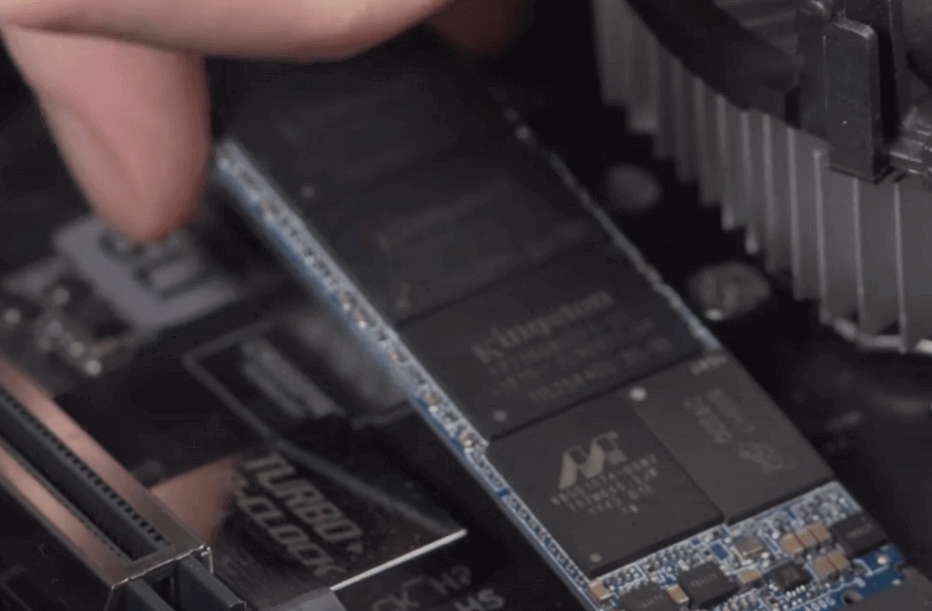
Step 4. Secure the drive in place by replacing the screw. Put back the hatch or panel, ensuring that the SSD does not make contact with it. Power up your laptop. Lenovo users with embedded batteries should connect the power supply during this process to enable the battery.
Stage 4. Boot from the newly set SSD
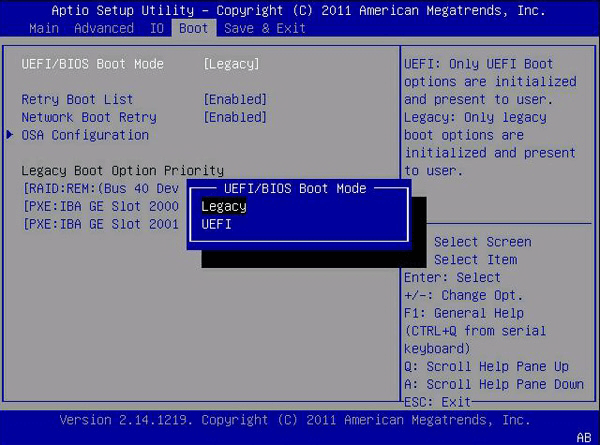
Once all the steps are completed, restart your laptop, and it will boot from the new solid-state disk. However, if your old drive and the new drive use different partition styles, you may need to change Legacy BIOS to UEFI boot mode, or vice versa, to ensure compatibility between the partition scheme and boot mode.
When you reboot your PC, press ESC, F1, F2, F8, or F10 repeatedly to access the BIOS setup. Look for the Boot tab, switch the boot mode to either Legacy or UEFI, and then press Enter.
Conclusion
Upgrading the SSD on your ASUS TUF A15 is a practical way to breathe new life into your laptop. With the right preparation and a reliable tool like AOMEI Partition Assistant, you can smoothly transfer everything from your old drive to a new one. The steps are simple to follow, and once completed, you’ll enjoy faster boot times, quicker game loads, and an overall better user experience. It’s a smart move for anyone looking to improve performance without starting from scratch.
The Best Windows Disk Partition Manager and PC Optimizer

