[Answered] What is BitLocker Lock Status Unlocked Meaning?
What is BitLocker lock status unlocked meaning? It indicates that the encrypted drive is currently accessible, allowing you to view, edit, and manage the data stored on it. To learn how to verify BitLocker status on your system and secure an unlocked drive, continue reading.
By Hedy / Updated on May 16, 2025
What does BitLocker lock status mean?
Data security is a top priority in today’s digital world, and one of the best ways to protect your sensitive files is by using encryption. BitLocker, a native Windows feature, offers robust encryption for your drives, ensuring your data is secure even if your device falls into the wrong hands. BitLocker uses two primary statuses for drives — "Locked" and "Unlocked". These statuses indicate the drive's current state and determine whether you can access the files stored on it.
✍ Difference between locked and unlocked status:
☛ Locked status: The drive is encrypted and cannot be accessed without authentication (password, PIN, or recovery key).
☛ Unlocked status: The drive is decrypted, and all data is accessible without any additional authentication.
When BitLocker shows a "Lock Status: Unlocked", it means that the drive is currently accessible. You can open, edit, copy, or delete files on this drive because the encryption is temporarily disabled for active use.
An "Unlocked" drive is fully functional, just like a regular, unencrypted drive. However, the encryption is still in place, and if the drive is locked again, you will need to re-authenticate to access your files.
How to check BitLocker lock status
BitLocker is a robust encryption feature in Windows that protects your data from unauthorized access. Knowing the current lock status of BitLocker on your drives is essential for maintaining data security. This guide will show you how to check the BitLocker status using three different methods: Control Panel, Command Prompt, and PowerShell.
Way 1. Check BitLocker status using Control Panel
Step 1. First, press Windows + S, type "Control Panel", and select it from the search results.
Step 2. Next, click on "System and Security" and then select "BitLocker Drive Encryption".
Step 3. Here, you will see the list of all your drives along with their respective BitLocker status. If a drive is protected by BitLocker, it will display as “BitLocker On”. Conversely, if it is not protected, it will indicate “BitLocker Off”.
Way 2. Check BitLocker status using Command Prompt
Step 1. Press Windows + S, type "Command Prompt", right-click on it, and choose "Run as administrator".
Step 2. Type the following command and press Enter:
manage-bde -status
Step 3. This command will list all drives with their corresponding BitLocker status, including information on whether they are encrypted, the encryption method used, and the protection status.
Way 3. Check BitLocker status using PowerShell
Step 1. Press Windows + S, type "PowerShell", right-click on it, and select "Run as administrator".
Step 2. Enter the following command and press Enter:
Get-BitLockerVolume

Step 3. PowerShell will display detailed information about all your drives, including their BitLocker status, protection status, and encryption percentage.
How to lock BitLocker-protected drive again
If you have unlocked a BitLocker-protected drive and want to secure it again, you can easily lock it using one of several methods. This guide will show you how to lock a BitLocker-protected drive using File Explorer, Command Prompt, PowerShell, and a third-party BitLocker manager.
Method 1. Lock BitLocker-protected drive using File Explorer
Step 1. Press Windows + E to launch File Explorer.
Step 2. Navigate to the drive you want to lock.
Step 3. If it is a removable drive (such as a USB drive), right-click it and select “Eject”. This will lock the drive automatically.
Step 4. For an internal drive, you can either restart your system or log out and log back in. This will also automatically lock the drive.
Method 2. Lock BitLocker-protected drive using Command Prompt
Step 1. Press Windows + S, type "Command Prompt", right-click it, and select “Run as administrator”.
Step 2. Use the following command to lock the drive (replace X: with your drive letter):
manage-bde -lock X: -forceDismount
Step 3. The drive should now be locked immediately.
Method 3. Lock BitLocker-protected drive using PowerShell
Step1. Press Windows + S, type "PowerShell", right-click it, and choose “Run as administrator”.
Step 2. Use the following command to lock the drive (replace X: with your drive letter):
Lock-BitLocker -MountPoint X:
Step 3. The drive will be locked instantly.
Method 4. Lock BitLocker-protected drive using BitLocker manager
BitLocker is a built-in encryption feature in Windows that protects your data from unauthorized access. However, if you want a more versatile way to manage and lock your BitLocker-protected drive, AOMEI Partition Assistant offers an excellent solution.
It offers an intuitive interface, making it easy to manage your drives. Besides locking BitLocker drives, it also provides powerful disk management functions. It ensures your data is protected with strong encryption.
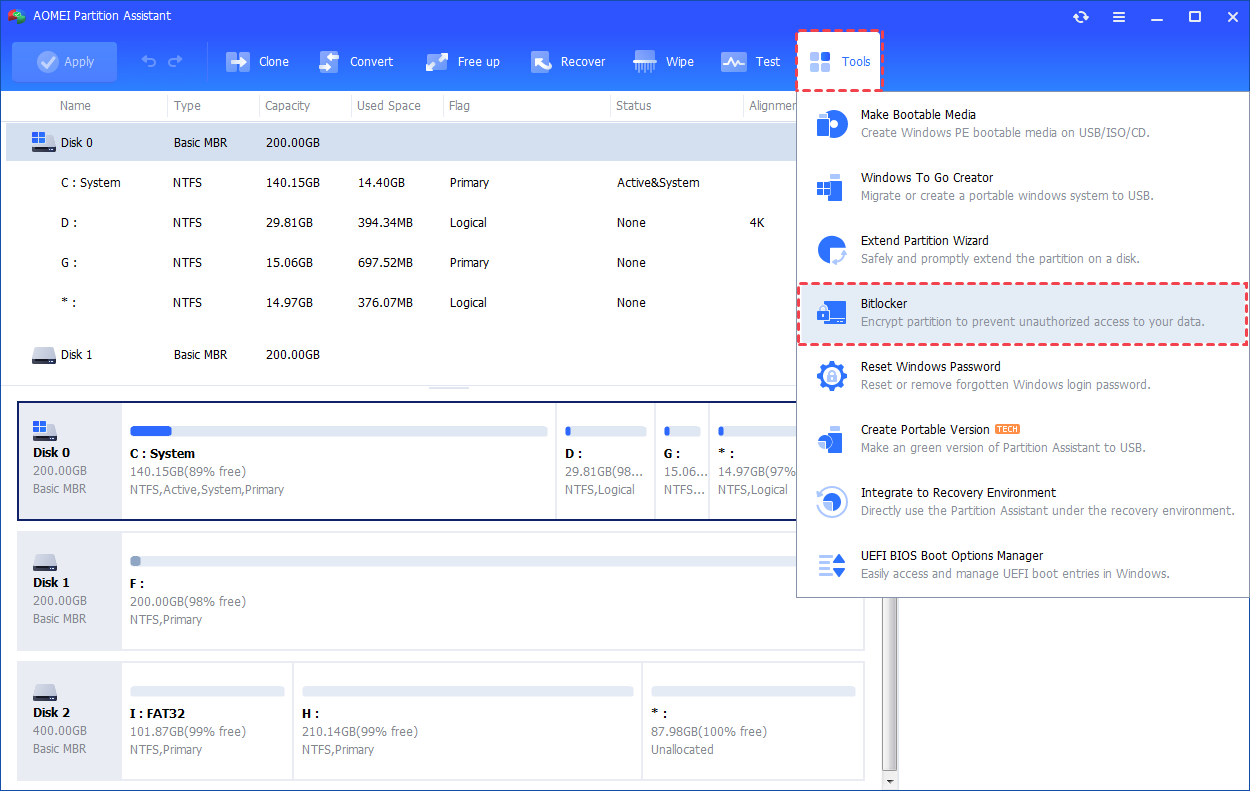
Step 1. Install and launch AOMEI Partition Assistant. Click the "Tools" main tab and select "BitLocker".
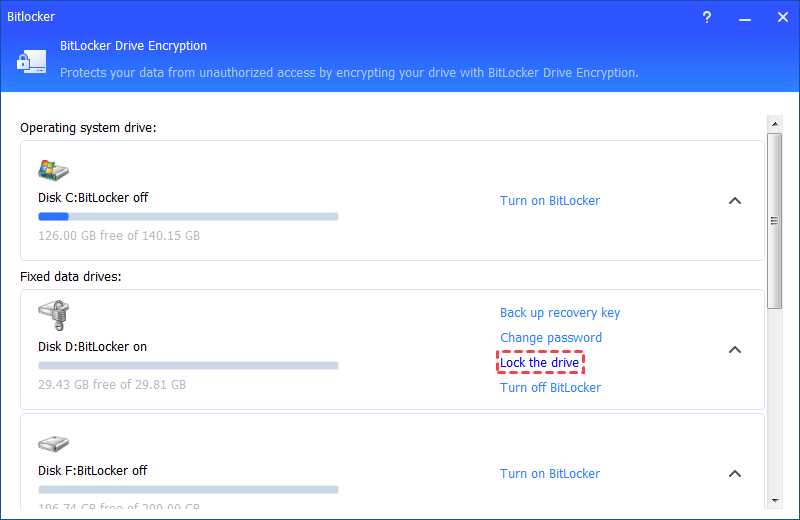
Step 2. Find the drive you want to lock, you can click the option "Lock the drive" to directly lock the drive.
Conclusion
That’s all about BitLocker lock status unlocked meaning. An "Unlocked" drive is accessible like any regular drive but remains encrypted. You can easily check whether your drive status is unlocked using Control Panel, Command Prompt, or PowerShell. To re-lock an unlocked BitLocker-protected drive, this post also offers several effective methods. For enhanced control and management, consider using AOMEI Partition Assistant, which provides an intuitive interface for managing BitLocker-protected drives.

